Hello Trailblazers!
Salesforce Dashboards provide a powerful way to visualize data, monitor performance, and make data-driven decisions. However, dashboards are only effective when the right people have access to them. Sharing Salesforce Dashboard folders allows teams to collaborate, share insights, and align strategies efficiently.
In this blog, we’ll explore the importance of sharing Salesforce dashboard folders and the required permissions and provide a step-by-step guide to sharing dashboard folders effectively.
Before You Begin:
In the earlier sections of this blog series, I provided an in-depth explanation of Salesforce Dashboards, the various types of dashboard components, and the concept of Dynamic Dashboards in Salesforce. For a comprehensive understanding, I recommend reviewing these sections first using the provided links before proceeding further.
Why Share Salesforce Dashboard Folders?
Collaboration and Alignment
Sharing dashboards fosters collaboration among teams, ensuring everyone has access to key metrics and performance indicators.
Transparency
Managers and team members can view the same data, reducing misunderstandings and improving communication.
Efficient Decision-Making
Shared dashboards provide real-time insights to all stakeholders, enabling quick and informed decisions.
Prerequisites for Sharing Dashboard Folders
Before sharing a dashboard folder, ensure the following:
- Folder Permissions: You must have “Manage” access to the dashboard folder you want to share.
- User Permissions: Users with appropriate access levels can only view or manage the shared folder based on the permissions assigned.
- Folders Enabled: Ensure the dashboards are stored in folders, a feature supported in Lightning Experience and Classic.
Steps to Share Salesforce Dashboard Folders:
Step 1: Navigate to the Dashboards Tab
- Click on the App Launcher and search for Dashboards.
- Open the Dashboards tab to access your saved dashboards.
Step 2: Locate the Dashboard Folder
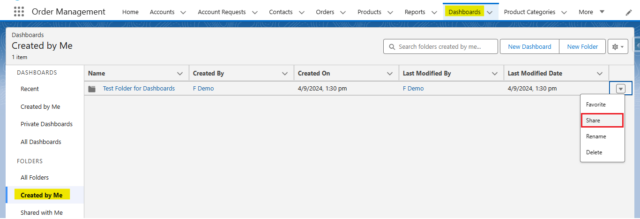
- In the Dashboards tab, locate the folder that contains the dashboard you wish to share. (All Folders/Created by me)
- Click the Folder dropdown menu to view all folders.
- Select the folder you wish to share.
Step 3: Open Dashboard Folder Sharing Settings
- Click the Folder Options dropdown (represented by three dots or a gear icon) next to the folder name.
- Select Share from the dropdown menu. So, this action opens the dashboard folder-sharing settings.

Step 4: Add Users, Roles, or Groups
- So once you click share, a pop-up will appear.
- A pop-up window will appear, allowing you to add specific users, roles, public groups, or even entire roles and subordinates.
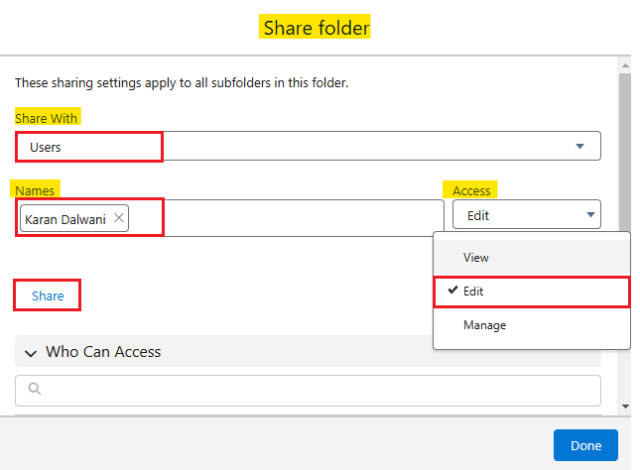
- Choose Users from the Share With dropdown menu.
- Use the “Names” field to search for the desired users.
- Choose the appropriate access level (View, Edit, or Manage) from the “Access” field.
- So, after selecting the users, click “Share” to complete the process, as illustrated in the figure below.

Note: To give multiple users different accesses, select the desired users and click on share. In the next step, we’ll see how to do this.
Step 5: Assign Access Levels
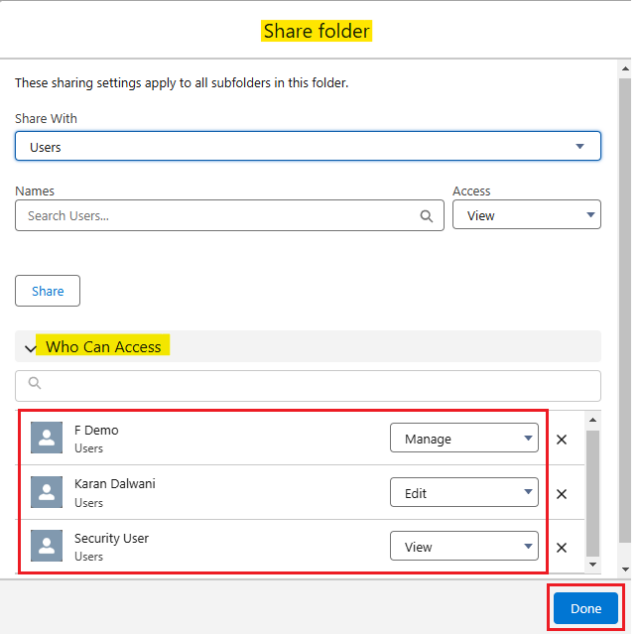
- Once you click on “Share,” the selected users, roles, or groups appear in the “Who Can Access” section.
- After adding a user, role, or group, assign an appropriate access level:
- Viewer: Can view and run dashboards but cannot edit or share them.
- Editor: Can view, edit, and run dashboards but cannot share the folder.
- Manager: Can view, edit, run, and manage dashboards. Managers can also modify sharing settings.
- Click Done to save the user with the assigned access level, as shown in the figure below.

Step 6: Review and Save Dashboard Sharing Settings
- Finally, review the list of users, roles, and groups accessing the dashboard folder.
- Ensure the permissions align with organizational policies and data security standards.
- Click Done to save the changes.
Use Case: Sharing a Sales Dashboard with the Team
Imagine you have a Sales Performance dashboard that tracks key metrics like closed deals, pipeline value, and win rates. But You want to share this dashboard with your sales team and managers:
- Create a public group named Sales Team in Salesforce Setup.
- Add all sales team members and managers to this group.
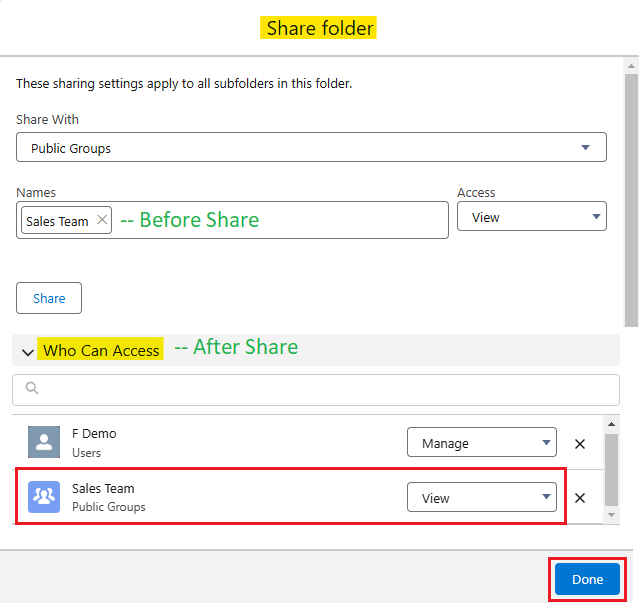
- Share the Sales Performance dashboard folder with the Sales Team group and assign Viewer access to members and Manager access to team leads.

This setup ensures that everyone on the sales team can access the dashboard, while team leads have additional privileges to edit or manage it.
Best Practices for Sharing Dashboard Folders
- Assign Permissions Based on Need
- Use the principle of least privilege: assign only the permissions users need to perform their roles.
- For example, give Viewer access to most users and Editor or Manager access to team leads or analysts.
- Use Public Groups for Efficiency
- Instead of adding individual users, create Public Groups in Salesforce. So this approach simplifies folder management and ensures consistency.
- Maintain Data Security
- Ensure sensitive data on dashboards is shared only with authorized personnel.
- Use role-based sharing to restrict access to specific users based on their job functions.
Common Issues When Sharing Dashboard Folders
- Missing Manage Access
Ensure you have Manage Access to the folder before attempting to share it. So without it, you won’t see the sharing options.
- Permissions Mismatch
Users may still face access issues if the underlying report folders aren’t shared with the same permissions. So always ensure the report folder permissions align with the dashboard folder permissions.
Note: If you would like to learn how to share Lightning Report Folders in Salesforce, please follow the link mentioned above.
Conclusion
Sharing Salesforce dashboard folders is straightforward but essential to fostering collaboration and transparency across teams. By following the steps outlined in this blog, you can ensure that the right people have the right level of access to critical data, empowering them to make informed decisions.
Happy Reading!
“Learning is a path, not a destination, and every step forward matters.”
Related Posts:
You Can Also Read:
1. Introduction to the Salesforce Queues – Part 1
2. Mastering Salesforce Queues: A Step-by-Step Guide – Part 2
3. How to Assign Records to Salesforce Queue: A Complete Guide
4. An Introduction to Salesforce CPQ
5. Revolutionizing Customer Engagement: The Salesforce Einstein Chatbot

