
Hello Trailblazers!
With the need for effective customer data and records management increasing, Salesforce developed a solution called Salesforce Queue. Queues offer a dynamic solution, allowing users to efficiently organize, assign, and prioritize tasks and records.
If you are not aware of what a Salesforce Queue is, how to create one, and its advantages, check out this previous blog. It will help you understand the basic concepts of the Salesforce Queues.
In this blog post, we’ll learn how to add or assign records to a Salesforce Queue, the methods, and more.
How to Add Records to the Salesforce Queue
There are two approaches for adding records to Salesforce Queues, and each record can be allocated to any owner or user. So, to add them to the queue, you only need to update the record owner.
This can be accomplished manually or through the use of an Assignment Rule.
- Assignment Rules: With the help of the Assignment Rule, the records are automatically added to the queue when they are created by defining certain specific criteria. For e.g. Lead Assignment Rule.
- Manually: We can add records to the queue by simply going to the record page and updating the owner field to the queue (created). For e.g. Update the lead record’s owner field to the newly created queue, i.e. Demo Lead Queue.
Let’s dive into both methods.
Method 1: Assignment Rule
Assignment Rules in Salesforce are a feature that automatically assigns records to users or queues based on criteria you define. These rules can be used for various objects, including leads, cases, and custom objects.
So, when a new record is created and meets the criteria specified in the assignment rule, Salesforce automatically assigns the record to the appropriate user or queue. This can help streamline your workflow and ensure that records are assigned to the right person or team without manual intervention.
To create an Assignment Rule, follow the below steps:
- Go to the Setup.
- Enter the Assignment Rule in the Quick Find Rule in the Quick Find Box.
- Select the “Lead Assignment Rule.” Go to Feature Settings > Marketing > Lead Assignment Rules. Here you’ll find a few already created lead assignment rules as shown below. And you can also create new ones.
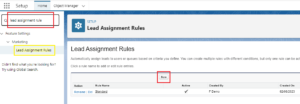
- Click New.
- Enter Rule Name – Assign Lead to Queue.
- Check the Active checkbox.
- Click Save.
Here, you’ll see that your Lead Assignment Rule is created and it is active.
Now, we need to tell how our lead is going to assign that particular queue. There can be many queues. So, to assign the record to the specific queue, we need to define some conditions.
Let’s do that…
Assignment Rule Entry Criteria for Queue:
- Click on the recently created rule – Assign Lead to Queue.
- In the Rule Entries, click New.
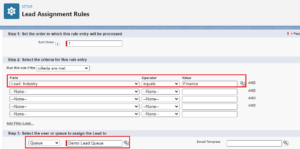
- In step 1, set the Sort Order = 1
- In step 2 – Run this rule if – the criteria are met
The criteria is…
Field – Lead: Industry
Operator: equals
Value: Finance
(You can also add multiple conditions) - In step 3, select the Queue from the first dropdown.
- To select the queue, click on the search icon and select the desired queue.
Here we are selecting the “Demo Lead Queue” that we had created in the previous part of this blog.
If you do not know how to create a Salesforce Queue, check out this link. - Additionally, you can add an Email Template too if you have any.
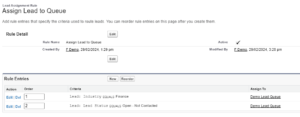
So, your Lead Assignment rule should look like this.
- Click Save.

Let’s create another rule entry keeping Sort Order = 2 and Lead: Status = Open – Not Contacted.
Your assignment rule – Rule Entries should look like this.
Note: In the Lead or Case assignment rule, there can be only one Assignment Rule Active at a time. But, you can have multiple entries in the Rule.
Lead Object Page Layout:
Before testing the lead record or assigning the lead record to the queue via the Assignment Rule, check that you have a checkbox named “Assign using active assignment rule.” It appears on the downward side when we create a new lead record.
If this is visible there, then it’s good. And, if not, then follow the below steps to make it visible there.
- Go to the Object Manager.
- Open the Lead Object and go to its Page Layout.
- Click “Lead Layout.” (Ensure that you will edit the same page layout that you are going to work on)
- Click Layout Properties.
- Check the Lead Assignment Checkbox as shown in the figure below.
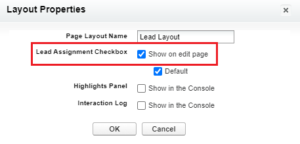
- Click OK.
- Save the Page Layout.
Test the Lead Assignment Rule of Queue:
- Go to the Lead tab.
- Click New.
- Add Name, Company, and other details.
- Choose “Finance” from the Industry dropdown menu.
- Choose “Open – Not Contacted” from the Lead Status dropdown menu.
- Check the “Assign using active assignment rule” checkbox.
- Click Save.
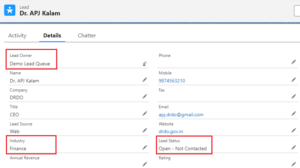
You can see the newly created lead record is assigned to the “Demo Lead Queue” queue.
There are two rules/conditions in the Lead Assignment Rule as per the above created. When the record satisfies those two conditions, it will automatically be assigned to SF_Queue with the help of the Assignment Rule.
See the below figure to have a better understanding.
Method 2: Manually
Records can be manually added to the queue by changing their “Owner” field to the queue.
Let’s do it…
- Create a lead record.
- Choose “Finance” from the Industry dropdown menu.
- Choose “Open – Not Contacted” from the Lead Status dropdown menu.
- Keep in mind, this time you do not have to check the “Assign using active assignment rule” checkbox.
- Click Save.
Your Lead record should look like this: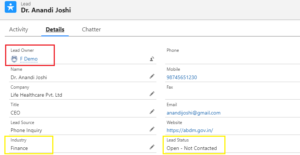 In the above image, the Lead owner is different than the Salesforce_Queue. This is because we didn’t send it to the Assignment Rule.
 - Now, click the Lead Owner field.
- On the left side of the search bar, click on the “Users” dropdown menu.
- Select Queue as shown below.
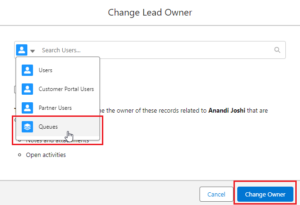
- Search for the “Demo Lead Queue” and select it.
- Check the “Send Email Notification” checkbox if you need it.
- Click the “Change Owner” Button. This will change the lead owner to the SF_queue we selected. It will be as shown below.
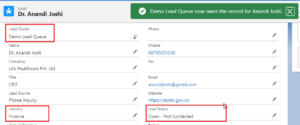
With this, we change the lead owner to the queue manually.
Is it possible to assign records automatically to the queue but without using the assignment rule? Yes, it is doable with the help of a flow builder. In the next blog, we’ll discuss assigning records to the Queue using Salesforce Flow.
Happy Reading…
Most of the time Motivation does not last longer. But being disciplined and consistent always leads you towards success.
References:
You Can Also Read:
- An Introduction to Salesforce CPQ
- Salesforce CPQ and its Key Features
- Unlocking the Power of AI: Einstein for Developers
- Revolutionizing Customer Engagement: The Salesforce Einstein Chatbot