
Hello Trailblazers!!
Salesforce is a powerful CRM platform that allows businesses to manage customer relationships and analyze data effectively. One of the most critical tools for data analysis in Salesforce is the reporting feature, which enables users to create reports based on the data stored in their Salesforce instance. While standard report types cover a wide range of reporting needs, there are times when you need more tailored, specific reports. So this is where the Custom Report Types come into the picture.
In this blog, we’ll explore what Custom Report Types are, why they’re important, and how to create and use them effectively in Salesforce.
What Are Custom Report Types?
Salesforce defines the Custom Report Types are the customizable templates that define the relationships between objects in Salesforce, determining which records and fields are available in a report. Unlike standard report types, which are predefined by Salesforce, custom report types allow you to:
- Choose which related objects are included.
- Define the relationships between these objects.
- Select the fields available in the report.
- Specify how data is filtered and presented.
So, let’s create a custom report type.
Creating a Custom Report Type in Salesforce
Step 1: Navigate to the Report Types Section
- Go to Setup.
- In the Quick Find box, type Report.
- Select Report Types from the dropdown list as shown in the figure below.
It’ll take you to the page where you can create ‘Custom Report Types’.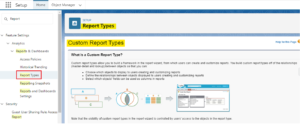
- Click Continue.
Step 2: Create a Custom Report Type
- On the Report Types page, click the New Custom Report Type button.
-
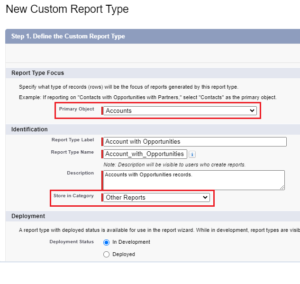
Choose the primary object for your report. This is the main object that the report will be based on (e.g., Accounts, Contacts, Opportunities).
-
Define Report Type Details:
-
- Report Type Label: Provide a name for your report type. This is how it will appear in the report builder.
- Report Type Name: This is auto-generated based on the label.
- Description: Add a brief description of the report type for clarity.
- Store in Category: Select the category where the report type should be stored, such as Accounts & Contacts, Opportunities, Leads, Campaigns, or Other Reports.
- Deployment Status: Choose whether to make the report type immediately available (Deployed) or keep it hidden for now (In Development).
It should look like this:
4.Click Next.
5.Here select – “Click to relate another object”.
Select the Primary Object Relationships: Define how the primary object relates to other objects in Salesforce. You can include related objects and specify the type of relationship (e.g., “A” and related “B” records or “A” with or without related “B” records).
6.Select “Opportunities” from the drop-down as shown in the figure below.
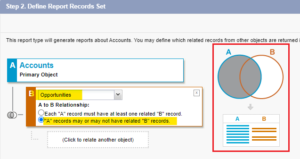
A to B Relationship:
Each “A” record must have at least one related “B” record: This means that an Account must be linked to at least one Opportunity. The report type will display only those Account records that have a related Opportunity.

“A” records may or may not have related “B” records: In this case, the report type will display all Account records, including those with related Opportunity records and those without any related Opportunity records.
7.So here, select the 2nd option as shown in the figure.
You can also choose another object for the B-to-C relationship.
8.Click Save.
So, after saving it’ll look like this.
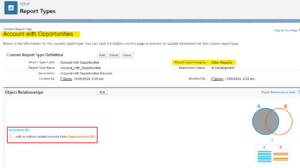
As a result, the custom report type has been created. This establishes the relationship between the objects, allowing reports to be generated for Accounts, whether or not they have related Opportunity records.
Step 3: Customize Fields:
After defining the relationships, you can choose which fields from the related objects should be included in the report. You can also create custom fields to use in the report.
Steps to follow:
- Scroll down while staying on the same page.
- Under the “Fields Available for Reports” column, select “Edit Layout.”
- You’ll see the Account fields displayed first, followed by the Opportunity fields.
- To modify the layout, select the Account/Opportunity field from the drop-down menu in the “View” section.
-
- To remove a field from the layout, simply drag and drop it into the “View” section.
- To add a field, do the reverse (drag from “View” back to the layout).
5.You can also click on any field to edit its properties and further customize it to suit your needs.
6.Once your changes are complete, click Save to apply them as shown in the figure below:

Step 4: Save and Deploy the Report Type
Once you’ve configured the relationships and selected the fields, click Save. If the report type is ready for use, set the deployment status to Deployed as shown in the figure below.
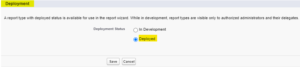
It says that – A report type with a “Deployed” status is available for use in the Report Wizard. While in development, report types are only visible to authorized administrators and their delegates.
Using Custom Report Types in Salesforce
After creating a Custom Report Type, you can start using it in Salesforce reports.
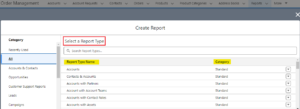
- From App Launcher, go to the Reports tab in Salesforce.
- Click New Report and choose Custom Report Type – Account with Opportunities from the “Other Reports” category as shown below:
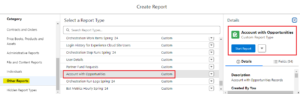
- Build Your Report: Use the report builder to select fields, apply filters, and add groupings. The fields and objects you defined in the Custom Report Type will be available for use.
- Run the Report: After customizing the report, click Run to generate the report based on the Custom Report Type.
Best Practices for Custom Report Types
- Plan Your Relationships: Before creating a Custom Report Type, carefully plan the relationships between objects to ensure the report meets your needs.
- Keep It Simple: Avoid adding too many related objects or fields, as this can make the report complex and difficult to use.
- Test Before Deploying: Always test your Custom Report Type with sample data before deploying it to ensure it works as expected.
- Update Regularly: As your Salesforce instance evolves, periodically review and update your Custom Report Types to ensure they remain relevant.
Conclusion
Custom Report Types in Salesforce are a powerful tool for creating tailored reports that meet the specific needs of your organization. By understanding how to create and use Custom Report Types effectively, you can unlock deeper insights into your data and make more informed business decisions. Whether you need to report on custom objects, include specific relationships, or optimize report performance, Custom Report Types offer the flexibility and control you need to get the most out of your Salesforce data.
Happy Reading !!
The journey of learning never ends; every moment is a chance to grow.
Related Posts:
You Can Also Read:
1. Introduction to the Salesforce Queues – Part 1
2.Mastering Salesforce Queues: A Step-by-Step Guide – Part 2
3.How to Assign Records to Salesforce Queue: A Complete Guide
4. An Introduction to Salesforce CPQ
5. Revolutionizing Customer Engagement: The Salesforce Einstein Chatbot