
Hello Trailblazers…
Salesforce provides robust functionality for managing partner relationships, including the ability to convert existing users into Partner Users. This feature is especially useful when you need external partners to have access to your Salesforce org to collaborate on opportunities, access resources, and enhance business processes.
In this blog, we will walk you through the steps to create a Partner User from a normal user in Salesforce.
In this blog post, we’ll learn:
- What is a Partner User?
- How to create a Partner user from a Normal User?
- Setting up the Partner Profile and Role.
- Customize the Page Layout.
- How do you log in to the Partner Portal?
- Best Practices for Managing Partner Users.
So let’s get started…
What is a Partner User?
The Salesforce definition for the Partner User is: “Partners are Salesforce users who have access to CRM objects like opportunities, leads, and campaigns”. A Partner User in Salesforce is an external user associated with a Partner Account who has specific permissions and access rights tailored for partner collaboration.
Partner Users can log in to your Salesforce Partner Community to access records, participate in processes, and contribute to the overall business goals.
So, once you have a partner account created, you can add users to the account as contact records and then convert them to partner users. If you do not know how to create a partner account, then you can go with this link.
How to create a Partner user from a Normal User?
To create a partner user in Salesforce, follow the below steps…
- Create a new Contact record or select any contact by choosing the All Contacts list view.
- Now, click on the dropdown menu at the right side of the record page to see all the quick actions available for this page.
- Click the “Enable Partner User” button, as indicated in the figure below.
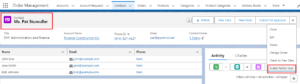
- On click, it’ll redirect you to the “User Detail” page.
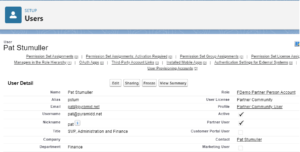
There you can fill in the additional details for the user if required. Also, you need to select the Role and Profile for the partner user.
You need to select the role and profile for the first time. And after that, it gets automatically selected for the upcoming partner users.
Setting up the Partner Profile and Role:
- Select Profile: Choose an appropriate Partner User profile. Profiles control the user’s permissions and access within the Salesforce org.
- Assign Role: Select a role for the Partner User. Roles help in defining the hierarchy and data access within the partner community.
- Save and Activate: Click “Save” to convert the users. The users will receive an email to activate their account and set up their login credentials.
So, below is the Demo Partner_user created from the normal_user.

Save the User.
So, with a few easy steps, we created the Partner user.
To learn more about User_Licenses for Partner Portal, you can go with this link.
Customize the Page Layout:
While enabling the partner users, if you do not see the “Enable Partner User” button in the drop-down menu options of the contact record. So don’t worry about it.
You can add it from the Contact Object Page Layout. Follow the below steps:
- Go to the Setup.
- Click on the Object Manager.
- Click Contact
- Go to the Page Layout, then click “Contact Layout”.
- Here, in the layout editor page, click on the Mobile and Lightning Actions.
You can get various types of buttons/actions here. - So, simply drag the “Enable Partner User”, “Disable Partner User” and “Log in to Experience” buttons and drop them to the “Salesforce Mobile and Lightning Experience Action” sections respectively as shown in the figure below.
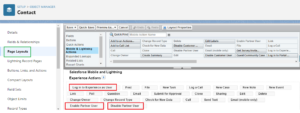
- Click Save.
With this, both buttons will be visible in the dropdown menu options on the contact record as mentioned above.
How to log in to the Partner Portal?
Once you are done with creating the Partner users, you can log in to the Partner Portal.
If you do not know, how to create a Partner Portal, then you can follow this link.
Follow the below steps to log in to the Partner Portal.
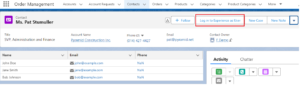
- Go to the Contact record which is also your Partner_User.
- Click the button name “Log in to Experience as User“, as indicated in the figure below.
- On click, it’ll redirect you to the Partner Portal.
Best Practices for Managing Partner Users:
- Customize Profiles: Tailor Partner Users profiles to grant the necessary permissions and access specific to your business needs.
- Training and Support: Provide adequate training and support to your Partner Users to ensure they can effectively use Salesforce for collaboration.
- Regular Reviews: Periodically review Partner Users access and permissions to maintain security and data integrity.
Conclusion:
Converting a normal_user to a Partner_User in Salesforce is a straightforward process that significantly enhances your ability to collaborate with external partners. By following the steps outlined in this guide, you can easily convert your normal_user into a partner_user.
Happy Reading…
The dream is not that which
You see while sleeping;
It is something that
does not let you sleep…
Related Post:
You Can Also Read:
1. Introduction to the Salesforce Queues – Part 1
2.Mastering Salesforce Queues: A Step-by-Step Guide – Part 2
3.How to Assign Records to Salesforce Queue: A Complete Guide
4. An Introduction to Salesforce CPQ
5. Revolutionizing Customer Engagement: The Salesforce Einstein Chatbot