
Hello Trailblazers!
Salesforce provides powerful reporting tools to analyze and visualize data effectively. Among these tools, the Bucket Field stands out as a feature that enables categorization of data directly within reports.
In this blog post, we’ll focus on creating a Bucket Column specifically for Picklist type fields in Salesforce Reports, offering a step-by-step guide to help users categorize data efficiently.
Before you Begin:
In the previous part of this blog we’ve explored “What is Bucket Field in Salesforce?”, ways to create it and many more. Before proceeding I highly recommend revisiting the earlier section to gain a comprehensive understanding of the fundamentals related to it.
What is a Bucket Column in Salesforce?
A Bucket Column/Field is a feature that allows users to group values of a specific field into categories (buckets) without altering the underlying Salesforce object. Here in this blog, we’re particularly using it for picklist fields, where predefined values can be grouped into broader categories to simplify analysis.
For example:
- Group opportunity stages into “Early,” “Mid,” and “Closed” categories.
- Categorize lead sources into “Digital,” “Offline,” and “Referral” groups.
Benefits of Bucket Columns for Picklist Fields
- Ease of Use: Group picklist values dynamically without modifying the schema.
- Enhanced Insights: Aggregate data into meaningful categories for better analysis.
- Time-Saving: No need for custom fields or formula fields to categorize data.
- Improved Collaboration: Share reports with categorized data easily across teams.
Note: If you’re interested in learning “How to Share Reports or Report Folders in Salesforce,” you can explore the detailed guide provided in this link. It offers step-by-step instructions to help you seamlessly manage report sharing and collaborate effectively.
Steps to Create a Bucket Column for Picklist Fields
Step 1: Open or Create a Report
- Navigate to the Reports tab in Salesforce.
- Click New Report or open an existing report that contains the picklist field you want to bucket.
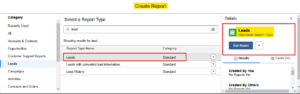
- Select the relevant report type (e.g., Opportunities, Leads).
- Here we are selecting standard “Leads” report type as shown in the figure below.

Note: If you are interested in learning “What is a Custom Report Type in Salesforce?” and learn how to create one, I recommend you to explore the detailed guide available through the provided link.
Step 2: Add a Bucket Column
Once you select the report type, it will open the Report Builder.
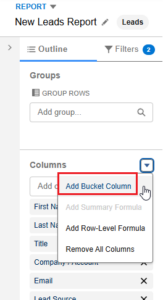
- Navigate to the Outline section in the left-hand panel.
- Locate the Columns section and click the dropdown menu.
- From the dropdown options, select Add Bucket Column to proceed, as shown in the figure below.
Note: We’ve previously explored an alternative method for creating a bucket column. If you’d like to learn that approach, kindly refer to the earlier part of this blog post. The relevant link is provided in the “Before You Begin” section and is also included at the end for your convenience.
Step 3: Configure the Bucket Column
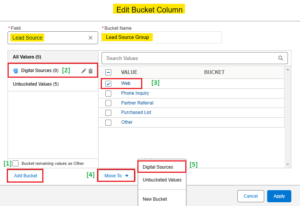
- Name Your Bucket Column: Enter a descriptive name, such as “Lead Source Group.”
- Select the Source Field: Choose the desired picklist field that you want to use for creating a bucket column. (e.g., Lead Source).
- Define Buckets:
- Click Add Bucket to create a new category.
- Enter a name for the bucket (e.g., “Digital Sources“).
- Select picklist values to include in this bucket (e.g., “Website,”).
- Click on “Move to” and choose “Digital Sources” from the options, as illustrated in the figure below.
- Repeat for Other Buckets: Create additional buckets for other categories (e.g., “Offline Sources,” “Referral Sources”). It should be like this:
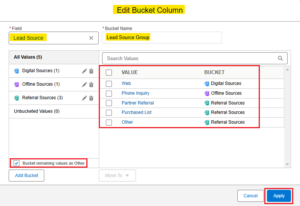
- Click Apply to save your configuration.
Step 4: Use the Bucket Column in the Report
- Drag the newly created bucket column into the report canvas anywhere you want.
- Use it for grouping, filtering, or summarizing data as needed.
- If you summarize the report by newly created Bucket Column/Field, it will look like this:
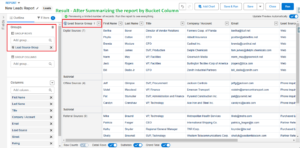
Note: If you would like to learn more about “How to create Summary Reports in Salesforce?”, then please follow the provided link.
Step 5: Save and Run the Report
- Save the report by clicking Save
- Provide a meaningful name, description, and folder location for the report.
- Click Save & Run to visualize your categorized data.
Best Practices for Bucket Columns
- Keep Categories Meaningful: Ensure that bucket names are intuitive and easy to understand.
- Test with Small Datasets: Verify the categorization before applying it to larger datasets.
- Document Your Configuration: Provide descriptions for each bucket to clarify their purpose.
- Limit Buckets: Avoid creating too many buckets to maintain report clarity and focus.
Conclusion
Bucket Columns in Salesforce Reports are a simple yet powerful way to organize and analyze data dynamically. For Picklist fields, they provide a flexible solution to group values into meaningful categories without altering the underlying schema.
By following the steps in this guide, you can quickly set up bucket columns and unlock deeper insights into your Salesforce data.
Happy Reading!
“A disciplined mind leads to a focused life; when you control your actions, you control your destiny.”
Related Posts:
You Can Also Read:
1. Introduction to the Salesforce Queues – Part 1
2. Mastering Salesforce Queues: A Step-by-Step Guide – Part 2
3. How to Assign Records to Salesforce Queue: A Complete Guide
4. An Introduction to Salesforce CPQ
5. Revolutionizing Customer Engagement: The Salesforce Einstein Chatbot
I appreciate how detailed yet easy to follow this tutorial is. Salesforce reporting can be tricky, but this makes it seem effortless!