Hello Trailblazers!
Public Groups in Salesforce are a versatile and essential feature designed to streamline user management and data sharing across your organization. So these groups provide a convenient way to manage access permissions and ensure seamless collaboration among users, roles, and other groups.
In this blog, we will explore what Public Groups are, their benefits, how to create and manage them, and best practices for their use.
What Are Public Groups in Salesforce?
Public Groups are collections of users, roles, and other public groups that can be used to simplify sharing settings, folder access, and workflow approvals. These groups are defined at the organization level and can be used throughout Salesforce to manage access to records, dashboards, and reports more efficiently.
Public Groups can include:
- Individual users.
- Roles and subordinates.
- Other public groups.
Benefits of Public Groups
- Streamlined Access Management
Public Groups allow administrators to manage access permissions for multiple users at once, reducing the complexity of assigning permissions individually.
- Improved Collaboration
By grouping users with shared responsibilities or objectives, Public Groups facilitate better collaboration on shared resources like records, dashboards, and reports.
- Efficient Workflow Approvals
Public Groups can be used in approval processes, ensuring that the right stakeholders are included in decision-making workflows.
- Consistency in Sharing Rules
Using Public Groups ensures that sharing rules remain consistent and easier to manage across your Salesforce instance.
Use Cases for Public Groups
- Folder Access Management
- Grant access to report folders or dashboard folders for specific teams or departments.
- Record Sharing
- Enable group-level access to records such as Accounts, Opportunities, or Cases.
- Approval Processes
- Include Public Groups as approvers in multi-step approval processes.
- Chatter Collaboration
- Use Public Groups to define access to specific Chatter groups and streamline communication.
Steps to Create a Public Group in Salesforce
1: Navigate to the Setup Page
- Log in to your Salesforce org.
- Click the Gear Icon and select Setup.
2: Access the Public Groups Page
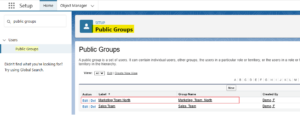
- In the Setup Quick Find box, type Public Groups.
- Click on Public Groups under Users as shown in the figure below.

3: Create a New Public Group
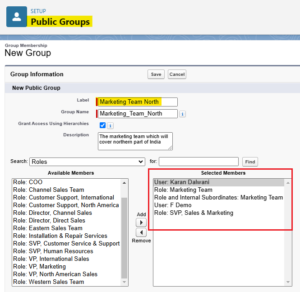
- Click New to create a new group.
- Fill in the following details:
- Label: Enter a name for the group (e.g., “Marketing Team North”).
- Group Name: This is auto-populated based on the label.
- Description: Provide a brief description of the group’s purpose.
- Add members to the group by selecting:
- Users.
- Roles.
- Roles and Subordinates.
- Other Public Groups.

4: Save the Group
- So after adding the desired members, click Save.
- The new Public Group is now available for use in sharing settings, approval processes, and other functionalities.
Note: Learn more about the Approval Process in Salesforce and its benefits by following the link provided.
So, by following these simple steps, you can create public groups in Salesforce Org.
Managing Public Groups
- Editing Groups
- Navigate to the Public Groups page in Setup.
- Click Edit next to the group you want to modify as shown below.
- Update the group name, description, or members as needed.

- Deleting Groups
- Only delete a group if it’s no longer in use to avoid disrupting workflows or sharing settings.
- Using Groups in Sharing Rules
- Public Groups can be included in sharing rules to grant access to records based on criteria or ownership.
Best Practices for Using Public Groups
- Define Clear Naming Conventions
- Use descriptive and consistent names to make it easier to identify groups (e.g., “Marketing Team/Sales Team/Support Team”).
- Regularly Audit Group Membership
- Periodically review group members to ensure they are up-to-date and relevant.
- Leverage Groups for Reporting and Dashboards
- Use Public Groups to manage access to shared reports and dashboards effectively. So we have already discussed this. Please follow the links below mentioned in the ‘Related Posts’.
Conclusion
Public Groups in Salesforce are a powerful feature that can simplify access management, enhance collaboration, and streamline workflows. So by understanding how to create and manage these groups effectively, organizations can improve operational efficiency and ensure a more organized Salesforce environment.
Happy Reading !!
“Every challenge is a hidden opportunity for growth—embrace it with optimism.”
Related Posts:
You Can Also Read:
1. Introduction to the Salesforce Queues – Part 1
2.Mastering Salesforce Queues: A Step-by-Step Guide – Part 2
3.How to Assign Records to Salesforce Queue: A Complete Guide
4. An Introduction to Salesforce CPQ
5. Revolutionizing Customer Engagement: The Salesforce Einstein Chatbot

