Hello Trailblazers!
Salesforce Experience Cloud (formerly Community Cloud) is a powerful platform that allows businesses to create engaging and personalized online communities, portals, and websites for their customers, partners, and employees. Activating an Experience Cloud site is a crucial step in harnessing the platform’s potential to enhance customer experience and drive business success.
In this blog, I’ll guide you through the process of activating your Experience Cloud site in Salesforce.
Before you begin:
If you are unfamiliar with “What is an Experience Cloud in Salesforce?”, and “How to create a Salesforce Experience Cloud”, then you can go with these links.
In this blog post, we’ll learn:
- What is Experience Cloud in SF?
- Pre-requisites.
- Create and Publish the Experience Cloud Site.
- How to Activate the Experience Cloud Site?
- Conclusion
So, let’s get started.
What is Experience Cloud in Salesforce?
Salesforce Experience Cloud, previously known as Community Cloud, is a digital experience platform designed to connect customers, partners, and employees with each other and the information they need. It enables organizations to build branded, customizable online communities, portals, and websites to enhance engagement and collaboration.
Pre-requisites:
Before you begin, ensure that you have the necessary permissions, editions, and licenses to create and manage Experience Cloud sites. You will need:
- Permission: Salesforce Administrator access.
- Licenses: Experience Cloud licenses.
- Editions: Enterprise, Performance, Unlimited, and Developer Editions
Create and Publish the Experience Cloud Site:
To activate your Experience Cloud site, you must first enable Digital Experiences in Salesforce.
- Go to the Setup.
- Enter “Digital Experiences” in the quick find box.
- Select Digital Experiences >> Settings.
- Enable the “Digital Experiences” in Salesforce.
- Click New, select the template, and enter the Site name as you want.
- Once you are satisfied with the setup, click the Publish button in the Experience Builder.
If you do not know, how to create an Experience Cloud Site in Salesforce and want to learn more about it, then please visit this blog. There I’ve mentioned in detail about creating a Partner Portal in Experience Cloud.
How to Activate the Experience Cloud Site?
Once you are ready with your experience cloud site and publish it, then it’s time to activate it.
To activate it, follow the below steps:
- Go to the Setup.
- Enter Digital Experiences in the Quick Find Box.
- Select “All Site”.
- Click Workspaces next to your Experience Cloud Site.
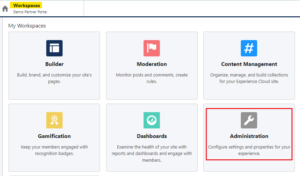
- Select Administration from My Workspaces as shown in the figure below.

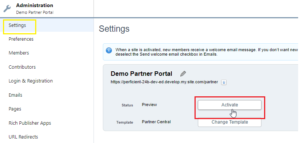
- Click on Settings.
- Click Activate as highlighted below.

- Click OK.
With these simple steps, we can activate the Experience Cloud Site.
Conclusion:
Activating an Experience Cloud site is a straightforward process that can significantly enhance your customer and partner engagement. By following these steps, you can create a dynamic, branded online community that meets your business needs.
Happy Reading!
Life is full of challenges,
but your resilience will help you
overcome them and emerge stronger.
Related Posts:
You Can Also Read:
1. Introduction to the Salesforce Queues – Part 1
2.Mastering Salesforce Queues: A Step-by-Step Guide – Part 2
3.How to Assign Records to Salesforce Queue: A Complete Guide
4. An Introduction to Salesforce CPQ
5. Revolutionizing Customer Engagement: The Salesforce Einstein Chatbot


Thank you for sharing good information.