
Hello Trailblazers!
In today’s world full of innovations and technologies, Salesforce is a powerful customer relationship management (CRM) platform that offers numerous customization options to fit businesses’ unique needs. One essential feature that allows for such customization is “Record Types.”
Record Types in Salesforce enable organizations to manage different business processes, page layouts, and picklist values for various users.
This blog provides an in-depth look at Record Types, exploring their benefits, setup, and best practices for effective use.
In this blog post, we’ll learn:
- What are Record Types in Salesforce?
- Setting up Record Types in Salesforce.
- Test the Record Type.
- Benefits of using Record Types.
- Best Practices for Using Record Types.
So let’s get started.
What are Record Types in Salesforce?
Record Types in Salesforce allow administrators to define different business processes, page layouts, and picklist values for different users based on their profiles. Essentially, they enable the customization of user experience and data management for different segments of users or types of records within the same object.
This functionality is particularly useful in scenarios where a single Salesforce object is used to manage various processes or data sets.
These can be applied to any standard or custom object and allow you to change the page layout, fields, mandatory fields, and picklist values.
They should be used for those records that have the same notion but require separate executions.
Salesforce allows you to configure different Page Layouts, Picklist values, Fields, and Required Fields.
Setting Up Record Types in Salesforce
Before you begin: Here, I created a custom object called “Vehicle,” which contains all the information related to the vehicles that customers purchase. We will create record types for the “Vehicle” object to configure and manage different types of vehicles and their related information. Specifically, we will create two record types: 1. Motorcycle, and 2. Car.
To create a record type in Salesforce org, follow the below steps…
- Go to the Setup.
- Then, go to the Object Manager.
- Select the object – here we’ll select “Vehicle”.
- Select the Record Types, and click New.
- Fill in the details as shown below.
a. Existing Record Type: Master
b. Record Type Label: Motorcycle
c. Record Type Name: Motorcycle
d. Description: For separating the vehicle types.
e. Active: selected - After this, you have the option to make this record type available for the specific profiles you want.
To make it available for specific profiles, deselect the Make Available checkbox and select the specific profiles that you want. - Click Next.
- Ensure that the Apply one layout to all profiles radio button is selected.
- From the Select Page Layout list, here I selected Vehicle Layout. (Further, we’ll see how to assign different page layouts to different record types)
- Click Save.
It will look like this:
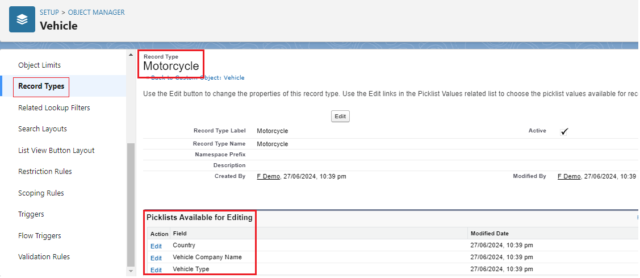
Once you create a picklist, it is available for Editing. From here, you can control the picklist values. Click ‘Edit’ to modify the picklist values as needed.
Thus, you can create the record type with easy steps.

Now that we have completed the first one, let’s create another record type.
Create Another Record Type
- While still viewing the Vehicle object in the Object Manager, select Record Types and click New.
- For Existing Record Type, ensure Master is selected from the picklist.
- Enter the Record Type Label as Car and the Record Type Name as Car.
- Select the Active
- After this, you have the option to make this record type available for the specific profiles you want.
To make it available for specific profiles, deselect the Make Available checkbox and select the specific profiles that you want. - Click Next.
- Ensure that the Apply one layout to all profiles radio button is selected.
- From the Select Page Layout list, here I selected Vehicle Layout.
- Click Save.
It will look like this:
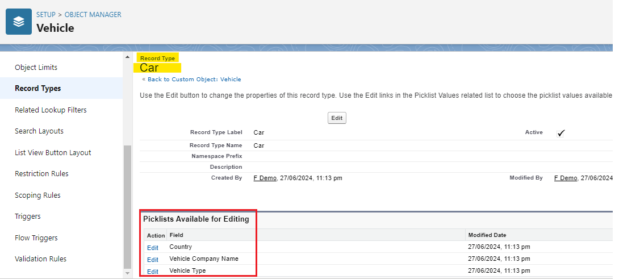
When you create a record type, the picklists are also available for editing, allowing you to control their values. Click ‘Edit’ to modify the picklist values according to your requirements.
If you would like to learn about “How to Control Picklist Values with the Help of Record Types?”, follow this link.
This way, we have created two distinct record types that manage picklists, record information, page layouts, and more.
Test the Record Type
Now, it’s time to test the created record types.
- Go to the Vehicles Tab.
- Click on New.
- A pop-up message will be shown as per the following…
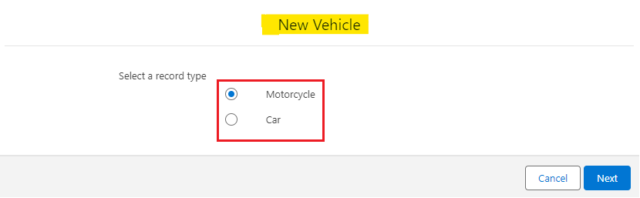
As you proceed, you’ll notice the customized picklist values and the unique page layout associated with the specific record type you created. Fill in the required details and then save your record.
Benefits of using Record Types
1. Tailored User Experience
Record Types allow you to customize page layouts and picklist values for different profiles, ensuring users see only the relevant information and options based on their role or department.
2. Streamlined Business Processes
Organizations can manage and streamline multiple business processes within the same object by defining different Record Types. This is particularly useful for objects like Opportunities, Cases, or Accounts, where different processes might apply.
3. Enhanced Data Management
Record Types enable better data segmentation and management by allowing different fields and values for different record types. This helps in maintaining data integrity and relevance.
4. Improved Reporting and Analysis
By categorizing records with different Record Types, organizations can generate more specific and meaningful reports and dashboards, leading to better insights and decision-making.
Best Practices for Using Record Types
1. Plan Before Implementation
Carefully plan the use of Record Types before implementation. Identify the business processes and user requirements to determine the need for separate Record Types.
2. Use Descriptive Names
Give record types descriptive names to make it clear what each Type represents. This helps users select the correct Type when creating or editing records.
3. Keep It Simple
Avoid creating too many Record Types, as this can lead to complexity and confusion. Use them only when necessary to differentiate distinct processes or data sets.
4. Regularly Review and Update
Periodically review and update Record Types, page layouts, and picklist values to ensure they remain relevant and aligned with changing business needs.
5. Monitor and Optimize
Monitor the usage of Record Types through reports and dashboards. Identify any issues or areas for improvement and optimize the setup accordingly.
So, these are a few best practices we should follow while creating and managing record types.
In the next part of this blog, we’ll learn “how Salesforce Record Types controls Picklist values and Page Layouts.” Stay Tuned!
In this blog, we learned “What is Record type in Salesforce, and how to create it.” Record Types in Salesforce are a powerful tool for customizing the user experience, streamlining business processes, and enhancing data management. Organizations can leverage this feature to better meet the needs of different user groups and business scenarios by understanding how to set up and manage Record Types effectively.
Happy Reading!
The dream is not that which
You see while sleeping;
It is something that
does not let you sleep…
Related Posts:
You Can Also Read:
1. Introduction to the Salesforce Queues – Part 1
2.Mastering Salesforce Queues: A Step-by-Step Guide – Part 2
3.How to Assign Records to Salesforce Queue: A Complete Guide
4. An Introduction to Salesforce CPQ
5. Revolutionizing Customer Engagement: The Salesforce Einstein Chatbot