
Amazon Web Services (AWS) Glue is a fully managed ETL (extract, transform, and load service) that categorizes your data, cleans, enriches it, and moves it reliably between various data stores. These data stores consist of a central metadata repository known as the AWS Glue data catalog, which is an ETL engine that automatically generates Python or Scala code as well as a flexible scheduler that handles dependency resolution job monitoring and retries so that there is no infrastructure to set up or manage.
Let’s review some use cases of AWS Glue:
- Build a data warehouse to organize, validate, and format data.
- Run server-less queries against an Amazon S3 data lake.
- Create and run event driven ETL pipelines
AWS Glue Terminologies
Data Catalog: The data catalog is metadata stored in AWS Glue. It contains table definitions, job definitions, and other controlled information to manage an AWS glue environment. Each account has one data catalog per region.
Classifier: A classifier determines the schema of your data. AWS glue provides classifiers for common file types such as CSV, Jason, and XML. AWS glue also provides classifiers for common relational database management systems using a JDBC (Java Database Connectivity) connection. You can write your own classifier by specifying a row tag in an XML document.
Connection: A connection contains the properties that are required to connect to your data store.
Crawler: A crawler is a program that connects a data store to a source or target. It progresses through a prioritized list of classifiers to determine the schema for your data and then it creates metadata tables in the data catalog.
Database: The database is a set of associated data catalog table definitions organized into a logical group in AWS glue.
Data store: A data store is a repository for storing your data. Some examples include Amazon S3 buckets and relational databases.
Job: A job is a business logic that is required to perform the ETL work. It’s composed of a transformation script, data sources, and data targets job runs are initiated by triggers that can be scheduled or triggered by events.
The Benefits of Glue
Easy management
Amazon manages almost everything for us. The options for us to allocate the specified number of resources that we want to specify for our ETL job can scale up and down easily. Amazon manages all of the updates, security patches, and version upgrades so we don’t have to deploy any maintenance. The cloud computing system makes it easy for us to be able to store data from different sources into the data warehouse and use your ETL tools with it.
Cost Management

Amazon is one of the cloud services that come at really affordable rate because we only pay for resources we use. For example, if we have a server in our own office space, we’ll still have to keep it consistently running all the time and pay for it. But in Amazon’s case, everything is managed, we don’t have to pay anybody anything for it, and we’re not renting anything. You’ll only have to pay for the exact percentage of the number of resources that we use.
Superior Functionality
Glue has superior functionality. You’ll receive the primary benefits of ETL tools because it easily integrates with other services as well other cloud, offline services, and third-party services. Additionally, because Amazon as an organization aims to provide compatibility with a lot of things that you would do in your data analytics or data science career, it provides organizations with the most affordable and reliable cloud services.
How AWS Glue Works
Below we can see how AWS Glue works by importing CSV files from a S3 bucket into the Redshift data warehouse using the AWS Glue service.
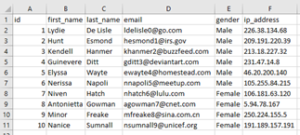
- We have created a sample CSV file with some dummy data and uploaded the file in an Amazon S3 bucket, which we are going to import into Redshift.

- To import the data into Redshift, we have to launch the Redshift cluster.

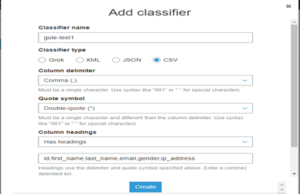
- To begin, we’ll create a classifier. You’ll go to the AWS Glue service, classifier, and then go to “add classifier.” Here, we will change some options such as classifier type, where you’ll choose “CSV,” classifier delimiter, where you’ll add “comma,” and then the column heading, and column names.
- Now we need to create a crawler for the CSV file which is in an S3 bucket. For that, you’ll do the following:
- Go to AWS Glue, crawler, and then add crawler. Specify the “crawler name” in crawler information and “add classifier,” which we created in third step.
- Next, go to the next page, where we’ll need to specify the crawler source type. This will be “data store.”
- The next page will be the data source. Select data source “S3,” and in the include path option, select the CSV file location with S3 bucket.
- For example, “s3://aksh-s3-009/Emp.csv.”
- Next, we need to choose the IAM (Identity and Access Management) role. The IAM role allows the crawler to run and access your Amazon S3 data stores. We can create a new IAM role by simply specifying the IAM role name and AWS will create a role with all required permission to run and access S3 data store.
- Now we can create a schedule and set the frequency. There are 6 options from which we can set the frequency:
- Run on demand
- Hourly
- Daily
- Choose days
- Weekly
- Monthly
- For the output, we need to create a database by using “add database,” which will help us create a database.
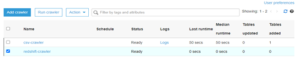
- Finally, we review the changes and create a crawler with the status “Ready.”
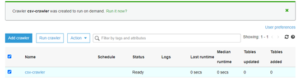
- This crawler basically goes to S3, identifies the structure of the CSV file, and creates a table with metadata in the database. To do that, we need to run the crawler by clicking “Run crawler.” After running the crawler, the status will change. After starting and finishing its task, it will again display the status as “Ready” as well as the “Table added” column. The “Table added” column will show 1, which means 1 table is added in the database. We can also verify by clicking the tables option in the AWS Glue service.
- Now we will create a connection for Redshift. To create a connection, click “add connection,” then specify the connection name and connection type, which will be “Amazon Redshift”. Next, we will specify the cluster detail that we already created in that we will specify the cluster name, database name, username, and password. Once that’s done, click “finish.”
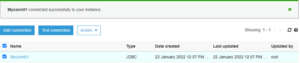
- After creating a connection, we have to test whether it is connecting to Redshift. To do this, select “connection” and click “Test connection.” It will also ask for an IAM role. You’ll select the same IAM role which we create during crawler creation.
- Now we will create another crawler that will connect to the Redshift database and will identify schema for the table. The steps will be the same for how we created a crawler in step 4. The only difference is for the data store, where we will select “JDBC” instead. In connection, select the connection that we created in step 5. Here we also need to specify the path of the table in the Redshift cluster. For example, “dev/public/emp.” In the next step, we need to specify the IAM role. We’ll choose the one we already created. After that, we’ll ask for a database. Here, we need to create a database for the Redshift crawler, which will be the same as we created for the CSV crawler. After this, click “finish.”
- Now we have 2 crawlers and we need to run a redshift crawler as well it will detect table configuration, schema definition, and validate and the table will be created in the Table section.
- The next step will be creating the jobs that will transfer data from the source S3 CSV file to the destination Redshift database table. You’ll want to do the following:
- Specify the job name and select the IAM role which we created early.
- The Job type will be Spark. In the advance option, select “job bookmark” to enable so that if we run the job multiple time it will remember what records it already transferred so that it isn’t transferred twice.
- In the data source, select the S3 table that was created by the crawler, “1 CSV-crawler.”

- In the data target, select the Redshift table created by “crawler 2 redshift-crawler.”

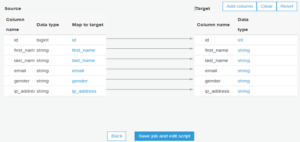
- Now we will do the mapping. For this, we will verify the mappings created by AWS Glue. First, you’ll change mappings by choosing other columns with a map to target. We can clear all mappings and reset to default AWS Glue mappings. AWS Glue generates a script with the defined mappings.
- After we click “save job” and “edit script,” we will generate a script where we can add advance options, transformation if needed, and we will save the script and close it.
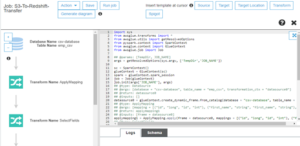
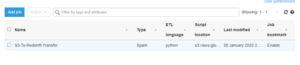
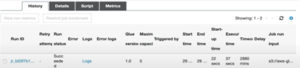
- Now we will select the job “S3-To-Redshift-Transfer” and go to action and run the job.
- Once the job receives data from the CSV file, it is transferred to the Redshift database table, and we can verify the data by querying redshift table.
How can Perficient help you?
Perficient is a certified Amazon Web Services Partner with more than 10 years of experience delivering enterprise-level applications and expertise in cloud platform solutions, contact center, application modernization, migrations, data analytics, mobile, developer and management tools, IoT, serverless, security, and more. Paired with our industry-leading strategy and team, Perficient is equipped to help enterprises tackle the toughest challenges and get the most out of their implementations and integrations.
Learn more about our AWS practice and get in touch with our team here!
Nice Article 🙂