AEM has a vast infrastructure, and it requires time to hold expertise on it. Every expert was once a beginner, so you are never too late to start and have fun on AEM. In this blog, we will focus on the developers’ perspective of AEM and how one can start as an AEM developer. We will go through some of the topics which will help you station your pillars on AEM and get the crux of it.
To begin with AEM, you should have a basic understanding of:
- Java – Servlets, JSP, Collections, OPPs concepts.
- JS
- HTML/CSS
Note: This tutorial will focus on the latest AEM – 6.5.
Firstly, What is AEM?
AEM is a Content Management System (CMS) that provides solutions to build websites, mobile apps, and forms. What makes it different from other CMSs is its ability to build content and deliver them in a single platform using various marvelous features such as Dam, Forms, Communities, Cloud, etc.
Note: In this tutorial, we will explore the necessary steps to complete a given functionality. For complete and more details on the related topic, visit the links at the end of this blog.
Go through the following diagram to get a glimpse of the topics we are going to discuss in the blog:

So, Let’s begin the groove.
Install AEM on your Local System:
For trying your hands-on, you will need a local AEM instance setup. For that, you will require:
- AEM quickstart jar and a license file
- Java 8 or 11 installed in our system
Note: In this tutorial, we are focusing on the 6.5 version of AEM. Recently, it has been the most widely used version with all the available features.
Installing AEM is the first step in, to begin with, AEM. Since we are focusing on the developers’ perspective, we will set up an author instance in our system. Now, to start with, there are two modes in which you can set up your instance:
Author: Instance where you author or design your site. Here you can write your pages, assets, experience fragments, templates, configurations, etc.
Publish: Instance where all the content created in the author instance is deployed after publishing. This is the actual instance where the end user will interact with your site.
Now, let’s set up an author instance, as we will create all our content here, and the developer’s work revolves around this instance.
Follow the steps to set up your instance:
- Copy and paste the AEM quickstart jar and the license file into a dedicated folder.
- Rename the jar file to aem-author-p4502.
- Double-click to run the jar file. It will take around 8-10 mins to run.
After it is done thoroughly, you will notice AEM running on your browser at the 4502 port number, as it is specified in the file name as well(aem-author-p4502). Login with admin/admin, and you are good to go and explore AEM.
Please refer to the link below for more details on setting up your local instance:
Walkthrough the AEM Environment:
There are many areas in AEM supporting a wide range of functionalities. Go ahead and try your hands on various features.
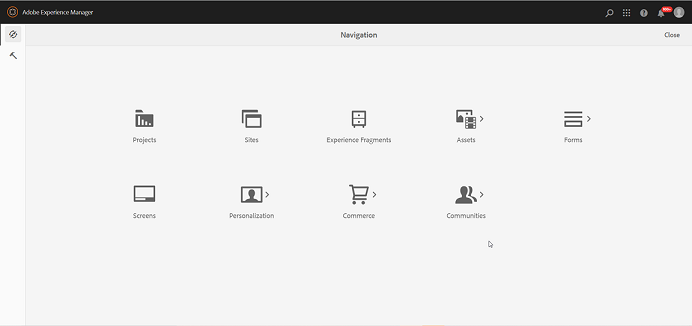
Step into the Author’s shoes
Who is an Author?
The Author is the one who generates content for our pages by authoring and configuring the components. All the blocks of code(components) are combined and integrated by the Author to develop a simple web page. In short, the Author is the mediator between the user and our code.
To develop a component, it is important to understand how the Author will configure the elements on the page and how they will behave and look at the other end.
Please go through the following tutorials to learn authoring pages and components:
Follow this video for an overview of AEM
Go through this document to understand more about authoring in a brief
Editable templates
Once you have understood the authoring pages and components on an AEM page, it’s time to dig deeper and understand pages and their structure.
Any website has a template upon which it is built. Similarly, AEM provides a means by which we can create our templates and edit them dynamically. A template can be created or edited using the template console, as shown in the screenshot below:

Follow the link below to Learn about authoring pages:
After you have created a template, you can create any number of pages from that template, and it will serve as a structure for your page.
This was just an introduction to understanding AEM’s environment and its basic concepts. Being an AEM developer requires a lot more steps. Let’s get into the first few steps that will help you run swiftly.
Time to Develop
Once you are set up in the environment and begin to understand how AEM works as a content management system, it’s time to see how an AEM developer creates custom components and extend the existing component.
Before we move forward, let’s understand a few key concepts used by an AEM developer day in and day out. Following are some of them:
Sightly: This is a scripting language used for rendering the content on the page. Previously, JSP was used for generating the contents. Still, newer versions of AEM sightly became the recommended one for obvious reasons such as code separation, protection against cross-site scripting, etc. Sightly is similar to HTML, with a few new tags helping integrate with AEM concepts.
crx/de Lite: This is a developer console that helps the developer quickly make the changes and verify them on the page. It contains the actual tree structure of the instance organized sophisticatedly. Every node has its purpose of serving. For example, all the components for a project are stored under the app’s node, and all pages are stored under the content node.
http://localhost:4502/crx/de/index.jsp
We will learn about more such concepts as we move ahead and explore AEM further.
At this point, you understand how pages are created and authored in AEM and how they serve the content to the end user. Now, let’s understand how these components are designed and how are they made available to the authors.
First, let’s begin by understanding what a component in AEM is?
A component is a working piece of code encapsulated to serve a specific web page area. We can use this component anywhere on our pages and customize its behaviors as required using dialogs.
Creating the First AEM component
For the first component, we will start by reusing the existing component from the we-retail site (Sample site, which is shipped with AEM 6.5).
- Go to crx/de
- Navigate through the path apps -> weretail -> components -> content. The components folder contains all the components created for we-retail site. We can further sub-classify them into various categories such as content, structure, etc.
- Open the button component. You will see the following nodes as shown in the image below:
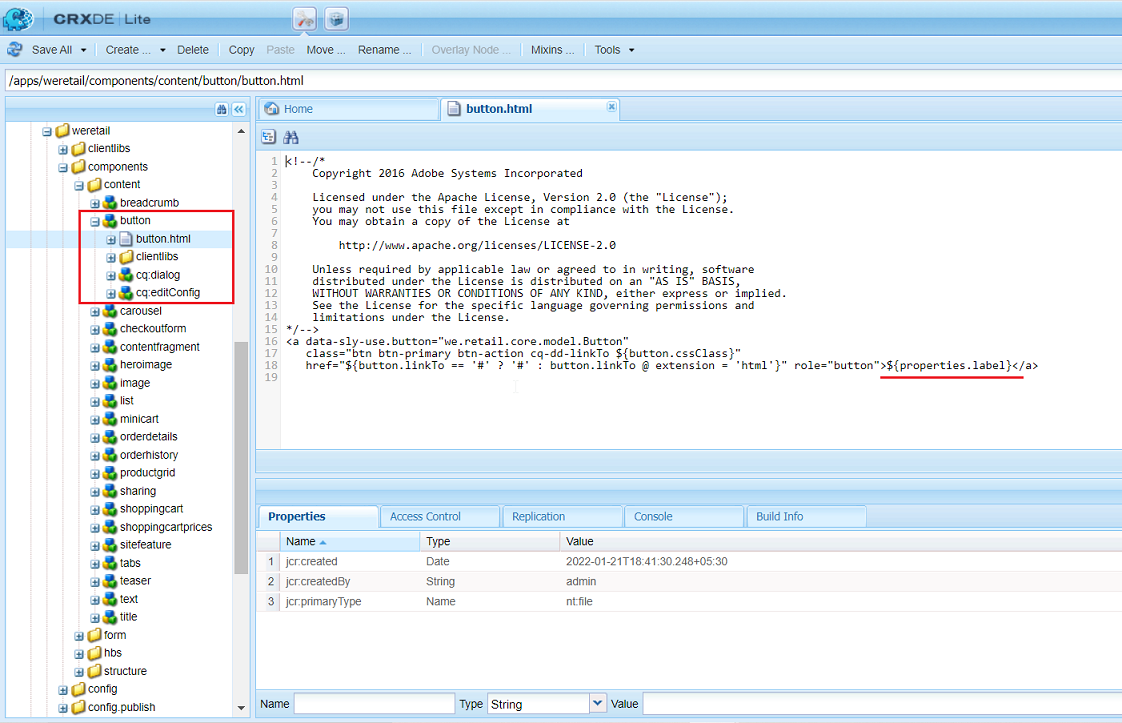
For now, let’s focus on button.html and cq:dialog.
button.html: It contains the actual HTML code rendered when the component is added to the page.
cq:dialog: This node forms the node’s dialog, which is served to the Author as an authoring dialog to configure the fields. These values are stored in a node structure under /content node. For example, if you added the button component under men page of we.retail site then these values will be stored under the path /content/we-retail/us/en/men/jcr:content/root/responsivegrid/button_1022012327 as shown in the image below:
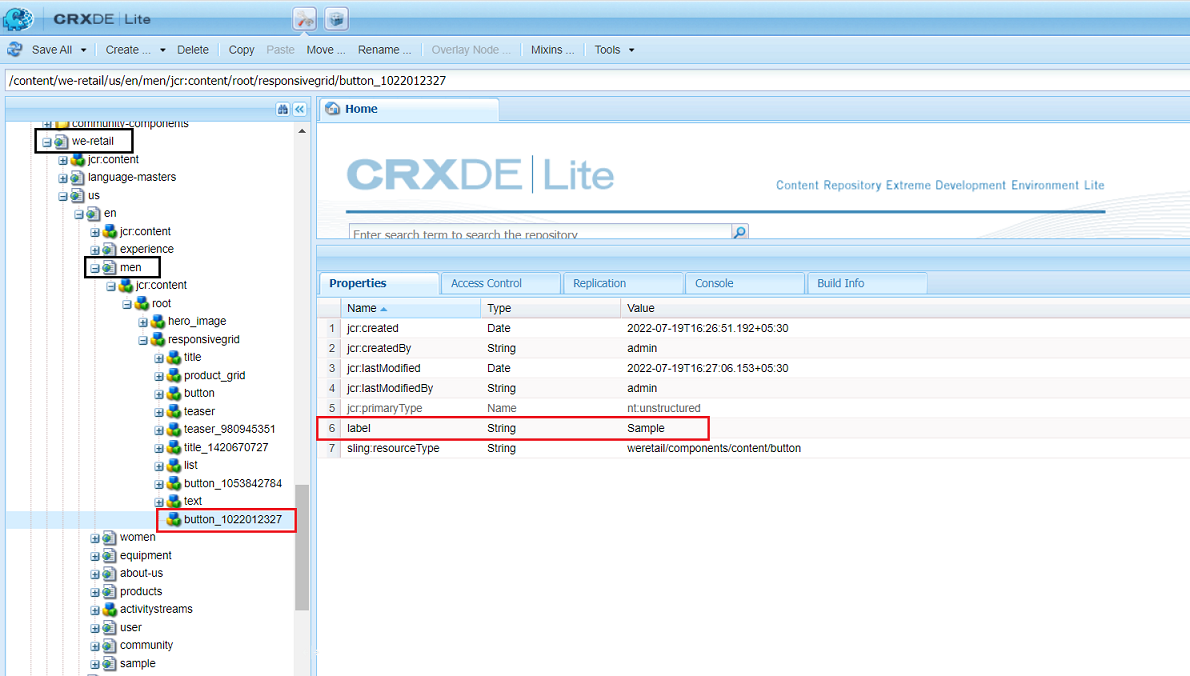
Here, I labeled my button as Sample. But, just saving them is not our motive. We have to get these values and render them too. Thankfully, we have Sightly, which makes our job easy. Look at the underlined sentence in button.html in the previous screenshot.
${properties.label}
This is a sightly way of accessing the values from the dialog. So, here properties are implicit objects that AEM provides to access values from a dialog using a dot operator. There are many such implicit objects we can use to get and process the values. They are also known as Global Objects. Please go through Sightly’s documentation to understand more about them.
Here, we are accessing the property/field label. As shown in the screenshot above, the value of the button’s label is stored in the label field. So, we are fetching that value and rendering it on the button using our HTML code. The property’s name is determined by the dialog, as shown below. So whatever name is specified in the dialog, values are stored with that name, and we can access them using the same name.
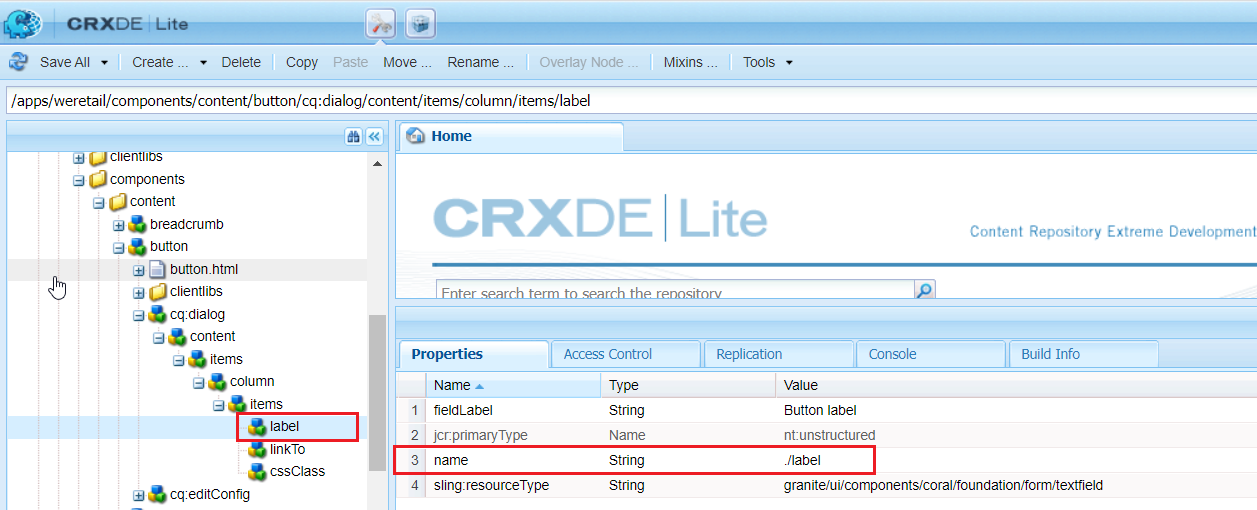
You will notice that everything is interconnected. It might be pretty confusing to get it in one go, but as you move ahead, this will be just a piece of cake for you.
Try adding this component to any of the we-retail site pages and experimenting with the component.
Create an AEM Project Using the Latest Archetype
We can experiment and try our hands out in crx/de to understand the functioning of AEM. An AEM developer uses crx/de just for testing, quick fixes, and debugging; hence, we cannot develop the entire project on crx/de. To create any working AEM site, we need to create a project and deploy it in higher environments.
Let’s create an actual AEM project.
Following are the prerequisites for setting up any AEM project: For any AEM project to start working, the following things should be installed in your system:
- Maven
- Java 8 or higher
- Git and Npm
- Any IDE, IntelliJ or Eclipse
- Adobe Public Maven Repository: This maven2 repository provides access to public artifacts used in conjunction with developing Java-based applications on Adobe frameworks. Just copy the content of this link in your C:\Users\My user.m2\settings.xml directory or /.m2/settings.xml in your mac.
Refer to the following link for more information about this: https://experienceleague.adobe.com/docs/experience-cloud-kcs/kbarticles/KA-17454.html?lang=en
Now, let’s create an AEM project using the maven command.
Go to the local drive location where you want to save your project and open the command prompt from there. Alternatively, you right-click on the desired location on the drive and open Git bash. Now, run the following command:
mvn -B org.apache.maven.plugins:maven-archetype-plugin:3.2.1:generate \
    -D archetypeGroupId=com.adobe.aem \
    -D archetypeArtifactId=aem-project-archetype \
    -D archetypeVersion=35 \
    -D appTitle="WKND Sites Project" \
    -D appId="wknd" \
    -D groupId="com.adobe.aem.guides" \
    -D artifactId="aem-guides-wknd" \
    -D package="com.adobe.aem.guides.wknd" \
    -D version="0.0.1-SNAPSHOT" \
    -D aemVersion="cloud"
As soon as the command finishes its execution, you will see a project being created at the desired location.
This was a straightforward way to kickstart any project. Once you have got a hold of AEM, this is the only step required to create and begin on any project, but since you are a beginner, please go through the following document and understand the project structure and modules of any AEM project.
Please run the following command to install the project on your local instance:
mvn clean install -PautoInstallPackage -PautoInstallBundle
Please go to the following link if you want to understand more about the command:
Once the project has been built successfully, open the project in your IDE(IntelliJ or Eclipse)
To enable your IDE to understand AEM modules and concepts, you need to install plugins in your IDE.
Eclipse: Install AEM Developer Tools for Eclipse. Follow the link for a step-by-step procedure – https://experienceleague.adobe.com/docs/experience-manager-64/developing/devtools/aem-eclipse.html?lang=en
IntelliJ: Install AEM IDE Tooling 4 IntelliJ. Just go to File -> Settings -> Plugins in your IDE. Search the plugin and install it.
These plugins provide an easy way to manage and develop any AEM project by strengthening the features IDE provides. It is always good to have these plugins installed in your IDE for faster development and effortless mappings.
Creating a Custom Component
AEM allows you to create custom components and extend the existing core component, which is shipped with AEM. Here, we will see how to create custom components and concepts such as sightly, sling models, and dialogs.
Please follow the following tutorial on how to create a custom component:
Note: The tutorial refers to another git repository, but you can also create this component in your newly created project.
While going through the tutorial, you must have come across a few new concepts like sightly and sling models. You don’t need to understand them in one go. So, no worries, you will get them as you work with them more. Again, AEM is not a very simple thing to understand, but once you start, there is no looking back.
To understand more about the new concepts, refer to the following links:
As you start understanding these concepts, everything will make sense, and you will be able to match the pieces together.
Many More To Go
These were just baby steps to an understanding of AEM and beginning with it. AEM is not, that’s all. We haven’t even explored 10% of it. But the concepts we went through earlier will help you get hold of AEM so that you can explore further on it. It was ABC for AEM. To name a few, the following are a few more concepts that will help you understand and develop a site in AEM:


Thanks for the useful Article.
Very simply defined…. thanks!