REST- ASSURED

REST stands for REpresentational State Transfer. It supports Behavior-Driven Development (BDD) syntax like Given, When, and Then notations. It helps us to integrate with testing frameworks like Junit or TestNG.
| Code | Explanation |
| Given() | ‘Given’ keyword, lets you set a background, here, you pass the request headers, query and path param, body, cookies. |
| When() | ‘when’ keyword marks the premise of your scenario. For example, ‘when’ you get/post/put something, do something else. |
| Method() | Substitute this with any of the CRUD operations (get/post/put/delete) |
| Then() | Your assert and matcher conditions go here |
Basic scenario to automate JIRA Application:
- Login to Jira to create session using “Login API”
- Add a comment to the existing issue using “Comment API”
- Add an attachment to the existing issue using “Add Attachment API”
- Get issue details and verify that if added comment exists using “Get Issue API”
Let’s start by importing the package so that we can use its methods.
![]()
Let’s store the base URI before using it, user the following line to store the BaseURI
![]()
Note: Now that we are all set, Let’s look at the scenarios.
Login to Jira to create session using “Login API”

In the above example we have used SessionFilter which helps us to keep the track of the current session, we just must use the keyword filter(session) and the rest will be taken care automatically.
As we are using the body as JSON Data where we are passing the username and password to log into the application, we have to user the header as “application/json”.
Using the keyword relaxedHPPTSValidation() means that you’ll trust all hosts regardless if the SSL certificate is invalid.
The keyword log().all() is responsible to log the entire output for better understanding. Also, it is not necessary, but it is considered as a good coding standard.
The keyword extract().response().asString() does the work of extracting the response as a string as we might need the string to perform future operations.
Click on the link to learn more about the Cookie Authentication
Conclusion: Congratulations, you have Successfully Logged in the application and Created a Session using Login API.

Add a comment to the existing issue using “Comment API”
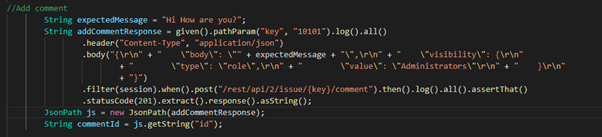
Path Parameter when the user wants the information for key with the ID 10101 and not for all the ID, in such situation, we can use the PathParam.
Also, we can send dynamic data into the JSON by passing the data which is stored in a string called “expectedMessage”.
We are also using assertThat().statusCode(201) to assert that the status code should be 201 or fail stating that the expected statusCode “201” but found this “XXX”.
We can parse JSON Response with Rest Assured by using the JSONPath class.
Hence, we are passing the string to JsonPath. Now the individual data is accessible with the help of object created which is “js” in our case.
Conclusion: Congratulations, you have successfully Added your First Comment into the bug you just created with the help of REST API.
Add an attachment to the existing issue using “Add Attachment API” (with Curl Command)
In the Documentation the add attachment uses the Curl Command:
curl -D- -u admin:admin -X POST -H “X-Atlassian-Token: no-check” -F “file=@myfile.txt” http://myhost/rest/api/2/issue/TEST-123/attachments
Decoding the upper curl command, means D – Different parameters that we are passing, u – Username Password, X – HTTP Method (Post, Delete, etc.), H – Header (key value), F – File for the attachment.
With the help of above data we can easily build our code using given, header, post.

Here we are Uploading a file and not using any raw data as a body, hence we are using the Token as “X-Atlassian-Token – no-check” and “Content-Type – multipart/form-data”.
Multipart requests combine one or more sets of data into a single body, separated by boundaries.
You typically use these requests for File Uploads and for Transferring Data of several types in a single request (for example, a file along with a JSON object).
Note: There’s a cool JSON Online Editor available which you should check out for sure.
Conclusion: Congratulations, you just Added your First Attachment into the existing bug you created with the help of Rest API.
Get issue details and verify that if added comment exists using “Get Issue API”
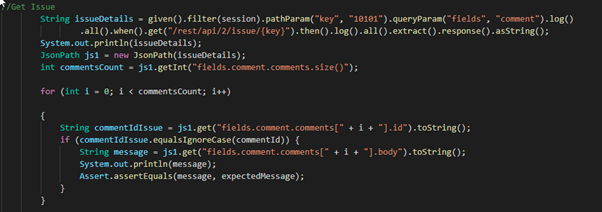
There may be Scenarios where you need to fetch only a few or a single record. In such cases, query string parameters play an important role.
In our example we are interested in the Single Field comment, hence with the help of queryParam.
- Let’s dive into the logic we we’ll write to check our comment exists or not.
Steps:
- Get total size of comment using size().
- Iterate through every comment and check if the commentId is present
- If Yes, check the comment body is same using assertEquals(comment, expectedComment)

Conclusion: Congratulations, you have successfully Added and Verified a Comment with the help of REST API.
Conclusion:
In this blog, you Explored Jira APIs. You created your first issue in Jira using the Jira Cloud REST APIs and performed various operations on the issue you created. You can now use the REST API to build add-ons for JIRA, develop Integrations between JIRA and other applications.

Happy Coding!
Very well put blog! Liked how each keyword is explained for better understanding of the reader.
Very Informative Blog, nicely written. The information is very precise.
Thankyou Uddesh Tidke.
Thankyou Nikita Hatwar.
Very Informative Blog. Thanks for sharing.