
Delivering success with Marketo requires best practice knowledge and expertise for marketing automation teams. This ongoing Marketo Essentials series shares tips and expertise you can put to use in Marketo to do more and perform better.
Appending data to a field in Marketo allows you to store historical data in a legacy field so that you can use the ongoing field to capture net new data.
For example, let’s say an IT director fills out the comment section of your website form asking for information on Product A. She fills the form out again a few weeks later, this time asking about Product B. You want her record in Marketo to have both comments so you would append the previous comments (“Product A”) into a field to track legacy comments. (“Product A + Product B”). So that you can keep a record of previous information provided by individuals in your system.
To set this up in Marketo, you will need two custom fields and a smart campaign. Here’s how you do it.
Set Up Your Custom Fields
In this example, we’ll assume you have Salesforce as your CRM.
Field 1: Marketing Comments – Historical
- Create this field in SFDC on the Lead and Contact levels with the same API name
- Ensure the field data maps on the lead > contact conversion process
- Field Type: String
![]()
Field 2: Appending Marketing Comments
- Create this field in Marketo. This is a Marketo-only field that will be live on all applicable forms.
- Field Type: String
![]()
Set up Your Smart Campaign in Marketo
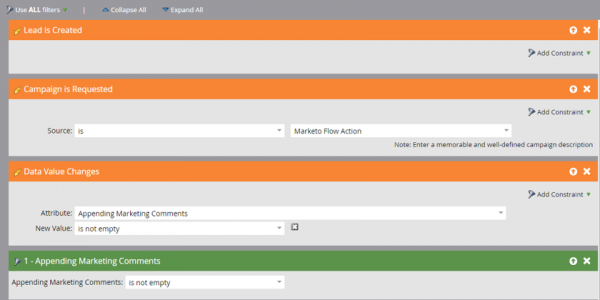
Create a new smart campaign in Marketo.
Select the following Triggers and filters:
- Choose the “Lead is Created” Trigger
- Add the “Campaign is Requested” Trigger
- For the Source, select “Marketo Flow Action”
- Add the “Data Value Changes” trigger
- The Attribute will be the field available on your forms. In this example, we’ll enter “Appending Marketing Comments”
- For New Value select “is not empty”
- Add Appending Marketing Comments filter to support the first two trigger scenarios
- Select “is not empty”

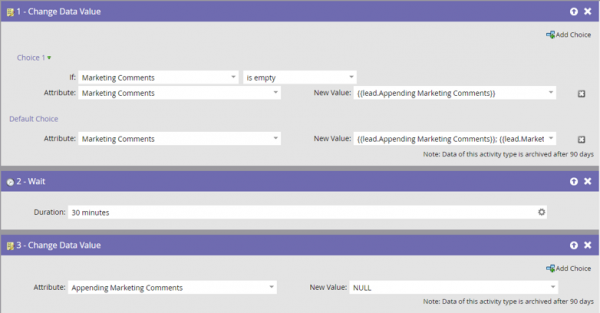
Now set your Flow with these steps:
- Select “Change Data Value”:
- If Marketing Comments “is empty”
- Attribute: Marketing Comments
- New Value: {{lead.Appending Marketing Comments}}
- You could also do {{system.date}} {{lead.Appending Marketing Comments}} to include a date stamp of when the comment was made
- Default Choice:
- Attribute: Marketing Comments
- New Value: {{lead.Appending Marketing Comments}}, {{lead.Marketing Comments}}
- You could also do {{system.date}} {{lead.Appending Marketing Comments}}, {{lead.Marketing Comments}} to include a date stamp of when the comment was made
- Add a Wait step of 30 minutes
- Add another “Change Data Value”:
- Attribute: Appending Marketing Comments
- New Value: NULL
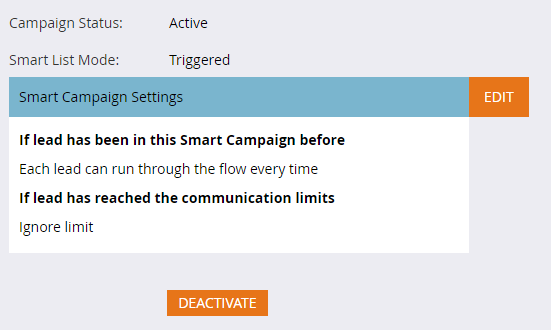
Set Your Smart Campaign Schedule
Set a schedule with these settings:
- If lead has been in this Smart Campaign before:
- Select “Each lead can run through the flow every time”
- If lead has reached the communication limits:
- Select “Ignore limit”
Once your campaign is set up, the following process will occur:
If an IT director fills out the comment section of your website form asking “Can I receive more information on Product A?”.
During form submit:
- Appending Marketing Comments = Can I receive more information on Product A?
Your trigger campaign will then fire and cause the following to occur:
- Marketing Comments = Can I receive more information on Product A?
- Wait 30 Minutes
- Appending Marketing Comments = “empty”
If that same IT director fills out the comment section of your website form a few weeks later asking “Can I receive more information on Product B?” the following process will occur:
During form submit:
- Appending Marketing Comments = Can I receive more information on Product B?
Your trigger campaign will then fire and cause the following to occur:
- Marketing Comments = Can I receive more information on Product B?, Can I receive more information on Product A?
- Wait 30 Minutes
- Appending Marketing Comments = “empty”
That’s how you append data to a field in Marketo.
Was this helpful? Get more Marketo tips in our Marketo Essentials series.
very thankful for the useful information, it is used to increase my knowledge and i will implement on other ideas