
So, you find yourself in a need of upgrade of your existing Sitecore platform and don’t know what to start with or how to approach it? This series of blog posts will cover the whole process from zero to hero, or in upgrade terms – from planning to going live. It comes in the form of a guide that will save you at least 2 times of cumulative effort, due to avoiding hidden traps and unobvious issues on your way to a shiny upgraded solution. Over time I have struggled and documented most of these issues and now want to share them all in one place.
Content
- Part 1: Scope Planning
- Part 2: Upgrade Tactics
- Part 3: Content Migration
- Part 4: Upgrading the Codebase
- Part 5: Changes in Sitecore 10.x
- Part 6: Testing and Going Live
Upgrading the Сodebase
The most central part of my blog post series focuses on upgrading the actual codebase. Upgrading a Sitecore codebase, especially when jumping from older versions of 8.x to the latest 10.3 can be a complex and time-consuming process. Some of the potential challenges you may include compatibility issues, dependency conflicts, testing and debugging, etc.
I want to start it by sharing two useful tips to identify the customization of a given project.
1. Tip on identifying the customization
In order to estimate to amount of customization for a solution, I do the following quick trick.
First I perform a clean install of the version of Sitecore that the current solution is running.
After it is up and running, I go to the webroot and do: git init, and then commit to everything. It’s just a local git initialized within Webroot – I do not push it anywhere and delete git files immediately after completing this exercise.
Next, I build and publish the codebase as normal, so that all the artifacts come above vanilla Sitecore into a Webroot.
Finally, my git tool of choice shows the entire delta of all the customizations of that solution. With that trick, I could also easily see all web.config transforms and mismatching or altered DLLs, for example, provided with hotfixes.
That trick gives me the overall feel of how much that instance varies from the vanilla one.
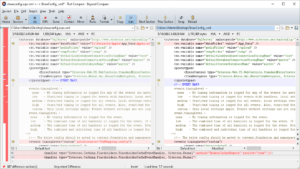
![Gitinit[1]](https://blogs.perficient.com/files/gitinit1-300x116.png)
2. Tip on finding customization with ShowConfig
While the previous trick mostly aims to show the overall amount of customizations, this one would be more specific about the changes in configuration. It will show all the patches and config alterations done on top of the vanilla instance so that a more precise estimation could be done.
We already got the vanilla Sitecore of the legacy instance version in the previous step. What we need to do is run showconfig.aspx tool (from /sitecore/admin folder) for generating the combined configuration. And save it into an XML file.
Next, once again perform build and deploy into local Sitecore, as normal. Once the instance gets up and running – run ShowConfig.aspx tool again and save the output into a different file.
Now, having an actual solution configuration we can compare it against a vanilla combined configuration for that same version of the platform – using any diff tool. I recommend using the advanced Beyond Compare tool:
For your convenience, you could also extract the whole delta between both into a single config file – it will be a valid patch!
3. Incorrect DLL(s) coming from the deployment
While upgrading the codebase you might also find facing a dependency hell in terms of referenced assemblies not playing well with each other. This can take ages to fix.

Assembly Hell in Sitecore
Every Sitecore release contains an Assembly List featuring a complete list of assemblies shipped with this release in the Release Information section. (for example, there are 443 assemblies shipped with the 10.3 XP).
Official Assembly List is provided as a spreadsheet featuring each single dependency
DLLs must exactly match counterpart vanilla DLLs in versions and also in size unless that is a hotfix DLL.
With a previous first trick, you could identify all the mismatching DLLs, and with the second trick – where those are referenced from.
You may also perform a solution-wide search for a specific faulty assembly and then see all the found results along with their sized bytes. At least one would mismatch – that will point you to the specific project where the faulty one is coming from. I would recommend my file manager of choice – Total Commander which is perfect for such operations.
If the previous result gives you more than one – but lots of faulty referenced assemblies, you could rely on PowerShell for performing RegEx replacement of all the invalid references with the correct ones. It may have a steep learning curve initially, but very soon this technique will start saving you lots of time.
4. Troubleshoot the assembly bindings
This issue occurs due to the dependencies used in your solution projects, that mismatch those DLLs versions that are actually shipped with vanilla Sitecore. For example, your feature module uses Sitecore.MVC dependency, which in turn relies on System.Web.MVC. When you add Sitecore.MVC using NuGet package manager, it will pull the latest dependency, but not the one that was latest and referenced at the time when the particular Sitecore build was released. Or in case you add a library ignoring dependencies, you could process with the latest dependency yourself.
Two ways of getting out of this. One is strictly hard referencing your project dependencies to match those from webroot. Troubleshooting becomes really annoying when upgrading the solution with a large number of projects (the max I have seen was 135) or in rare cases not possible.
Another approach is advised to adjust particular Assembly Binding to the latest version. Since you should not modify vanilla config manually – you may employ the config transform step as a part of your local build & deploy script (see this link about using web.config transforms on assembly binding redirects).
Assembly binding may look similar to the one below. From the original binding of
<dependentAssembly>
  <assemblyIdentity name="WebGrease" publicKeyToken="31bf3856ad364e35" culture="neutral" />
  <bindingRedirect oldVersion="0.0.0.0-1.5.2.14234" newVersion="1.5.2.14234" />
</dependentAssembly>
you adjust it to the newer version which you can always find in the official assembly list for each target version of the platform:
<dependentAssembly>
  <assemblyIdentity name="WebGrease" publicKeyToken="31bf3856ad364e35" culture="neutral" />
  <bindingRedirect oldVersion="0.0.0.0-1.5.2.14234" newVersion="1.6.5135.21930" />
</dependentAssembly>
The situation has improved with 10.1 as libraries updated to the latest versions and bindings became less strict.
5. NoReference packages
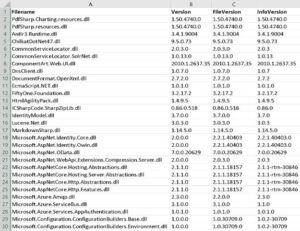
![Noref[1]](https://blogs.perficient.com/files/noref1-262x300.png) Sitecore no longer publishes the NoReferences NuGet packages. For example, if you install the 9.3 packages you will get a lot of dependencies installed along with it. That’s not what we want.
Sitecore no longer publishes the NoReferences NuGet packages. For example, if you install the 9.3 packages you will get a lot of dependencies installed along with it. That’s not what we want.
The correct way, in this case, is to use the Dependency Behavior option of the Nuget Package Manager.
Choosing the dependency behavior to “IgnoreDependencies” will only install the package without any of the dependencies.
This function is also available as a parameter switch in PowerShell:

6. Migrate from packages.config to PackageReference
Just like a project to project references and assembly references, PackageReferences are managed directly within project files rather than using separate packages.config file.
Unlike packages.config, PackageReference lists only those NuGet packages you directly installed in the project.
Using PackageReference, packages are maintained in the global-packages folder rather than in a packages folder within the solution. That results in performing faster and with less disk space consumption.
MSBuild allows you to conditionally reference a NuGet package and choose package references per target framework, configuration, platform, or other pivots.
So if you are convinced – please perform the update either manually from right-click context menu in Visual Studio or by running a migration script from packages.config to PackageReference (by Nick Wesselman).

Migrate From Packages.config To PackageReference
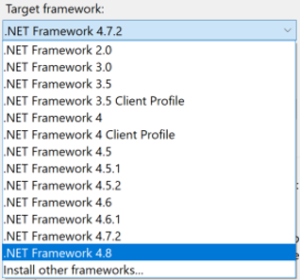
7. Update Target Framework
Net Framework 4.8 is the terminal version of Framework and is being used from Sitecore 9.3 onwards.

Target .NET Framework compatibility table
Migrating from earlier solutions will require you to update Target Framework for every project within a solution. I personally prefer to do that in PowerShell (PowerShell way to upgrade Target Framework), but there is also a Target Framework Migrator Visual Studio extension that also bulk-updates Target Framework for the whole solution.

8. Update Visual Studio
But of course, to benefit from this extension you may need to update Visual Studio itself first so that it has the required Target Framework. Least and most important – install the latest VS Build Tools which you of course can be updated on your own.
You will still likely be keen to get the latest VS 2022, especially given that it is now officially supported starting with 10.3 platforms. In that case, you can get at least VS 2019 which also has nice features.
Helix Solutions may sometimes have over a hundred of projects that affect overall performance. Solution filters allow filtering only those projects you’re working with, keeping unloaded from VS but still operable. It works as an SLNF-file that references your solution with an array of whitelisted projects.
You can also now perform one-click code cleanups and also search for Objects and Properties in the Watch, Autos, and Locals Windows.
9. Unsupported third-party libraries
The solution you’re upgrading may reference third-party libraries that are discontinued. In that case, you need to investigate each of those libraries and decide what to do.
An example from my experience: I came across Sitecore.ContentSearch.Spatial library that performed geo-spatial searches. It has the source code available but has not been updated for 5 years so far. Meantime Lucene search has been removed from Sitecore and this library became no longer relevant, as the library hard-referenced Lucene.
As an outcome, the whole related feature at the solution was temporarily disabled to be later rewritten using Solr Spatial search.
10. Dependency injection
Microsoft.Extensions.DependencyInjection became built into Sitecore from version 8.2
It is fast and reliable and supports pretty much everything you may need. Just use this one!
Learn more about Sitecore Dependency Injection and scoped Lifetime (article by Corey Smith)
11. Glass Mapper
If you are using an older version of Glass mapper, you will need to update it to version 5. Package naming has changed to reflect the version of Sitecore it is working with, and are three related packages:
- Glass.Mapper.Sc.{Version}
- Glass.Mapper.Sc.{Version}.Mvc
- Glass.Mapper.Sc.{Version}.Core
Glass has lots of changes in v5 most significant of which would be a new way of accessing content from Sitecore. Glass Controller gets obsolete, same is true for GlassView which went in favor of elegancy:
<!-- instead of of GlassView -->
@inherits GlassView<ModelClass>

<!-- it becomes -->
@model ModelClass
Instead of ISitecoreContext using the new IMvcContext, IRequestContext and IWebFormsContext abstractions.
public class FeatureController : Controller
{
    private readonly IMvcContext _mvcContext;
    public FeatureController()
    {
        _mvcContext = new MvcContext();
    }
    var parameters = _mvcContext.GetRenderingParameters();
    var dataFromItem = _mvcContext.GetDataSourceItem();
}
Glass lazy loads by default now and [IsLazy] attributes on model classes were removed. Other attributes removed are [SitecoreQuery], [NotNull].
You will need to remove these model properties in order to re-implement them as methods, getting rid of the attributes (see Lazy loading after upgrading to Glass Mapper 5).
After upgrading Glass, I faced a bunch of run-time errors that were difficult to identify. Eventually, I realized that happened due to a lack of virtual property modifiers in model classes. With old versions of Glass Mapper, model properties still map correctly even without the virtual modifier, but not any longer, so please make sure your property definitions look as below:
[SitecoreChildren(InferType = true)]
public virtual IEnumerable<Model> InnerChildren { get; set; }
Tip: when installing a higher version of the GlassMapper with NuGet package ensure the files App_Start\GlassMapperSc.cs and App_Start\GlassMapperScCustom.cs are not overwritten with the defaults. Also, they should not appear in the feature modules, but only in the Foundation module that is responsible for Glass Mapper.
Before upgrading GlassMapper I would recommend reading through these useful blog posts about the changes:
- GlassMapper upgrade from 4 to 5 (by Gerhart Magdás)
- What is new and changed in Glass Mapper version 5 (by Shu Jackson)
12. Custom Pipelines
Sitecore tries to reduce breaking changes where possible but sometimes they are unavoidable, so as with all Sitecore upgrades some custom code and configuration will need to be updated to be compatible with
The HttpRequestArgs.Context property has been removed in favor of HttpRequestArgs.HttpContext – in fact, just been renamed:
[Obsolete("Use HttpContext instead.")]
public System.Web.HttpContext Context => this.HttpContext.ApplicationInstance.Context;

public HttpContextBase HttpContext { get; }
It resulted in a breaking change for all of your custom pipeline processors, which you all need to rewrite. I used my preferred PowerShell RegEx to replace one-liner to update them in one go:
gci -r -include "*.cs" | foreach-object {$a = $_.fullname; (Get-Content -Raw $a -Encoding UTF8) | `
foreach-object {$_ -replace 'args\.Context\.','args.HttpContext.' } | `
set-content -NoNewLine $a -Encoding UTF8}
Custom processors patched into a pipeline now required mandatory resolve attribute.
<CustomPipeline>
    <processor type="ProcessorType, Library.DLL"
        patch:instead="processor[@type='Sitecore.Mvc.Pipelines.Response.RenderRendering.GenerateCacheKey, Sitecore.Mvc']"
        resolve="true" />
</CustomPipeline>
13. Link Manager
One more change in version 9.3 takes place with LinkManager in the way we get the default option for building a URL:
var options = LinkManager.GetDefaultUrlBuilderOptions();
var url = LinkManager.GetItemUrl(item, options);
Long story short – its internals have been rewritten, and are mostly hidden from our eyes. What we need to know is an updated way of patching default URL options. The old way of patching
<configuration xmlns:patch="http://www.sitecore.net/xmlconfig/">
  <sitecore>
    <linkManager defaultProvider="sitecore">
      <providers>
        <add name="sitecore">
          <patch:attribute name="languageEmbedding">never</patch:attribute>
          <patch:attribute name="lowercaseUrls">true</patch:attribute>
      </add>
      </providers>
    </linkManager>
  </sitecore>
</configuration>
now becomes more elegant:
<configuration xmlns:patch="http://www.sitecore.net/xmlconfig/">
  <sitecore>
    <links>
      <urlBuilder>
        <languageEmbedding>never</languageEmbedding>
        <lowercaseUrls>true</lowercaseUrls>
      </urlBuilder>
    </links>
  </sitecore>
</configuration>
Read more about LinkManager changes to link generation in 9.3 (by Volodymyr Hil).
14. Caching changes
The solution I was upgrading had a publish:end event configuration to do HTML Cache clearing for different site instances:
<events>
  <event name="publish:end">
    <handler type="Sitecore.Publishing.HtmlCacheClearer, Sitecore.Kernel" method="ClearCache">
      <sites hint="list">
        <site hint="apple">apple</site>
      </sites>
    </handler>
  </event>
  <event name="publish:end:remote">
    <handler type="Sitecore.Publishing.HtmlCacheClearer, Sitecore.Kernel" method="ClearCache">
      <sites hint="list">
        <site hint="apple">apple</site>
      </sites>
    </handler>
  </event>
</events>
Since 9.3 such behavior became default after a publish. It actually works the other way around now – you have to actually disable HTML cache clearing explicitly if you need to.
The previous code will break, and you have to remove that whole section.
<site name="apple" cacheHtml="true" preventHtmlCacheClear="true" … />
15. Forms
WebForms For Marketers, one of the most questionable modules, was deprecated in Sitecore 9.1 in favor of built-in Sitecore Experience Forms. That also raised questions on how to keep the data and migrate the existing forms while performing platform upgrades.
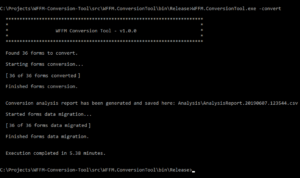
Thankfully there is a tool to do exactly that: convert WFFM forms and data to Sitecore Forms. WFFM Conversion Tool (by Alessandro Faniuolo) is a console application that provides an automated solution to convert and migrate Sitecore Web Forms For Marketers (WFFM) forms items and their data to Sitecore Forms. It takes WFFM data from a SQL or MongoDB database as a source into the destination – Sitecore Experience Forms SQL database.
16. Support Patches & Hotfixes
![Hotfix[1]](https://blogs.perficient.com/files/hotfix1-300x291.png) You will likely come across some hotfixes or support patches applied to your solution over time. Sitecore Support addresses issues by providing support DLLs and releasing hotfixes. Some real-life examples of how these libraries look like:
You will likely come across some hotfixes or support patches applied to your solution over time. Sitecore Support addresses issues by providing support DLLs and releasing hotfixes. Some real-life examples of how these libraries look like:
- Sitecore.Support.131168.dll
- Sitecore.Support.137437.dll
- Sitecore.Support.137437.dll
Each of them addressed an issue for the old version of Sitecore. You need to investigate if that issue was resolved in the version you’re upgrading to. Use this 6-digit support code to find more details by using a search at Sitecore Knowledge Base website.
When it comes to hotfixes when they keep the original name of DLL they replace, the knowledge base code could be found in the file properties dialog.
If the issue was resolved before the target version of Sitecore you are upgrading to, you may remove those along with any related configuration. This post is aimed at giving an idea of how we can identify if we have hotfix DLLs within Sitecore \bin folder so that we could approach them individually.
17. Deprecated Sitecore DLLs and removed API
When jumping up through a big number of versions, you definitely face lots of Sitecore DLLs and APIs being deprecated.
There are a few examples of removed DLLs below:
- Sitecore.NVelocity
- Sitecore.Abstractions
- Sitecore.Analytics.Outcome
- Sitecore.ContentSearch.Analytics
- Sitecore.ExperienceExplorer.Business
Sometimes deprecation takes some particular API off the kernel, for example, these classes:
Sitecore.Data.Serialization.ManagerSitecore.Jobs.Job and Sitecore.Jobs.JobOptions
Sadly, deprecation will require you either to rewrite the code that consumes those APIs or eliminate the entire business feature that relies on deprecation. The best strategy to deal with similar cases is to refer to a Release Notes section of a particular Sitecore version for more details. Typically, there is some sort of advice on why deprecation took place and what would be the substitute.
18. SXA
SXA is not an integral part of the platform and it has its own upgrade guidance released along with each version. So, I will only touch on it briefly.
As it is valid for the rest of the Sitecore platforms, most of the SXA changes took place with the 9.3 release. As for me, the biggest change was NVelocity deprecation from 9.3 in favor of Scriban templates, which affects Rendering Variants – one of the most powerful features of SXA.
Also, since that version, it has a version parity with its holding XP or XM platforms.
Read more:
- New in SXA 9.3: Scriban Templates
- How to migrate NVelocity Extensions to Scriban
- Adventures with Scriban and Sitecore SXA
19. Sitecore Search
Both Lucene and Azure Search became obsolete and removed. With Sitecore 10, Solr became the recommended technology to manage all of the search infrastructure and indices for Sitecore. Managed Solr allows your developers to implement faster, and spend more time focused on building a better search experience and less time supporting search infrastructure.
Please migrate your solution, keep in mind that it might take significant effort.
Consider using SearchStax which takes from you the pain of installation, failover, security, maintenance, and scale. SearchStax provides solutions to teams for the most challenging issues for developing with Solr.

There are also a few commonly met issues while upgrading Solr. Sometimes you can come across the case of core name mismatching index name. This is a fairly simple issue and could be fixed with a config patch:
<configuration>
  <indexes>
    <index id="sitecore_testing_index">
      <param desc="core">$(id)</param>
    </index>
  </indexes>
</configuration>
The second issue relates to a configuration that defines Solr index. If you are indexing all fields – that must be wrapped with documentOptions tag of the correct type:
<defaultSolrIndexConfiguration>
  <documentOptions type="Sitecore.ContentSearch.SolrProvider.SolrDocumentBuilderOptions, Sitecore.ContentSearch.SolrProvider">
    <indexAllFields>true</indexAllFields>
  </documentOptions>
</defaultSolrIndexConfiguration>
20. Custom Content Databases
Custom Sitecore databases now require a Blob Storage setting and you have to append Blob Storage for all the custom databases you are using, in a similar manner as that is configured for those databases coming out of the box.
21. Upgrading xDB and analytics
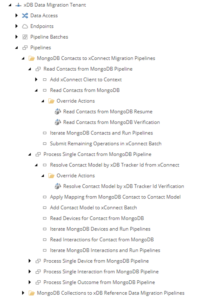 After the introduction of xConnect, there was a question on what to do with all existing analytics data from MongoDB upgrading it to 9.x or 10.x. To address that Sitecore created a tool called the xDB Migration Tool which does the following:
- Converts and migrates data from xDB 8.x up to 10.0
- Functions on top of Data Exchange Framework
- Reads from MongoDB, and writes to the xConnect server
- Works asynchronously
- Features optional Verification feature to track xConnect submissions
Keep in mind if you have years of data on production, you can be looking at gigabytes of data migration. Be sure to take the appropriate
precautions, like preventing regular app pool recycles, as the process can take days. If possible, discuss trimming the MongoDB data, or not importing it at all if it’s not used. This tool uses a custom collection model to be deployed to both xConnect service and the xConnect indexer service. After rebuilding the xDB search index you will get the data in the Experience Profile.
An optional Verification feature is in fact a standalone database that gets a record of each entity being submitted to xConnect.
You can get the latest xDB Data Migration Tool 5.0.0.
Overall, upgrading a Sitecore codebase from version 8 to 10 can be a challenging process, but with careful planning and execution, it can be done successfully. I believe all the above are the most important changes you should consider while upgrading a codebase as a part of a platform upgrade initiative. In our next chapter, we’ll deep-dive into the important changes that came into play with the introduction of Sitecore 10.x versions.