Introduction
There was a time in a not so distant past, shopping means, it was all about planning which weekend to go, and in the name of shopping, people spend at least 3 to 4 hours minimum which includes going to restaurants as well. But now, Amazon and Flipkart are what we think about shopping, Swiggy and Zomato are what we think for food. How did the online retailers able to achieve this? How did they pull the rabbit out of the magic hat? The answer is Cloud!
Every single day over 2.5 quintillion bytes of data are getting created. We create more data than the air we breathe in a single day!!! Data that we create in the grid knowingly or unknowingly tells more about us than we know. These data are raw power, you need a proper vessel or proper weapon to contain it and use it efficiently. Cloud is that vessel! Cloud is that weapon! Cloud is the key! Which can unlock the raw power of the data and use them for wonders? Online Retailers use cloud to see the patterns and insights in the data. With its data analytics capabilities, it helps them to understand what product an individual might be interested in. With its scalability, the evolving needs of the customers can be met. So, basically, Cloud is the magic wand that is waved to unlock the power of the data and pull the rabbit out of the magic hat.
The best and the significant part of the cloud above all others is, you don’t have to maintain this weapon. You don’t have to allocate space for this weapon. Everything will be maintained by someone else. You just use it when you need it. Amazing isn’t it?! Who will say no to this power?!
Connector in Informatica Cloud
If you are an Informatica ETL developer, connecting to Oracle, Sybase, SQL Server, DB2, and even Mainframe is common. Almost every ETL developer create the connections for the mentioned systems day in and day out. Doing the same thing using the Informatica cloud will not be interesting. There is nothing new in that. Therefore, I am creating this blog on how to create a connector in the Informatica cloud to use Twitter, one of the famous social media apps as the source. The contents of this blog will be the stepping stone for my upcoming blogs on things that we can achieve via Informatica Cloud.
Creation of Twitter Developer App
Pre-requisites
Please make sure that you set up all the below tools and software to seamlessly extract practical knowledge on this blog.
- Informatica Cloud Secure Agent
- Informatica account for accessing Informatica Cloud – Free Trial (1 month available)
- Twitter Account
Step by Step Process
Step 1: Login into the Twitter Developer portal and register for free account creation. For the purpose of implementing this blog, the twitter username created is ‘Niv’.
Link: https://developer.twitter.com/

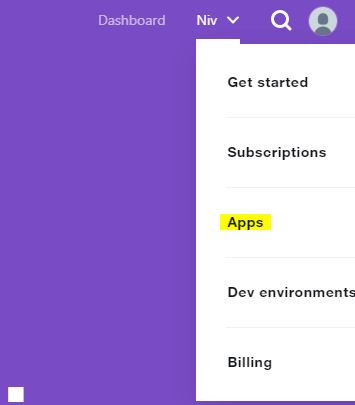
Step 2: On the right-hand side, under the created username ‘Niv’, the below options will be displayed. Click the option Apps as highlighted below.
Step 3: As before, on the right-hand side, the option for App creation is available as highlighted in yellow. Click this option for proceeding to App creation.

Step 4: During App creation, the below information listed is all required to be filled in. Other than these columns, the rest of the information are not needed to be filled for implementing this blog. These 4 fields alone are mandatory.
- App Name
- Application Description
- Website URL
- Tell us how this app will be used


For the purpose of this blog, the 4 fields were filled as such.
- App Name -> Tw_Test14
- Application Description -> App to form a connection between Informatica Cloud and Twitter for data analysis.
- Website URL -> https://twitter.com/
- Tell us how this app will be used -> The purpose of this app is to fetch twitter data via Informatica Cloud.
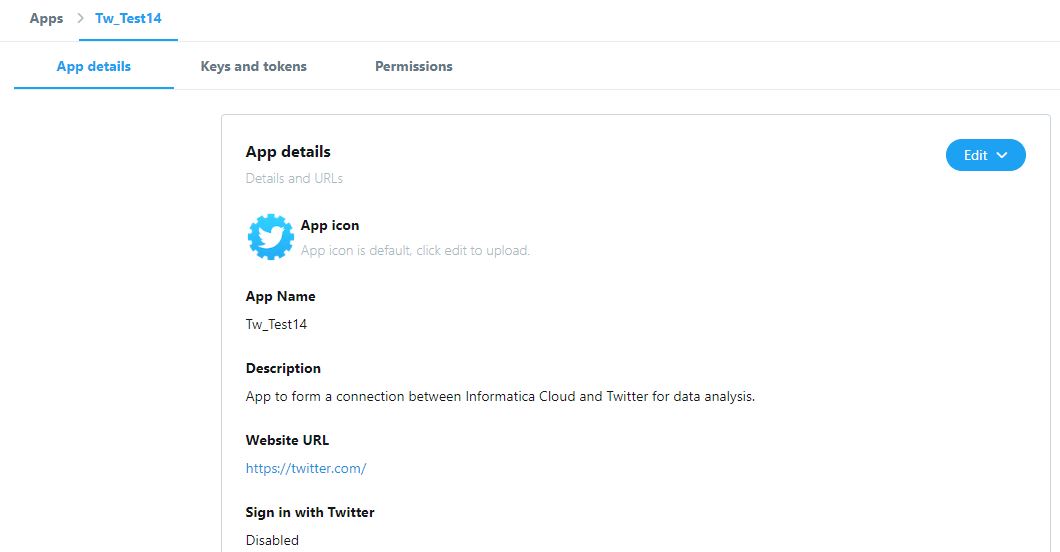
Step 5: Once the app has been created, three tabs are available for display as displayed in the preceding image.
- App Details
- Keys and Tokens
- Permissions
Along these, the tab Keys and Tokens are the most vital information, required for Twitter Connector Creation in IC.
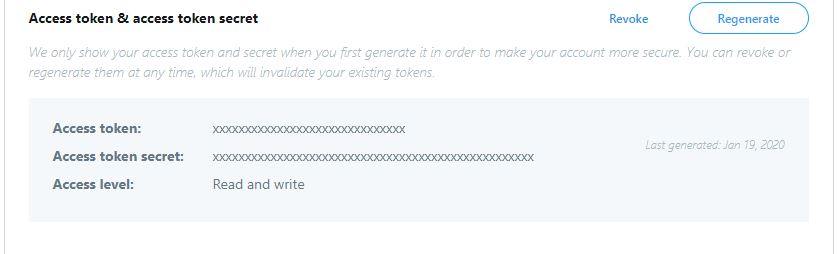
Under Keys and Tokens, two types of keys will be available.
- Consumer API Keys
- Access token and Access token secret

Consumer API Keys will be displayed as they are, whereas Access token and Access token secret are hidden after the first time of app creation. Therefore, it will be best to copy the access token and access token secret as soon as the app has been created. These two types of keys are mandatory for Twitter Connector creation in IC.
Creation of Twitter Connector
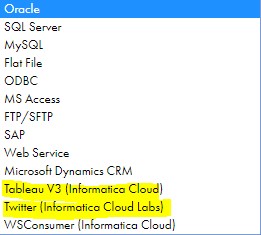
In IC, by default, the below-listed connectors are alone available after IC registration, except for the highlighted ones. Apart from these, the rest of the connectors along with Twitter and Tableau requires separate installation. Prior to creating the twitter connector, make sure to install Twitter Connection in IC.
Step by Step Process
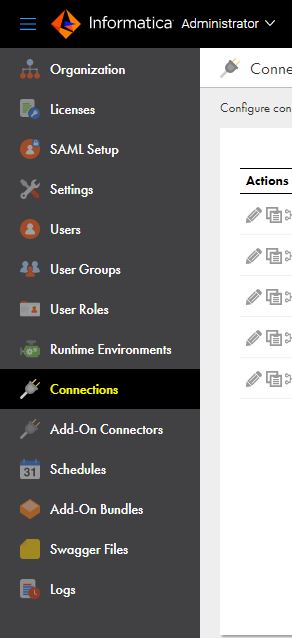
Step 1: Login into the IC portal and click open the ‘Administrator’ service.

Informatica – Login

Informatica – Administrator
Then inside the Administrator, multiple options will be displayed on the left-hand side of the portal. Under these, click the option ‘Connections’ as highlighted in yellow.
Step 2: Inside the Connections tab, a green-colored icon in the right-top corner displays the option ‘New connection’.
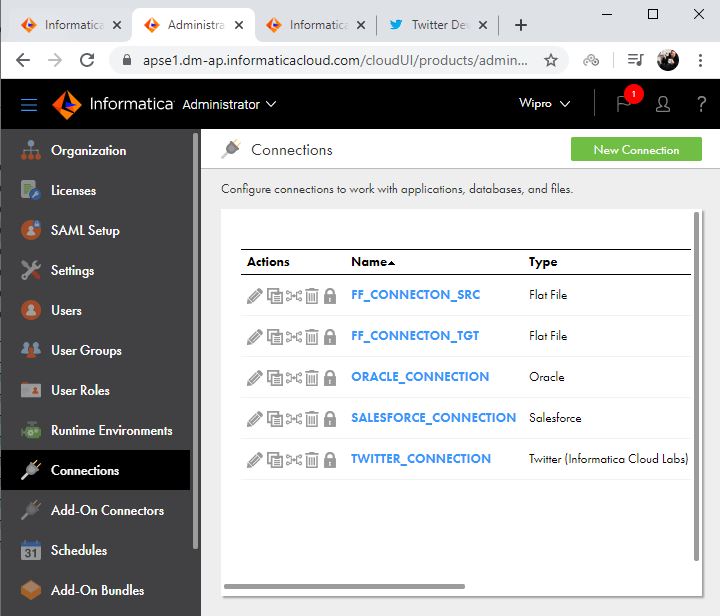
Step 3: In the new connections tab, enter the Connections Name and select the connections type as Twitter (Informatica Cloud Labs).
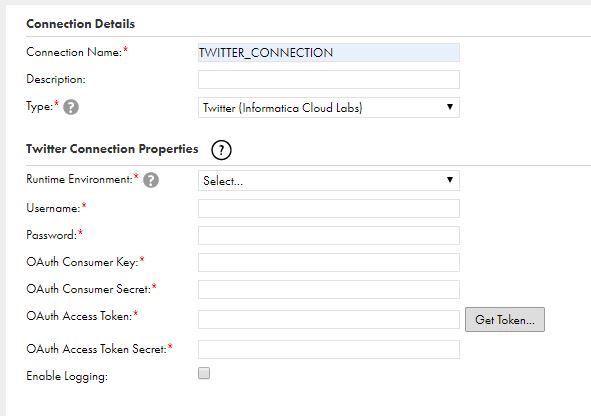
Fill in the Twitter Connection Properties as below.
- Runtime Environment -> Select the created Secure agent
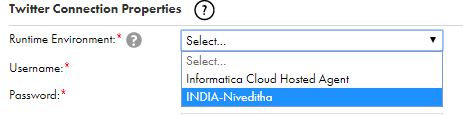
- Username and Password -> Enter the created Twitter Username and password.
- OAuth Consumer Key -> Enter the Consumer API key from the Twitter App
- OAuth Consumer Secret -> Enter the Consumer API Secret key from the Twitter App
- OAuth Access Token -> Enter the Access token from the Twitter App
- OAuth Access Token Secret -> Enter the Access token secret from the Twitter App
Step 4: After entering the information, finally test the connection. If the connection is successful, the below text is displayed ‘The test for this connection was successful’ as highlighted below.
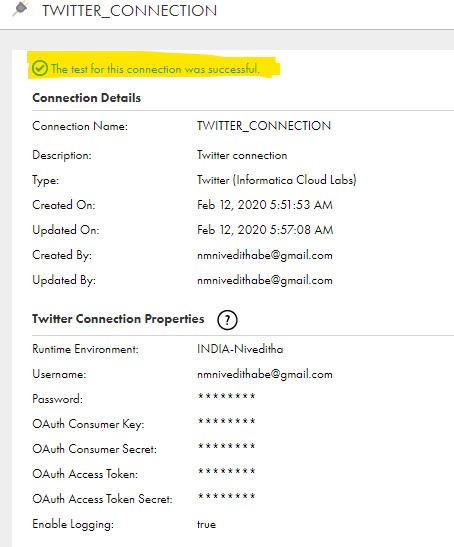
With this, we are concluding the Twitter source connection creation in Informatica cloud. In the next blog, we can concentrate more on implementing a real-time use case in Informatica cloud.
HI Niveditha,
This document is really helpful. I am facing below issue while running IICS job. Did you face this issue before?
[ERROR] Exception occured in Read operation: Filter value is Mandatory for Reading Tweets
Hello Varun,
While reading from Tweets, addition of filter is mandatory. While configuring the source object (Tweets), filter needs to be added under Query Options. Please let me know if this answers your question.