
Earlier this year Amazon announced Connect, a new contact center service available within AWS. Amazon Connect offers the ability to set up a cloud based call center and start routing calls within minutes. Making use of configurable hours of operation, queue capacity settings and custom routing profiles Connect makes it easy to ensure callers will be quickly sent to the right agent. On the other hand, in case the call center is closed or no agents are available callers can be routed to a voicemail or transferred to a preconfigured phone number.
However, sometimes simply routing a call to voicemail is not enough, especially for a time sensitive emergency. Luckily, as this post will show you, AWS integration makes it easy to expand on Connect’s out of the box alerting capabilities and set up an automated text alert.
Set-up
In order to set everything up we will make use of the following services. If you want to follow along please make sure you have the appropriate permissions for your AWS instance or make use of a new free-tier account.
- An SNS topic with appropriate subscribers. This will be the list of agents who will receive an alert.
- A Lambda function that will handle publishing a message to the SNS topic. This post uses Python 2.7, but the code can be easily converted to Python 3.6 or Node.js.
- A custom Connect contact flow that will invoke the Lambda function when appropriate. Connect contact flows will be covered in more detail in a second post.
Creating the SNS topic
Amazon’s simple notification service (SNS) is a web service that handles the delivery of messages to subscribing endpoints. It can handle numerous protocols, including SMS and can be used to send messages to an entire distribution list using SNS topics.
To get started, navigate to the SNS service within your Amazon dashboard and create a new topic. Enter an appropriate topic name and make sure you enter a display name. This is a requirement for text messages and will appear before the body of the SMS in the format “Display name> body of text”. I recommend using something like “Connect” or “Alert”, just keep in mind the display name can only be 10 characters.

Once the topic is created you will be brought to a new screen where you can create a subscription.
Note the Topic ARN as we will use it in the next step, select SMS as the protocol and enter the desired phone number as the endpoint.
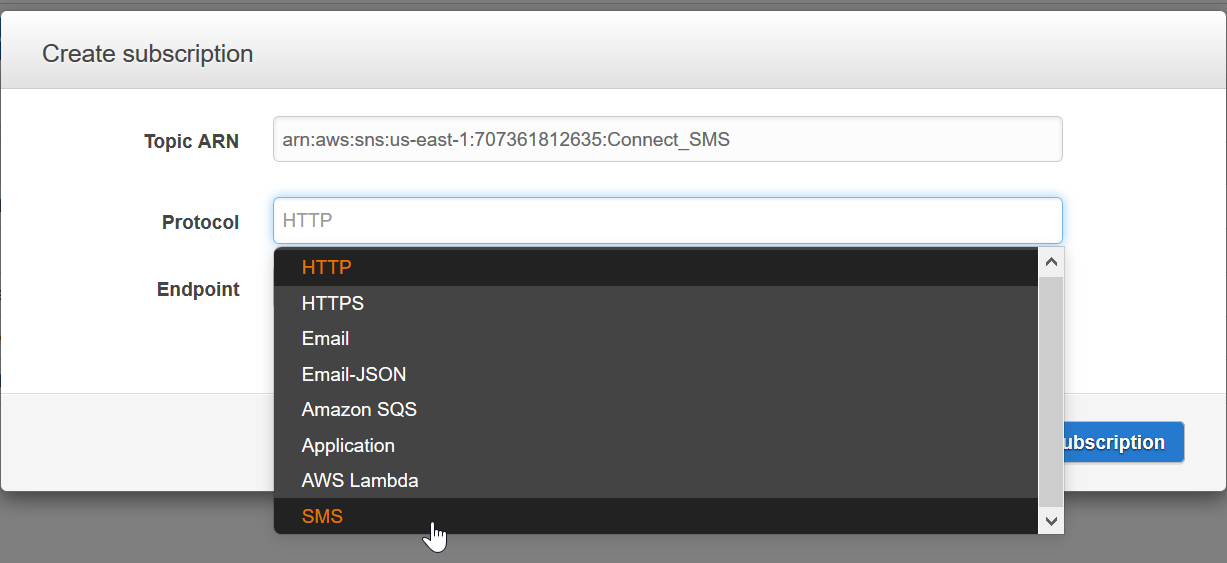
You can add more phone numbers by using the “Actions->Subscribe to topic” menu or going directly to the Subscriptions section and using the Topic ARN.
Now that we have a list of subscribers we can look at the Lambda function that will publish the text message.
Setting up the Lambda function
Before we can write the actual function code, we need to make sure it will be allowed to publish a message to the SNS topic we just created. If you already have a role that allows Lambda to interact with SNS feel free to skip this section.
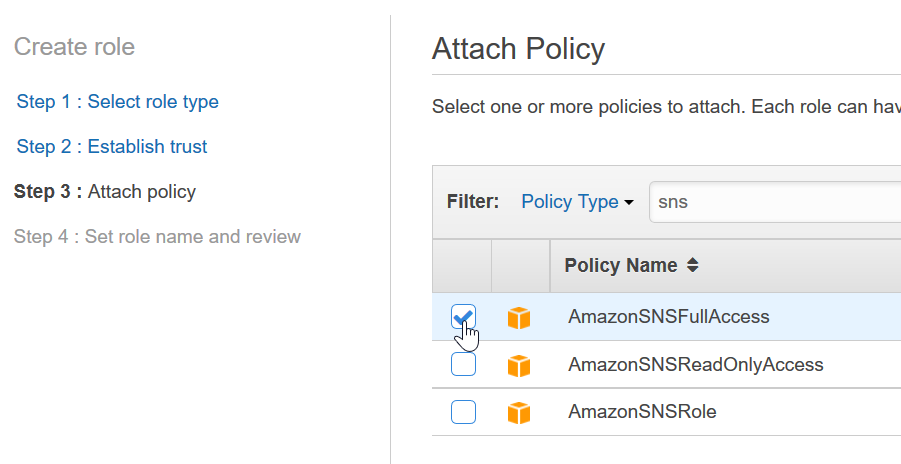
Navigate to IAM within the AWS dashboard and select Roles from the left hand menu. Create a new role and select AWS Lambda as role type.


Attach the AmazonSNSFullAccess policy and name the new role something appropriate. We will use this role in the next step to let AWS know that our function is allowed to access SNS resources and can trigger a message.
Creating the Lambda function
Lambda allows custom code to run at almost any time without having to worry about provisioning servers. This allows you to easily set up a function that will receive an input from Connect and in turn send a message to SNS which will handle the actual distribution based on the subscriptions you have set up previously.
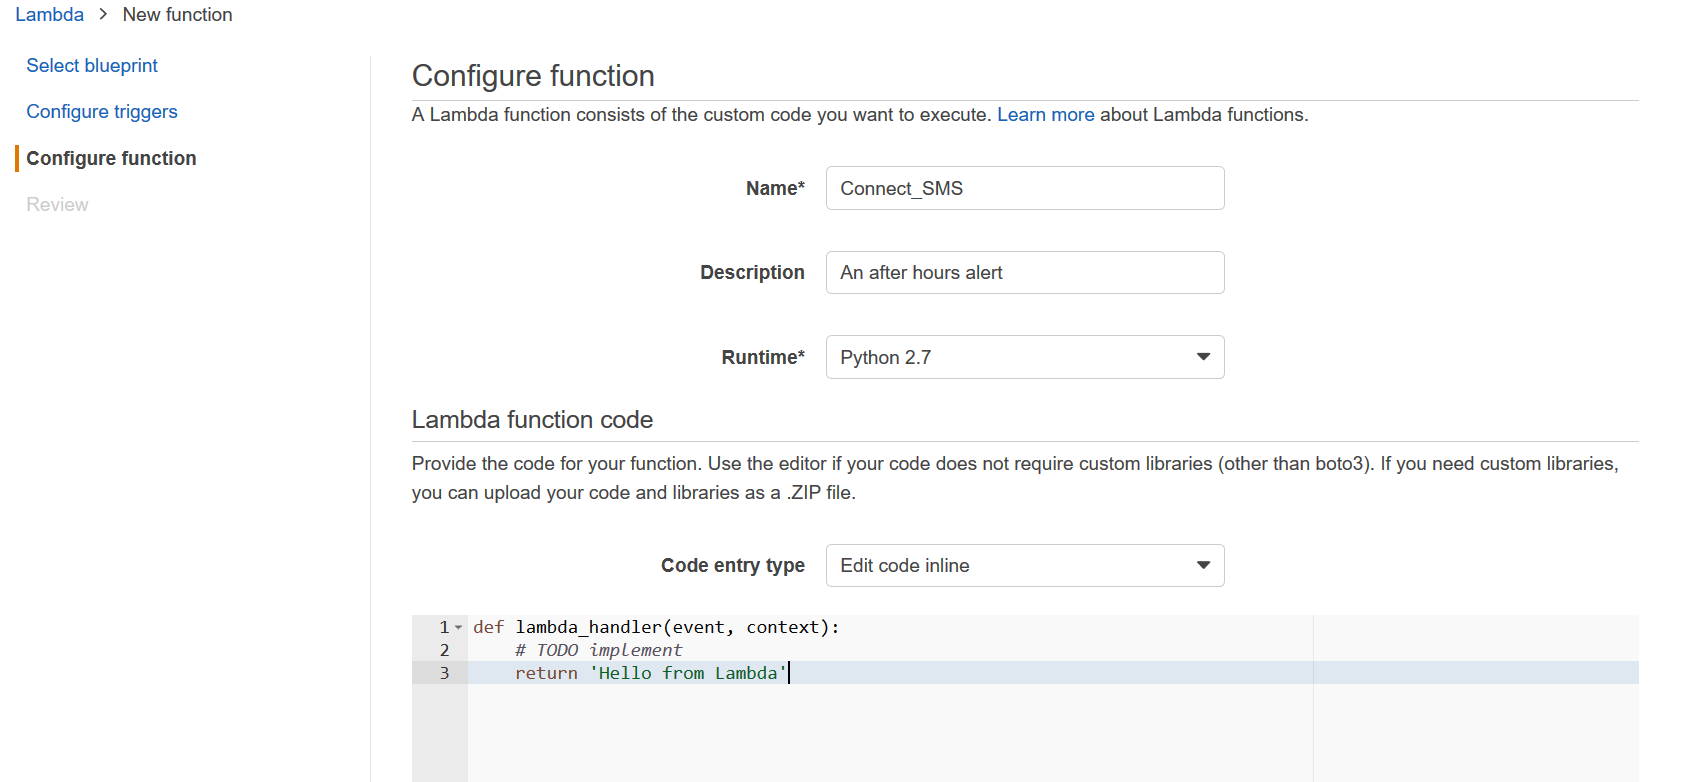
To get started navigate to the Lambda console and create a new function. From the blueprints provided select “Blank Function”.
![]()
The next screen will allow you to configure triggers for the Lambda function, however since we will call it directly from Connect you can simply click next.
On the configure screen enter a name for your function and add a description. The run-time will be Python 2.7 and since the function will have no external dependencies you can select the “Edit code inline” option.
Inside the code edit window delete the sample code within the lambda_handler and import the following two libraries.
import boto3
import os
Boto3 is the Amazon Web Services (AWS) SDK for Python and is needed in order to access other AWS services. The OS library will allow access to environment variables. We will make use of such an environment variable to store the topic our function will send messages to. Add the following line of code inside your handler
topic_arn = os.environ['TOPIC']
Make sure you also add a “TOPIC” variable in the environment variables section underneath the code editor and enter the SNS topic ARN from the previous step.

The actual body of the message to be sent can be hard coded into the function, but using a parameter passed into Lambda by Connect is recommended. This will allow you to easily modify the contents of your SMS and even send out additional information collected from the call center, like the caller’s phone number.
To understand how this will work here is an example of what the Lambda function will receive from Connect when invoked. The Parameters section will contain any custom variables you create within the call flow.
{
  "Details": {
    "ContactData": {
      "Attributes": {},
      "Channel": "VOICE",
      "ContactId": "",
     "CustomerEndpoint": {
        "Address": "1234567890",
        "Type": "TELEPHONE_NUMBER"
      },
      "InitialContactId": "",
      "InitiationMethod": "INBOUND",
      "InstanceARN": "",
      "PreviousContactId": "",
      "Queue": null,
      "SystemEndpoint": {
        "Address": "1234567890",
        "Type": "TELEPHONE_NUMBER"
      }
    },
    "Parameters": {}
  },
  "Name": "ContactFlowEvent"
}
Go ahead and add the following within your handler.
msg = event['Details']['Parameters']['message']
This will tell your function to select the parameter “message” from the details section of the information it received. You can of course name this variable something else, just make sure to save it properly within your contact flow.
With all variables declared, the final step is to create a new SNS client and actually publish the text message. Add the following two lines to your handler in order to do this.
client = boto3.client('sns')
client.publish(TopicArn = topic_arn, Message = msg)
For more details on what is possible using the Boto library please review the official documentation .
At this point your complete function should look similar to this:
import boto3
import os

def lambda_handler(event, context):
topic_arn = os.environ['TOPIC']
msg = event['Details']['Parameters']['message']
client = boto3.client('sns')
client.publish(TopicArn = topic_arn, Message = msg)
Under the Lambda function handler and role section select “Choose an existing role” and select a role that will allow Lambda access to SNS.

You can now save the function and test it. You can use the JSON example provided above to test, simply add the variable “message” to you Parameters.
"Parameters": {
 "message": "Testing SMS"
 }
Once triggered your topic subscribers should all receive a text, otherwise you will see an error message in the Log Output area.
Finally, there are some permissions that must be set on the Lambda function which will allow Amazon Connect to invoke it. To set these permissions you’ll need to use the AWS CLI. You can follow these instructions to get started with the AWS CLI: http://docs.aws.amazon.com/cli/latest/userguide/awscli-install-windows.html
After you have the CLI installed and configured, running the following command will set a policy that lets Amazon Connect invoke our Lambda function (make sure to update the function with your amazon account ID, which can be found on the AWS dashboard:
aws lambda add-permission --region us-east-1 --function-name function:Send_alert --statement-id 1 --principal connect.amazonaws.com --action lambda:InvokeFunction --source-account %YourAmazonAccountId%
You are now ready to build the Connect contact flow which will be covered in a second post. To talk to our experts about our Amazon Connect solutions, email Craig Reishus.