
In this article, we’re going to explore how to deploy an AWS serverless infrastructure capable of storing and releasing data through typical actions (transcription, call recording, sending SMS through messaging services, etc.) taken in Twilio.
Twilio’s Role in AWS
Twilio, in a nutshell, provides a solution for contact centers that need to leverage caller information to make informed business decisions based on the insight collected from that data. To make client service more efficient, not only does Twilio provide automated SMS and voice capability, but it also provides the following:
- metric data related to call volume
- support for enterprise marketing campaigns via messaging services
- execution of repetitive tasks that would otherwise have to be completed by an agent
Twilio even offers third-party services such as SendGrid, Twilio Segment, ZipWhip, and more!
How Do We Use AWS with Twilio?
It’s actually pretty simple when we leverage the power of the AWS CDK, or Amazon Web Services Cloud Development Kit.
Essentially, the AWS CDK is a service that uses ordinary code to build the infrastructure you need to develop full-stack applications. Traditionally, you would’ve needed to create something called a YAML template, which would tell your AWS instance which resources to deploy and how to deploy them.
The problem with this is that learning how to create YAML has a very steep learning curve, is very verbose in terms of writing code, and the slightest mistake in spacing could crash your whole application. (but Jimmie, what’s the big deal about fixing a tiny error? Well usually, a YAML template tends to be incredibly long so you will spend a lot of time trying to find the incorrect indenture) This is where AWS CDK comes in, and all we have to do is pick a language we’re comfortable with, install CDK in our Integrated Development Environment (IDE), write the code, and AWS will do the rest!
But, for the time being, we’re going to create an AWS infrastructure that supports our Twilio instance, making it totally serverless and quick. The first thing we need to do is make sure we have the AWS CDK installed on our machine. If you have an IDE already installed, great! You can run this command in your terminal:
npm install aws
npm install aws-cdk-lib
This will install the dependency in your package.json file. If you’ve never used AWS in your IDE before, you’ll need to configure it to use your account.
Create a User with Admin Privileges
For this, I would highly recommend creating a user in AWS with Admin privileges, rather than using the root account. If you already have an AWS Account, follow these steps:
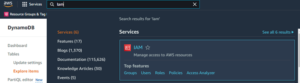
- Log into your root AWS account and navigate to the IAM services in your search bar:
2. Navigate to Users and click Add users in the top right-hand of the screen:

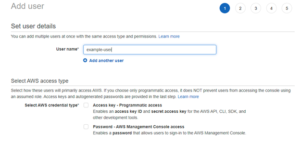
3. Create a username, select Access Key – Programmatic Access and click Next:
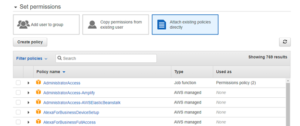
4. From here, you can select AdministratorAccess for the sake of this example. If you already have a group setup in IAM with Admin privileges, you can just assign them to that group:
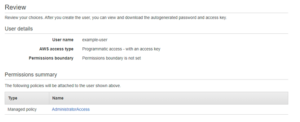
5. Then you can skip past the tags section as we won’t be needing it. You should then end up at the Review screen where you can finalize the creation of your user:
6. Once your user is successfully created, you will be able to download your credentials for safe keeping.
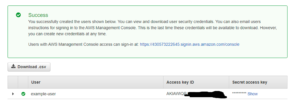
NOTE: I recommend you download your credentials and keep them somewhere safe because you will not be able to go back to this page once you leave. You will need the Access Key and the Secret to configure your CDK.
Now that we have that done, let’s hop into our IDE!
Tracking Your Profile in AWS
After you’ve created a folder to store your new CDK project, you want to configure it to track your profile. To do this, we run this command:
- aws configure –profile <PROFILE_NAME>
So in this case it would be:
- aws configure –profile example-user
It will prompt you for your Access Key and Secret in a screen that looks like this:

Simply enter your Access Key and Secret and hit the Enter key. If you don’t know what region you’re working out of, that’s okay, just keep hitting the Enter key.
That should do it! If you want to make sure that your profile is configured correctly, you can run this command:
- aws sts get-caller-identity
This should return information to the console about your configured profile (profile name, Access Key, and Secret), but if it isn’t configured correctly, it will return an error.
Folder and File Setup
When everything is set up, you will need to create a new folder and name it whatever you want. Within that folder, you will need to run the following command in your terminal:
- cdk init app –language typescript
Basically, all you’re doing here is telling AWS to deploy a starter application in this folder with the JavaScript derivative language, TypeScript.
You can create the command with other languages, as well. Just use the command cdk init app –help for more info on what languages you can use.
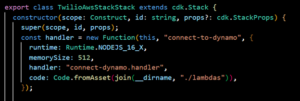
After this, you’ll need to create a Lambdas folder so that AWS can read the stored functions. Note: The stack will not work if the Lambdas folder is not present.
This folder will need to be embedded within the lib folder created when we initialized the project. Inside that Lambdas folder, we’re going to create a file called connect-dynamo.js for example’s sake.
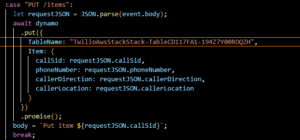
This Lambda will be the mechanism we will use to access our AWS resources. To put it plainly, we’re going to trigger this function every time something happens in Twilio. To avoid being too specific, we’re going to configure our Lambda to connect to a DynamoDB table. The code looks something like this:

Essentially, this code represents a custom API that will be invoked by a specific action happening in Twilio. Now that we have this in our Lambdas folder, we need to reference it somehow in our Typescript file that was created on project initialization.
NOTE: This isn’t the only thing you can do in your Lambda function. As long as you have the AWS SDK installed, you can pretty much use this toolkit to do anything you can imagine.
So now, in our TypeScript file, we can enter this code:
There are couple of things to note about this code:
1. Resources deployed in AWS CDK always contain the following parameters: scope, ID (or resource name), and optional props, which will always be in the form of an object.
2. Notice that we have assigned our function to a variable called handler. This will be important for assigning the Lambda permissions to access resources in our stack.
3. As for our props, we pick our language or runtime. In this case, it is node version 16, and our memory size (could be any number, but 512 is plenty for what we’re doing.). Then, we assign the handler, which is how we point to our function in the Lambda folder. Remember how we named our file connect-dynamo.js? We use that as the prefix to our handler name so the complete name is connect-dynamo.handler. Then finally, we tell the handler which folder to get the function from, which is, yet again, our Lambdas folder. What we’ve done in the code parameter is build the file path that we want our code to run from.
Deploying Our Stack
- After this, we are now free to bootstrap and deploy our stack! We want to run the following commands:
- cdk bootstrap
- This will deploy all your resources and roles in your AWS account. as well as the S3 bucket in which the resources will be kept.
- cdk synth
- This will show you the YAML template in which CloudFormation will be running. It’s good to have this configuration in case you want to edit it in the console later
- cdk deploy
- This command will compile all of your code and deploy it the form of AWS resources. Take a look in your management console to see everything you deployed so far.
- Of course, whenever you make changes to the resources provisioned in your stack (our TypeScript folder), you want to run the cdk deploy command to update and re-deploy the updated version of the stack.
NOTE: If you didn’t change the resources deployed in the application, and only the Lambda functions, you can run cdk deploy –hotswap to update and deploy just the functions. This makes deployment much faster!
Setting Up a Serverless Twilio Project in AWS
Now that we have our basic AWS stack setup, we will need to create a Twilio project within our AWS Stack.
So in our main project folder, we need to create a new folder, and you can name it whatever you want.
- Then we install Twilio:
2. npm install -g twilio
3. Then you can test if it was correctly installed by running:

4. twilio –version
5. It should give you a version number along with the module name. If it didn’t install correctly, it will return an error.
6. Then, within that folder, we want to run the following command to initialize our Twilio project:
7. twilio serverless:init –template=blank <PROJECT_NAME>
8. This command will set up all the files you need to successfully run your Twilio environment, including a functions folder, which will run our code within Twilio, and the .env folder, which will allow us to store our environment variables to use our Twilio Client.
9. For the sake of this example, we will write code that simply invokes a Lambda function via API Gateway.
If you’re unfamiliar with how API Gateway works, it’s a service built into AWS that allows external applications to access AWS resources, such as our Lambda that we’ve deployed.
If you look at the code from our Lambda, this function in particular will access a DynamoDB table that we’ve deployed in our stack (hence the funky name. AWS automatically assigns it a unique identifier on creation). For the sake of brevity, I will put the AWS documentation for programmatically initializing DynamoDB tables here.
Our code looks something like this:
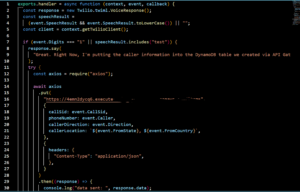
So this is just a simple Twilio function that utilizes the voice client to create a voice response each time our phone number is called. If you’re unfamiliar with how to test your function, we’ll go over it shortly, but in this particular case, when the caller presses 1 after a prompt, the voice client will confirm they pressed 1, and then it will make an Axios call to our API created in the AWS console.
Note: Axios call is what I use to make my HTTP calls. Please feel free to switch this to however you accomplish an HTTP connection. It should work the same way, essentially.
This can be done in the CDK as well, but I find creating the API in the console is easier for those starting out in AWS. That being said, creating your own REST API in AWS CDK will be its own blog post!
Creating a REST API
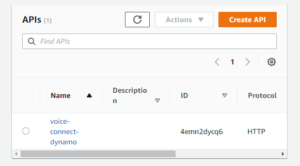
Now we need to create the API in the AWS console to put this all into context:
- First things first, head over to the API Gateway service in your AWS Console:
2. We want to click on Create API in the top right-hand of the page:

3. From here we want to choose HTTP, as this is the easiest, most cost-effective method for accessing our Lambda, which will then access our DynamoDB table:
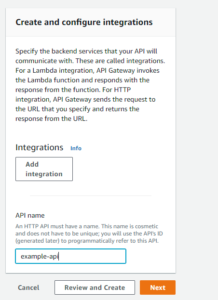
4. Now we give our API a name, and then we can keep hitting Next until we get through to the Review screen:

5. Click Create and we should be good to go!
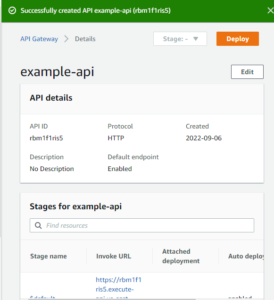
Configuring API Gateway
Now we need to let API Gateway know which Lambda function to look for. So let’s head over to the Integrations tab in API Gateway to configure it to run our function:
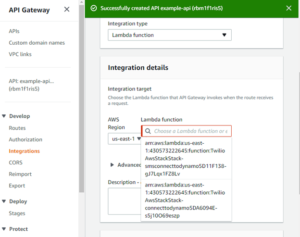
Notice the first Lambda function that pops up when we focus the function input. It’s the very same Lambda we deployed from the CDK. It’ll have the same name, along with a resource number and availability zone attached to it. Now, all we have to do is click Create!
NOTE: Make sure that the invoke permissions box is checked. This ensures that our API Gateway is given adequate permissions to trigger our Lambda function. Without this, API Gateway will not be able to access our Lambda function.
Now we should see something that looks like this:

Adding Routes to and API Resource
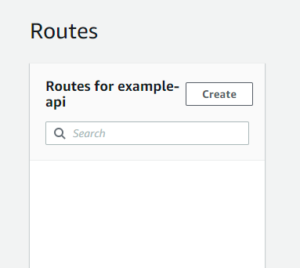
We’ve successfully attached our API Gateway to the correct Lambda. The final step we need to implement is adding routes to our API endpoint to let our Lambda know what actions it should take.
So now, let’s head over to the Routes tab in API Gateway.
- Let’s start by creating a new route by clicking Create:
2. Once we click Create we’ll be taken to this screen where we will be able to choose a method for engaging our API. Like so:
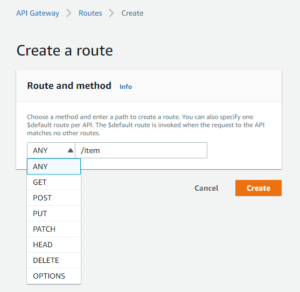
3. In this case, we’re just going to make a PUT request to our DynamoDB table to keep things simple. For our route names, we’re going to refer back to our Lambda function to see how we defined our path names. In this case, it’s items. So we’re going to name our path items and mark it as a PUT request.
(This is the Lambda we created at first)
Our paths should now look like this:
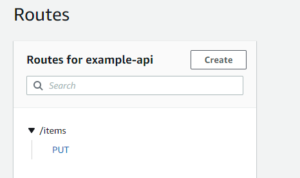
This can be used for any path and any method, but this is the method that corresponds to the paths we’ve built in our Lambda function.
That should do it for connecting our Lambda function to API Gateway, and defining a method as to how it should treat data. Now let’s give it a test in Twilio!
Testing Functions In Twilio
For the final piece of this article, I want to explain how to test your Twilio functions locally. First, you would need to have a Twilio account and a pre-purchased number so that you can assign it to an exposed webhook that can run your logic.
- If you haven’t signed up for a Twilio account yet, you can do it here: https://www.twilio.com/try-twilio.
2. You will also need to buy a phone number in the Numbers section of your Twilio console.
3. After you’ve done that, we need to circle back to the function we have in our IDE.
4. The first thing we need to do is drill all the way down into our project folder, if you’re not there yet, and then we need to run the following command:
twilio serverless:start –live –ngrok=
- What this command will do is create a live URL for you to test in Twilio using ngrok. The –live input blocks caching so that the function will run fresh every time, instead of returning possibly outdated information.
NOTE: If you have a paid ngrok account, you can put something next to –ngrok= so that it uses the same URL every time. This will make your testing process quick and efficient. I recommend it!
A successful command will return something like this:
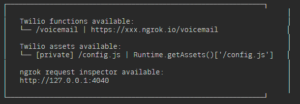
It will output the publicly available URL for you to use!
Now let’s go into the Phone numbers section of our Twilio console and configure it to run our code. Our phone numbers page should look like this:
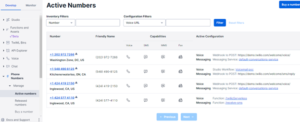
These are all the numbers I have purchased currently, and all I need to do is click one phone number to configure it. It should look like this:
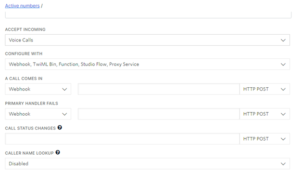
From here, what we want to do is paste our new ngrok URL into the box that says A Call Comes In, and if the dropdown box isn’t already set to Webhook, make sure that option is selected.
Click Save at the bottom of the page to save your changes.
Testing Your Twilio Function
And that should do it. All you have to do now is call your number and see if your Twilio function works as intended. If not, the debugging process begins! Here’s an example of everything that happens once we call our Twilio number and press 1 on the prompt.
This is the text we receive from our Messaging Service:
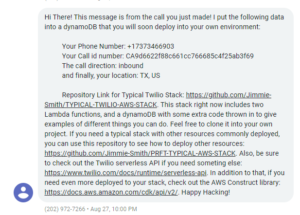
(Yes! The repositories are real. Feel free to visit them for details on how I built this.)
This is the information that was saved to our DynamoDB table from the call made in Twilio:
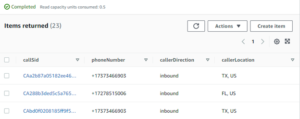
As you can see, we have successfully connected our Lambda function to DynamoDB via API Gateway and passed the information from Twilio to DynamoDB through the defined methods specified in our Lambda Function. Great!
There’s so much more you can do in AWS CDK, but this article gives you a taste of how you can go from setting up servers over a prolonged period of time to writing full-stack contact center programs within the day with the help of Amazon CDK and Twilio. It is Quick, Efficient, Cost-Effective and Totally Serverless. I recommend giving it a try!