We’ve broken down some of the most important email features below so you can start automating emails in Salesforce right away!
Email Templates in Salesforce
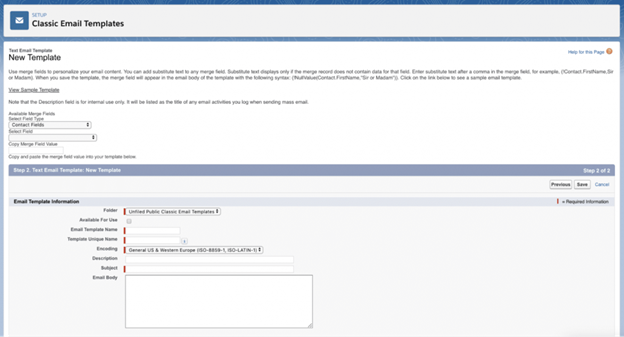
Salesforce email templates are reusable emails that can be linked to various types of automation. When other things happen in Salesforce, such as creating a new Opportunity, your customers or team members will receive these emails. Email templates will save you hours of time writing the same type of email over and over, and they are also simple to set up! 
- Folder. You can choose where you want to save this email template. This is useful for an organization that has a variety of email templates for various purposes.
- Email Template Title. Use a short, clear name that lets others know what your email template is for.
- Unique Template Name. After you enter an Email Template Name, this field will auto-populate. This name must be used if you use this email template in Apex Code elsewhere in Salesforce, such as in a Changeset. You don’t need to be concerned about it right now.
- Encoding. Encoding standards tell your web browser or email client how to read the characters or text in the body of your email. You don’t need to be concerned about it right now.
- Description. Write a clear, concise description so that others understand what your email template is for.
- Subject. This is the email subject that everyone who receives it will see.
- The email body. This is where you write your email message. To create your message, you can use plain text and Merge Fields.
Merge Fields
Merge fields can be used to automatically pull your customer’s unique information from Salesforce and into your email templates. For example, if you wanted to send an email directly to your customers, you would write something like this in the email template:
Dear {!Lead.Name}
Where {!Lead.Name} is the merge field that will be updated with your Lead’s name. Merge fields are fantastic because they allow you to easily customize emails sent to customers, making them feel valued. You can also use merge fields to send the most up-to-date information to your team, ensuring that everyone is on the same page with projects.
Workflow Email Alerts
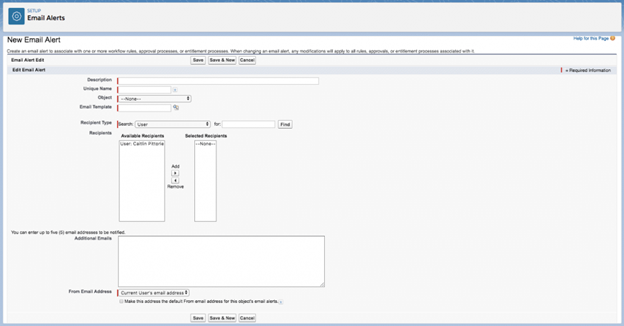
Salesforce Email Alerts allow you to send emails automatically. You can specify the type of person who will receive these email alerts, such as an internal User or Contact, as well as the email template that will be used in this alert. Email alerts can be used to perform actions such as automatically sending emails internally when deals close or sending “Welcome” emails to new Leads. To send an email alert, you must first create a configuration to trigger the rule. This will be discussed further below! 
- Description: Provide a clear and concise description so that others understand what your email alert is for.
- Unique Name: After you enter an Email alert Name, this field will auto-populate. If you use this email alert in Apex Code, you must reference this name.
- Object: Select the object with which you want your email alert to be associated for merge field values in the email as well as possibly where to find information to determine the actual recipient.
- Email Template: Select an Email Template to be associated with your email alert.
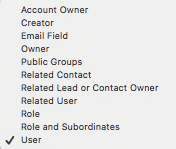
- Recipient Type: Specify how the email recipient will be identified. You can select from the following options:

- From Email Address. From the email address Indicate where the email was sent to the end user.
Send Emails in Salesforce Automatically
Many of your team member’s days are spent writing and sending emails rather than working on projects. With email templates, you relieved your team of the burden of actually writing certain emails. You can now set up emails to be sent automatically based on events in Salesforce using Workflow Rules or Process Builders, allowing your team to focus on more productive tasks.
Workflow Rules
Use Workflow Rules to send emails automatically, saving your team time! When something happens in Salesforce, workflow rules are triggered automatically. Workflow rules, for example, can be triggered when a new Opportunity is created, when a Lead’s status is changed to a specific value, and a variety of other events. Once you’ve written your rule to fire based on an action in Salesforce, you’ll need to link it to your existing email alert. After that, you’ll be ready to send emails automatically in Salesforce!
Process Builders
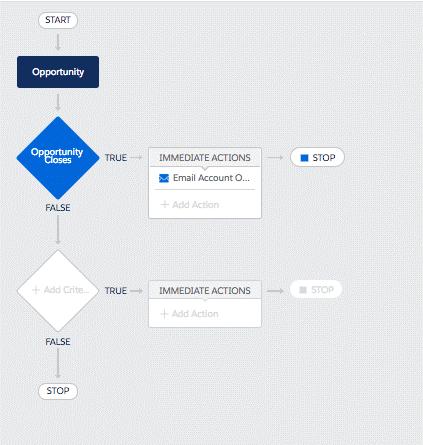
Process Builders are more advanced configurations that can also be used to send email alerts. Process builders provide many more options for triggering an email and can create more complex scenarios than workflow rules. For the time being, if you are new to Salesforce, stick to using workflow rules to send emails. However, once you’re more comfortable with your configuration skills, look into how a process builder can be used to automate emails, allowing your team to focus on more important tasks. 
Email Reports Daily/Weekly/etc.
One last email feature in Salesforce that you may not be aware of is the ability to automatically send Salesforce Reports via email to whomever you want, when you want, and with only the most up-to-date Report information. When you schedule a report to refresh, you are instructing Salesforce to automatically refresh the report so that the information is completely up to date. Then you decide whether you want the updated report to be sent to just yourself or to other Users you specify. Finally, you specify when you want the report emailed to you, such as at the end of the week, two weeks, a month, or another time.
Conclusion:
We know have an understanding of the most important email features below so you can start automating emails.


Thanks for this blog. Really helpful… Waiting for such new and helpful blogs. 🙂