So far in this mini-series, we have covered how to set up the Simple Workflow and how to automatically place newly created items into it. We now need to create a way to limit which Simple Workflow commands are available to users. In this blog post, we will go over the permissions that need to be applied to Sitecore roles to distinguish which users can submit content for approval and which users can approve the submitted content to complete the workflow. For the sake of simplicity, we will create three separate roles: Author, Approver, and Admin. In your tenant, you may already have different role groups you want to use. That is totally okay. If that describes you, simply view my three custom roles as conceptual. You will need to think of a way to fit your existing groups into each of these three groups.
Role 1: Author
We want users in the Author role to be able to edit content and submit their work for approval. However, we do not want them to be able to approve submitted content. When a user in this role locks and edits an item, they should only see the options below in the ribbon:

Note that the Submit option is the custom Submit command we created within the Simple Workflow that moves items in “Draft” status to “Awaiting Approval” status. Once the user submits their content, we do not want them to see the Approve or the Reject commands we created. Their options should look like below:

In order to get ONLY these options for users in the Author role, we must set the access permissions to the Simple Workflow commands in the Security Editor. Once you are in the Security Editor, click on the Columns option in the ribbon. Ensure that the “Workflow State Delete”, “Workflow State Write”, and “Workflow Command Execute” boxes are checked.
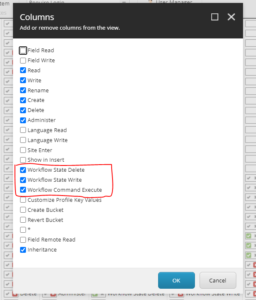
After checking those boxes, ensure you are editing security permissions for the Author role. Then set the permissions to match the screenshot below:

Role 2: Approver
We want users in the Approver role to be able to submit their work for approval and approve submitted content. When a user in this role locks and edits an item, they should see the options below in the ribbon:

Note that users in the Approver role also get access to the Submit and Approve command we created within the Simple Workflow that moves items in “Draft” status to “Approved” status. If a user in this role navigates to an item that has been submitted, they should have access to the Approve and Reject commands like below:

Like before, we will need set the access to the Simple Workflow commands in the Security Editor for the Approver role. Simply update the access permissions as seen below:

Role 3: Admin
The Admin role is not particularly needed to round out our workflow. However, I recommend having some users in some sort of Admin-like role for your content. They should have all the powers an Approver has right out the gate. However, you may want to limit access to various content for the Author and Approver roles. I like to hide technical items that require Sitecore development knowledge from these users and only make them visible to those in the Admin role. With regards to the Simple Workflow, set up the access permissions as seen below:

After setting these permissions, go back to each role and update the access permissions to the appropriate content those users should be able to see.
Workbox
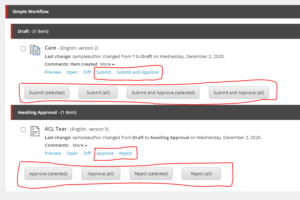
You can also perform the Simple Workflow commands from within the Sitecore Workbox. You can find the Sitecore Workbox in the Sitecore Launchpad. Once you are there, you can see which items are in “Draft” status and which items are in “Awaiting Approval” status. The options that one can perform on an item will match the permissions we set earlier in this blog post. For example, below is a screenshot of what an Approver can see/do in the Sitecore Workbox:
Comments
If you recall from earlier in this mini-series, we set the Default Comment Template and the Default Comment Dialog Height to the values seen below on the Simple Workflow root item:
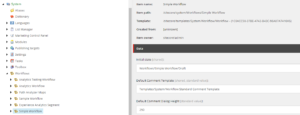
When a user performs a Simple Workflow command, the user will be presented a comment field that they can use to provide reasonings for rejections or various notes. The pop-up will look like the screenshot below regardless if the user performs the Simple Workflow command in the Content Editor or the Workbox:
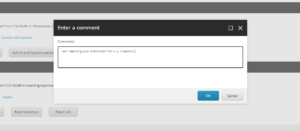
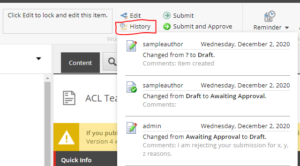
The comments that are submitted on an item can be viewed when clicking on the History option on the item.
Conclusion
Have questions about my mini-series thus far? Feel free to leave a comment below, and I will gladly assist you. This mini-series still has much more to cover. Stay tuned for more posts dealing with version control and speeding up the workflow process for those with the power to approve content!

