
In this blog post, I will guide you through the process of configuring a Jenkins server integrated with essential tools necessary for constructing a robust DevSecOps pipeline. This tutorial is designed for individuals with foundational knowledge of navigating the AWS console.
Prerequisite:
Step1: Jenkin Server Setup on EC instance and installation of Jenkin, Docker, Trivy, Sonarqube, Terraform, AWS CLI, Kubectl.
Install Jenkin
1.1) Launch an EC2 instance with Administrator Access Policy Attached. In my case I have used AMI Ubuntu 22.04 and Instance type T2 Large.
1.2) Install Jenkins, Docker and Trivy tools on EC2 instance we create above. SSH into EC2 instance using SSH client and create a Jenkins.sh script file with below code.
#!/bin/bash
sudo apt update -y
wget -O - https://packages.adoptium.net/artifactory/api/gpg/key/public | tee /etc/apt/keyrings/adoptium.asc
echo "deb [signed-by=/etc/apt/keyrings/adoptium.asc] https://packages.adoptium.net/artifactory/deb $(awk -F= '/^VERSION_CODENAME/{print$2}' /etc/os-release) main" | tee /etc/apt/sources.list.d/adoptium.list
sudo apt update -y
sudo apt install temurin-17-jdk -y
/usr/bin/java --version
curl -fsSL https://pkg.jenkins.io/debian-stable/jenkins.io-2023.key | sudo tee \
                  /usr/share/keyrings/jenkins-keyring.asc > /dev/null
echo deb [signed-by=/usr/share/keyrings/jenkins-keyring.asc] \
                  https://pkg.jenkins.io/debian-stable binary/ | sudo tee \
                              /etc/apt/sources.list.d/jenkins.list > /dev/null
sudo apt-get update -y
sudo apt-get install jenkins -y
sudo systemctl start Jenkins
After creating script.sh file, give the permission for execution and execute the script file. This will install Jenkins into you EC2 instance.
sudo chmod 777 jenkins.sh
sudo su   #move into root and run
./jenkins.sh    # this will installl jenkins
After installing Jenkins, proceed to open inbound port 8080 on your AWS EC2 Security Group, as Jenkins operates on this port. Now, grab your Public IP Address
<EC2 Public IP Address:8080>
sudo cat /var/lib/jenkins/secrets/initialAdminPassword
To proceed, unlock Jenkins using the administrative password and install the recommended plugins.
Jenkins will now install and configure all required libraries.
Create a user, click “Save,” and proceed.
Install Docker
1.3) Execute the below command to install docker on same EC2 instance.
sudo apt-get update
sudo apt-get install docker.io -y
sudo usermod -aG docker $USER   #my case is ubuntu
newgrp docker
sudo chmod 777 /var/run/docker.sock
1.4) After the docker installation, we create a sonarqube container (Remember to add 9000 ports in the security group).
docker run -d --name sonar -p 9000:9000 sonarqube:lts-community
Now our Sonarqube is up and running
![]()
Now grab the public ip of EC2 instance and access the Sonarqube login page on port 9000.
<EC2 Public IP Address:9000>
Enter username and password as admin/admin, click on login and change password.
1.5) Install Trivy, Kubectl,Terraform
Create the one more script file name it script.sh and copy the below script into the file and run it, it will install Terraform, Trivy, Kubectl, AWS cli.
#!/bin/bash
sudo apt-get install wget apt-transport-https gnupg lsb-release -y
wget -qO - https://aquasecurity.github.io/trivy-repo/deb/public.key | gpg --dearmor | sudo tee /usr/share/keyrings/trivy.gpg > /dev/null
echo "deb [signed-by=/usr/share/keyrings/trivy.gpg] https://aquasecurity.github.io/trivy-repo/deb $(lsb_release -sc) main" | sudo tee -a /etc/apt/sources.list.d/trivy.list
sudo apt-get update
sudo apt-get install trivy -y
# Install Terraform
sudo apt install wget -y
wget -O- https://apt.releases.hashicorp.com/gpg | sudo gpg --dearmor -o /usr/share/keyrings/hashicorp-archive-keyring.gpg
echo "deb [signed-by=/usr/share/keyrings/hashicorp-archive-keyring.gpg] https://apt.releases.hashicorp.com $(lsb_release -cs) main" | sudo tee /etc/apt/sources.list.d/hashicorp.list
sudo apt update && sudo apt install terraform
# Install kubectl
sudo apt update
sudo apt install curl -y
curl -LO https://dl.k8s.io/release/$(curl -L -s https://dl.k8s.io/release/stable.txt)/bin/linux/amd64/kubectl
sudo install -o root -g root -m 0755 kubectl /usr/local/bin/kubectl
kubectl version --client
# Install AWS CLI
curl "https://awscli.amazonaws.com/awscli-exe-linux-x86_64.zip" -o "awscliv2.zip"
sudo apt-get install unzip -y
unzip awscliv2.zip
sudo ./aws/install

Give permissions and run script.
sudo chmod 777 script.sh
./script.sh
Next, we will login to Jenkins and start to configure our required tools in Jenkins.
Step2: Install Plugins like JDK, Sonarqube Scanner, NodeJs, OWASP Dependency Check
2.1) Install Plugin
Goto Manage Jenkins -> Plugins -> Available Plugins -> Install below plugins.
| 1. Blue ocean | 8. Docker API |
| 2. Eclipse Temurin Installer | 9. Docker Build step |
| 3. SonarQube Scanner | 10. Owasp Dependency Check |
| 4. NodeJs Plugin | 11. Kubernetes |
| 5. Docker | 12. Kubernetes CLI |
| 6. Docker commons | 13. Kubernetes Client API |
| 7. Docker pipeline | 14. Kubernetes Pipeline DevOps steps |
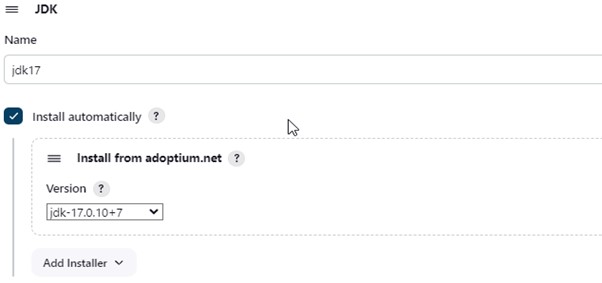
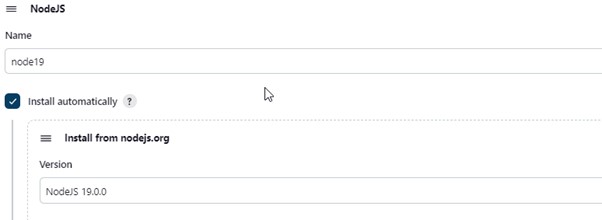
2.2) Configure Java and Nodejs in Global Tool Configuration
Goto Manage Jenkins -> Tools -> Install JDK(17) and NodeJs(19) -> Click on Apply and Save
Grab the Public IP Address of your EC2 Instance, Sonarqube works on Port 9000, so <Public IP>:9000. Goto your Sonarqube Server.
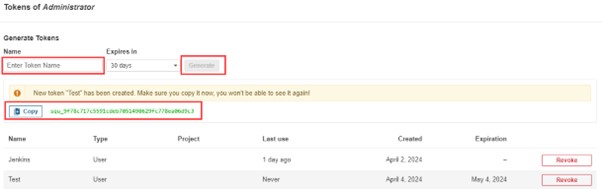
2.3) Click on Administration -> Security -> Users -> Click on Tokens and Update Token -> Give it a name -> and click on Generate Token

Create a token with a name and click on generate. Now copy the generated Token
2.4) Go to Jenkins Dashboard -> Manage Jenkins -> Credentials -> Add Secret Text. It should look like this
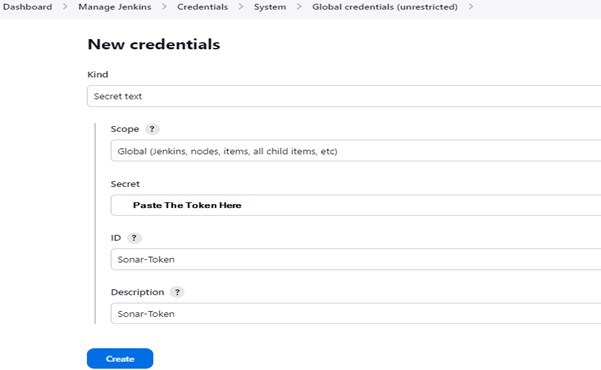
You will see this page once you click on create.

2.5) Now, go to Dashboard -> Manage Jenkins -> System and Add, like the below image.
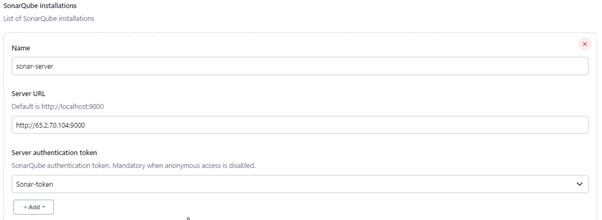
Click on Apply and Save.
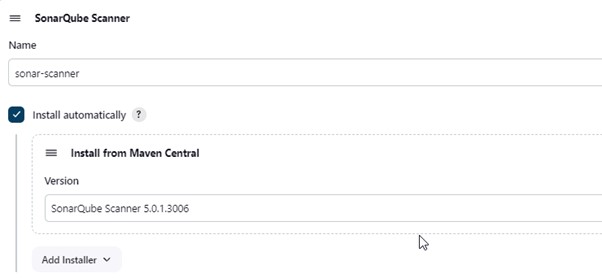
2.6) Now, we will install a sonar scanner in the tools. Goto Manage Jenkins -> Tools -> SonarQube Scanner.
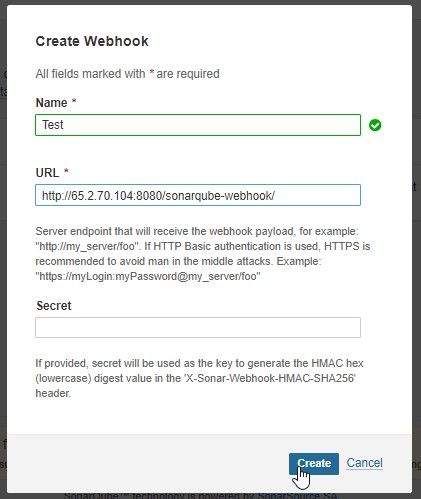
2.7) In the Sonarqube Dashboard add a quality gate also, Administration -> Configuration -> Webhooks -> Click Create
Name: Test
URL : http://<public_ip>:8080/sonarqube-webhook/
To view the report, navigate to the Sonarqube Server and access the Projects section.
Initially, we configured the plugin, followed by setting up the tool.
2.8) Goto Dashboard -> Manage Jenkins -> Tools -> Dependency-Check Installation.
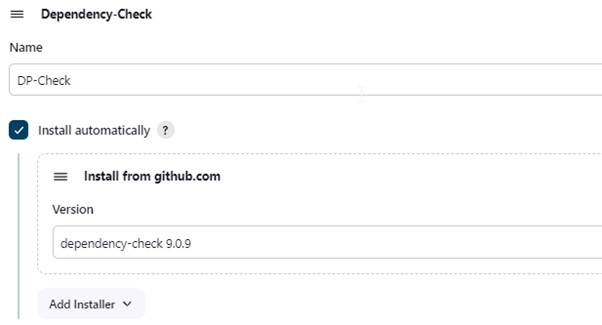
Click on Apply and Save here.
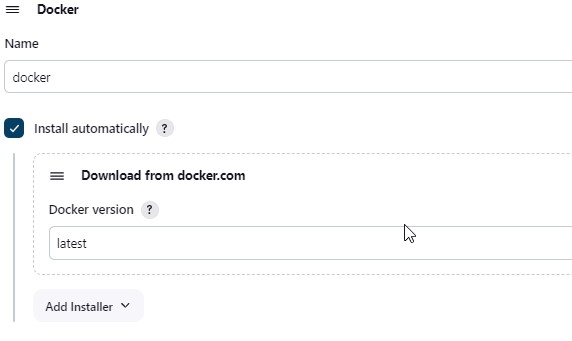
2.9) Now, goto Dashboard -> Manage Jenkins -> Tools -> Docker Installation
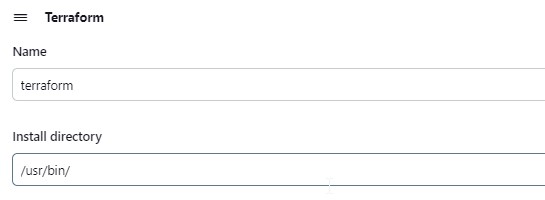
2.10) Tools –> Terraform add this, In Jenkins update the path of terraform installed in EC2 instance using below command.
which terraform
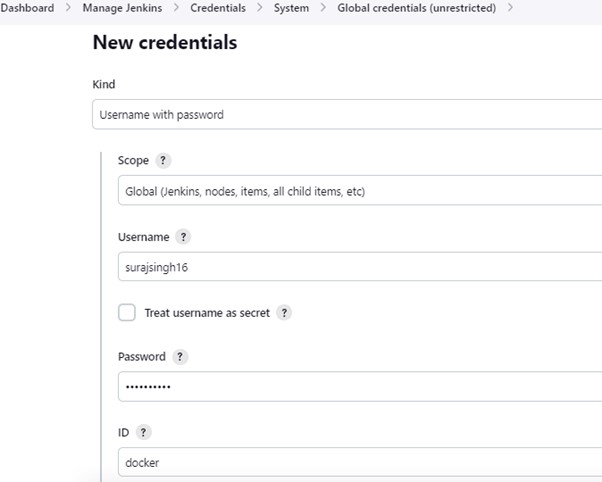
2.11) Go to manage Jenkins –> Credentials
Add DockerHub Username and Password under Global Credentials
With our Jenkins server fully configured, we are prepared to commence the construction of our DevSecOps pipeline for deployment.