
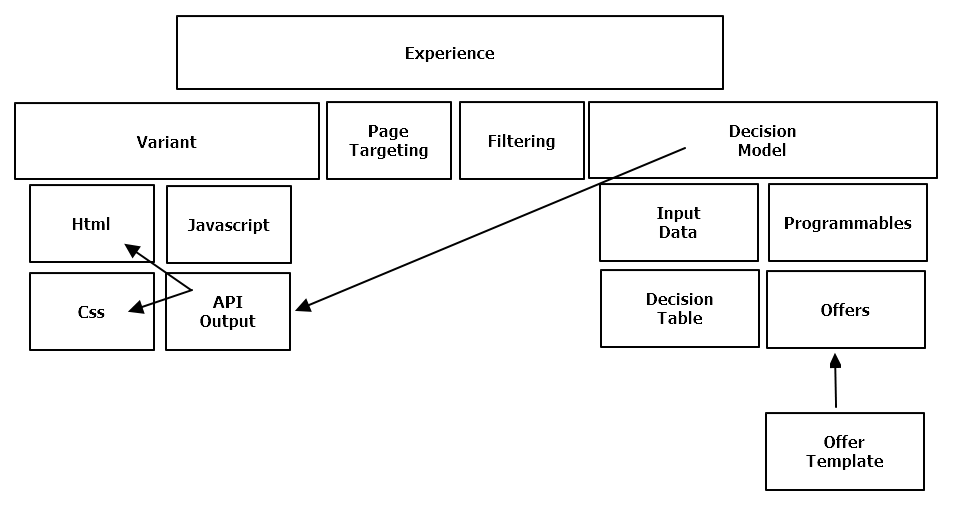
Sitecore Personalize uses a combination of experiences, decision models and offers to personalize content. An experience defines a variant. The variant is used to create the UI for the experience. The decision model uses programmables and decision tables to select an offer. The variant reads data from the offer to populate the UI. By default, Sitecore Personalize expects the variant to have one user experience and for the decision model to return offers that all use the same offer template. But what if you want to have different user experiences? You could have a block of content with a title, image and cta. You could have another block of content with a title, several icons each with their own block of text. You could have yet another block of content with the image on the left and the title and description on the right. Let’s look at some ways to do this in Sitecore Personalize.
Understanding the Pieces
Details of how the pieces of Sitecore Personalize fit together
- Experience: A block of personalized content and the required configurations. Requires a variant. Optionally includes page targeting, filtering and decision model.
- Web Experience: Useful for integration into websites
- Full Stack Experience: Useful for integration into websites and mobile apps
- Variant: The user interface for an experience. Made up of html, css, javascript and api output.
- Html: The html markup for a variant
- Javascript: The javascript required to display a variant on the website
- Css: The css to style the variant
- Api Output: Dynamic data (usually from the decision model) that can be used to populate/modify the html and css
- Page Targeting: Defines which pages the experience will run on
- Filtering: Defines which users will see the experience
- Decision Model: A logical flow chart of business rules that determines the next best offer for the current user. Made up of input data, decision table, programmables and offers.
- Canvas: The visual design tool for a decision model
- Input Data: Read data from the user, sessions and orders
- Programmables: Server-side javascript used to make decisions about the current user
- Decision Table: A matrix of data values mapped to offers
- Offers: The content that is used to populate the variant
- Offer Template: The field definitions (label and type) used to create offers
Multiple Layouts Option 1
Multiple web experiences, multiple decision models, multiple offer templates.
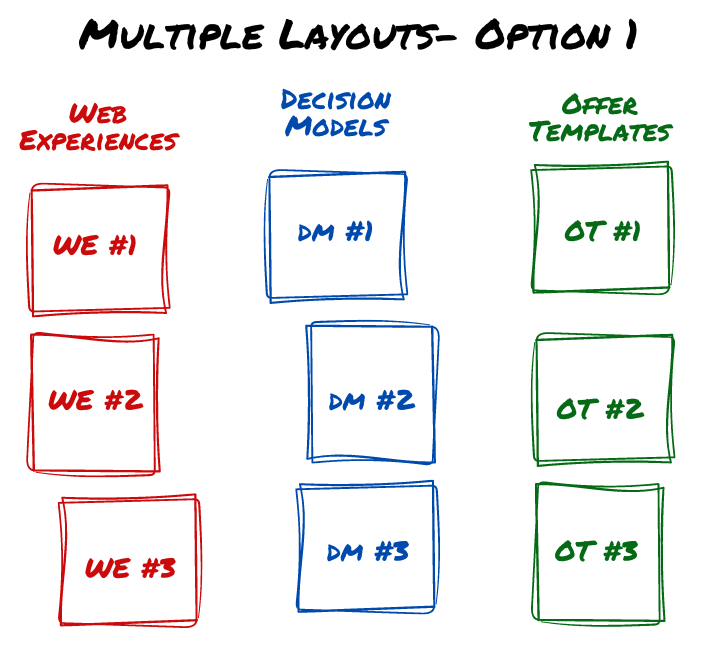
Visualization of option 1
You would create one experience, decision model and offer template per layout. If your layouts share the same data fields, you can reuse the offer template. If your layouts share the same logic, you can reuse the decision model. In this case you will use page targeting and filtering to help control where and when the experiences will be displayed on your site. Be aware that this option could have performance impacts as the number of experiences rise. Sitecore Personalize will check every experience to see if it needs to run for the current page or current user.
Pros: Easy to manage each individual layout.
Cons: The page targeting, filtering, decision models, and offers can get cumbersome and complex to manage. It is difficult to predict which experience will trigger on a given page for a given user.
Multiple Layouts Option 2
One web experience, one decision model, one offer template.
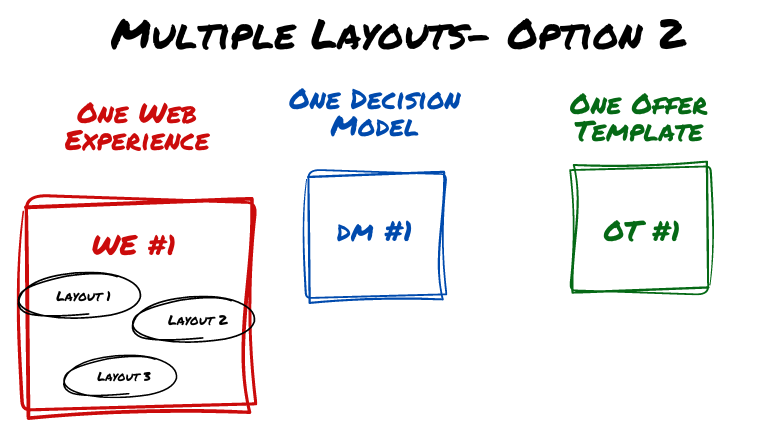
Visualization of option 2
You would create one web experience with multiple layouts defined in the html. Use if statements to decide which layout is visible based on a variable in the api. Include a number field in the offer template that indicates which layout to use. Add fields to the offer template to support all the different layouts. Don’t add fields to the offer template that you don’t need and try to reuse fields across layouts by using generic labels. You might create a help document for content authors to know which fields are used by which layout. Keep in mind that you cannot reorder fields on an offer template and you can only add new fields at the end of the list. When you create an offer, all fields from the offer template must be filled out to save the offer (you can use NA on fields not required by the specific layout).
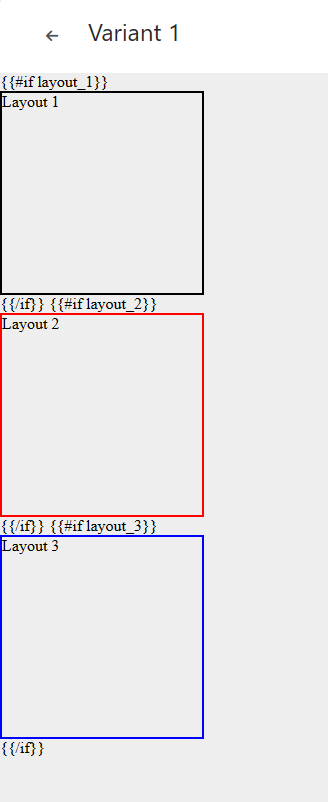
Multiple layouts inside one experience
Pros: Only one experience to manage. Only one decision table to manage.

Cons: Having multiple layouts in one experience can get a little confusing to preview. Creating an offer requires knowledge of how the fields are used in each layout.
Multiple Layouts Option 3
One web experience, one decision model, multiple offer templates.
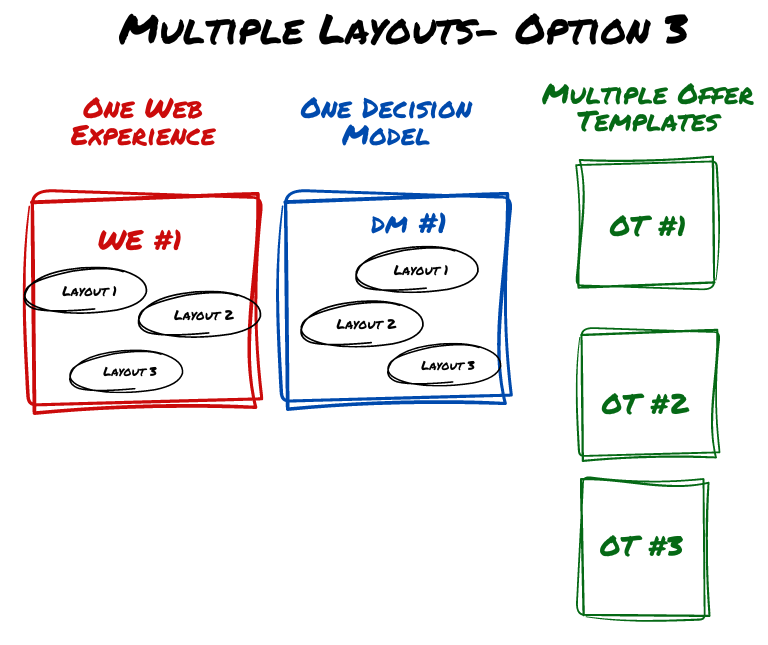
Visualization of option 3
This is similar to option 2 except that you would create one offer template per layout. The fields can be labeled specifically how they will be used in a single layout. This makes it easier for the content authors to create an offer based on the correct offer template for the target layout. The decision model gets more complicated as you add more layouts. You add a decision table for each layout/offer template. You must assign your inputs to each decision table. The content authors are able to assign the correct offer to the correct layout.

One decision model with multiple decision tables
Be aware that this option could have performance impacts as the programmables are evaluated for each decision table on the canvas.
A programmable will run once for each decision table it is linked to
Pros: Only one experience to manage. Individual offers are easier to manage.
Cons: The decision model is harder to manage as the number of layouts grows. Each programmable is evaluated once per decision table.
Multiple Layouts Option 4 & 5
One full stack experience, one decision model, one offer template.
One full stack experience, one decision model, multiple offer templates.
These two options are the same as option 3 and 4 except they use a full stack experience instead of a web experience. This means you will call the personalize api manually. This can be done either server-side or client-side. You will use the data returned from the api to populate the UI.
Pros: Complete control of UX.
Cons: You must call the personalize api manually and handle the response to populate the UI. Requires developers to make the api calls as well as to make changes to the UX.
Conclusion
You can bend the rules of Sitecore Personalize to allow multiple layouts. Consider the pros and cons of each solution and pick the option that is the easiest to manage while keeping the highest performance for your situation.
Shoutout to Megan Jensen for the fun visualization graphics!