
Hello Trailblazers!
In the realm of Salesforce development, Lightning Web Components (LWC) have emerged as a powerful tool for building dynamic and interactive user interfaces. At the heart of LWC lies its template rendering system, which governs how components display data and respond to user interactions.
In this blog, we’ll learn about template rendering or conditional rendering in LWC and provide an example.
So, let’s get started…
Understanding Template Rendering in LWC
Template rendering in LWC is the process of dynamically generating HTML content based on the component’s template file and the data provided to it. LWC uses a reactive rendering approach, meaning that the UI updates automatically whenever the underlying data changes. This results in a smooth and responsive user experience.
Let’s understand this with a proper example.
Take a scenario where a user requests account creation. So here is the “Account Request” form (a record edit form) along with its fields like Name, Phone, Email, Shipping Address, Billing Address, and a checkbox field—“Billing Address Same as Shipping Address.”
When the user checks the checkbox, all the fields in the Billing Address should be hidden (as this indicates that the billing address is equal to the shipping address). When the user unchecks the checkbox or keeps it as it is, the billing address field should be visible, and the user should be able to add details to it.

If you would like to learn how to create a record edit form in LWC, you can go with this link.
Solution LWC:
templateRenderingLWC.html
<template>
    <div class="slds-modal__content slds-p-around_medium" >
        <div class="slds-box box-config  slds-box_x-small slds-text-heading_medium" style="font-family:Arial ;" ><b>Make a request for your Account here!!</b></div>

        <div class="slds-grid slds-wrap slds-p-around" >
            <lightning-card>

                <lightning-record-edit-form object-api-name={Account_Request_Object} onsuccess={handleSuccess} onerror={handleError} >
                    <div class="slds-grid" >
                        <div class="slds-size_2-of-2 slds-grid slds-wrap slds-form_horizontal slds-form" >
                            <lightning-input-field field-name={Name} ></lightning-input-field>
                            <lightning-input-field field-name={Phone} ></lightning-input-field>
                            <lightning-input-field field-name={Email} ></lightning-input-field>
                            <lightning-input-field field-name={ShippingCity} ></lightning-input-field>
                            <lightning-input-field field-name={ShippingState} ></lightning-input-field>
                            <lightning-input-field field-name={ShippingPostalCode} ></lightning-input-field>

                            <lightning-input-field field-name={BillingAddSameasShippingAdd}   type="checkbox" onchange={handleCheckboxChange} ></lightning-input-field>

                                <template if:false={visible} >
                                    <div class="slds-size_2-of-2 slds-grid slds-wrap slds-form_horizontal slds-form" >

                                        <lightning-input-field field-name={BillingCity} ></lightning-input-field>
                                        <lightning-input-field field-name={BillingState} ></lightning-input-field>
                                        <lightning-input-field field-name={BillingPostalCode} ></lightning-input-field>
                                    </div>

                                </template>
                        </div>
                    </div>
                    <lightning-button type="submit" variant="brand" label="Save Request" class="slds-align_absolute-center" ></lightning-button>

                </lightning-record-edit-form>
            </lightning-card>

        </div>
    </div>
</template>
templateRenderingLWC.js
import { LightningElement, track } from 'lwc';
import {ShowToastEvent} from 'lightning/platformShowToastEvent';
import ACCOUNT_REQUEST_OBJECT from '@salesforce/schema/AccountRequest__c';
import NAME_FIELD from '@salesforce/schema/AccountRequest__c.Name';
import PHONE_FIELD from '@salesforce/schema/AccountRequest__c.Phone__c';
import EMAIL_FIELD from '@salesforce/schema/AccountRequest__c.Email__c';
import BILLING_CITY_FIELD from '@salesforce/schema/AccountRequest__c.BillingCity__c';
import BILLING_STATE_FIELD from '@salesforce/schema/AccountRequest__c.BillingState__c';
import BILLING_POSTAL_CODE_FIELD from '@salesforce/schema/AccountRequest__c.BillingPostalCode__c';
import SHIPPING_CITY_FIELD from '@salesforce/schema/AccountRequest__c.ShippingCity__c';
import SHIPPING_STATE_FIELD from '@salesforce/schema/AccountRequest__c.ShippingState__c';
import SHIPPING_POSTAL_CODE_FIELD from '@salesforce/schema/AccountRequest__c.ShippingPostalCode__c';
import CHECKBOX_FIELD from '@salesforce/schema/AccountRequest__c.Billing_Add_same_as_Shipping_Add__c';

export default class TemplateRenderingLWC extends LightningElement {

    @track visible = false;

//Map the HTML side and above imported object and its fields here
Account_Request_Object = ACCOUNT_REQUEST_OBJECT;
Name = NAME_FIELD;
Phone = PHONE_FIELD;
Email = EMAIL_FIELD;
BillingCity = BILLING_CITY_FIELD;
BillingState = BILLING_STATE_FIELD;
BillingPostalCode = BILLING_POSTAL_CODE_FIELD;
ShippingCity = SHIPPING_CITY_FIELD;
ShippingState = SHIPPING_STATE_FIELD;
ShippingPostalCode = SHIPPING_POSTAL_CODE_FIELD;
BillingAddSameasShippingAdd = CHECKBOX_FIELD;

//Handle checkbox chanages here
    handleCheckboxChange(event) {
             //this.visible = event.target.checked;
             if(this.visible==true)
             {
                 this.visible=false;
             }
             else{
                 this.visible=true;
             }

        }


//Handle success event here
handleSuccess(event){
    const toastEvent = new ShowToastEvent({
        title : 'Success',
        message : 'Your Account creation request has been sent successfully' ,
        varient : 'success'
    });
    this.dispatchEvent(toastEvent);
}

//Handle Error event here
handleError(event) {
    let errorMessage = event.detail.detail;
    console.log("response",errorMessage);
    this.dispatchEvent(
        new ShowToastEvent({
            title: 'Error',
            message: errorMessage,
            variant: 'error'
        })
    );
}
}
templateRenderingLWC.xml
<?xml version="1.0" encoding="UTF-8"?>
<LightningComponentBundle xmlns="http://soap.sforce.com/2006/04/metadata">
    <apiVersion>59.0</apiVersion>
    <isExposed>true</isExposed>
    <targets>
        <target>lightning__RecordPage</target>
        <target>lightning__AppPage</target>
        <target>lightning__HomePage</target>
    </targets>
</LightningComponentBundle>
LWC Output 1:
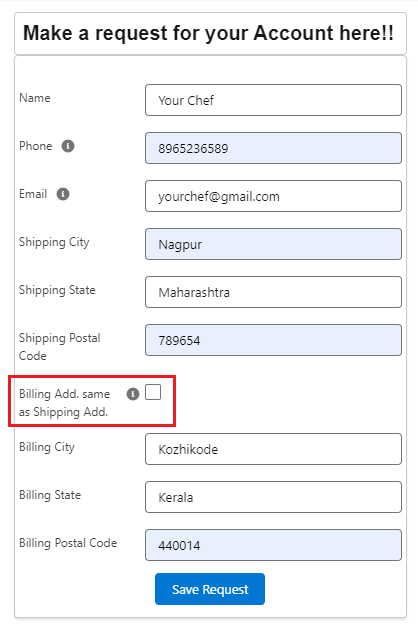
Here, we did not check the box. Thus, we filled out all the values.
LWC Output 2:
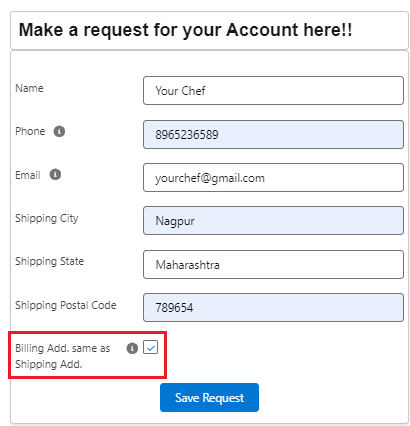
In the above output, we used the template rendering. Thus we check the checkbox, it hides the billing fields.
You can see that here we used a checkbox to make the Billing Address the same as the Shipping address. But how is it working?
So, to make the billing address the same as the Shipping address, we simply implement the trigger logic. If you would like to learn more about it, follow this link.
Conclusion
In this way, we implemented the template rendering or conditional rendering here using the address example.
Happy Reading!
Resources:
- Lightning Web Components Developer Guide
- Lightning Component Library
- Trailhead: Lightning Web Components Basics