
You can create a series of stages in an EPM pipeline, where each stage contains one or more jobs that perform actions like data loads, rule executions, file operations etc. By organizing these jobs and stages in a single Pipeline, EPM customers can streamline their business processes into executable “workflows”.
But what if one of the jobs fails causing the corresponding stage to fail? There could be several reasons for that to happen – a connection issue, invalid credentials, or a data issue. Whatever the reason is for a failure in a Pipeline, the whole workflow comes to a stop. Now this may be exactly what needs to happen. If the first step of the process has an issue, the user may not want the process to proceed. Conversely, the process may still need to proceed, despite a failure at any stage in the Pipeline. There may be another case where the user just wants to bypass a certain step in the process regardless of whether it is going to be a success or a failure.
The good news is that there is a way to design your Pipeline to work for any and all of these scenarios! You can use “Continue” and “Stop” options while creating the stages in your Pipeline to determine how the Pipeline process should progress.

These options are available only in Enterprise Profitability and Cost Management, Financial Consolidation and Close, FreeForm, Planning, Planning Modules, Tax Reporting as of September 2023.
Using Pipeline Execution Options
To create execution controls on the stages of your Pipeline
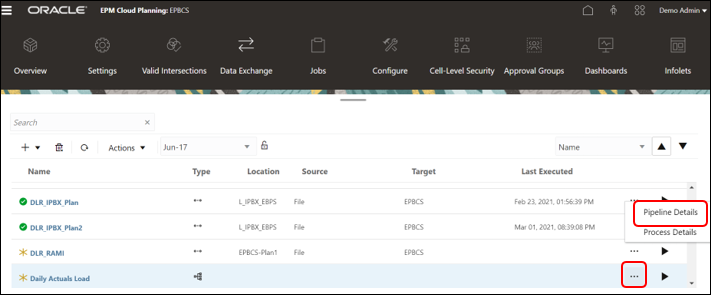
- From the Data Integration home page under Data Exchange, click
 to the right of the Pipeline you want to edit, and then select “Pipeline Details“.
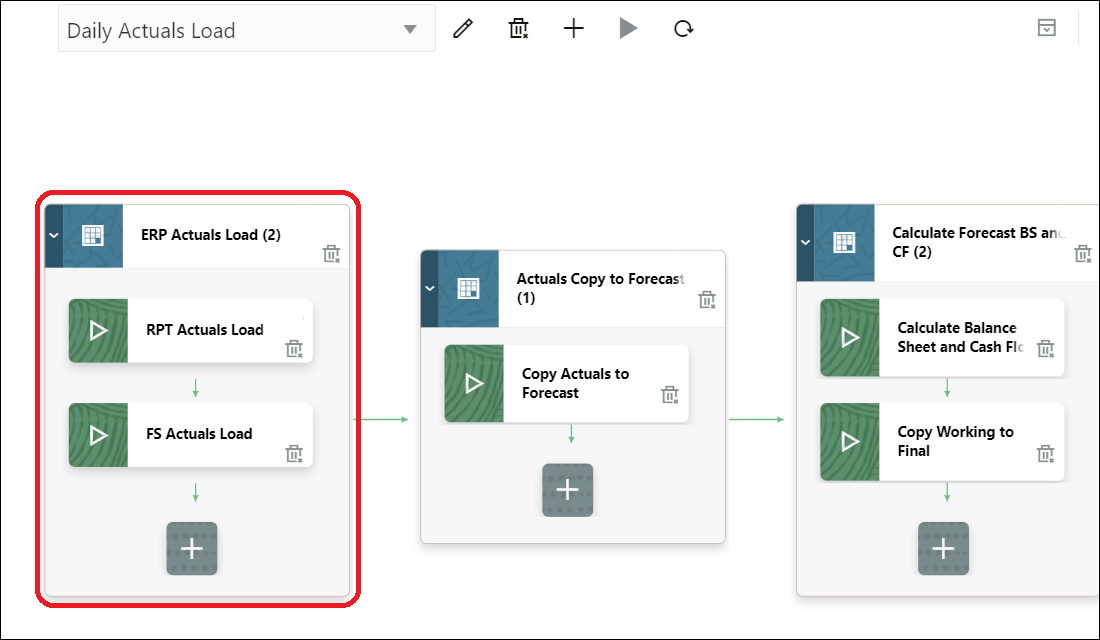
- Click on the Stage in your Pipeline to which you want to apply execution controls. The Editor box opens on the right. The first job in the below-selected Stage is ‘RPT Actuals Load’.
- You will see two new options: “On Success” and “On Failure”. You can define how the Pipeline should progress when the current Stage fails and when it is a success. Click “On Success”.

- In my case, if the ERP Actuals load to the RPT cube of my Planning application is a success, I can do one of the following: a) Continue to the next Job in this Stage i.e., ‘FS Actuals Load’, b) Stop the Pipeline execution at this point, c) Skip to the next Stage in the Pipeline i.e., ‘Actuals Copy to Forecast’, or d) Skip to the last Stage in the Pipeline i.e., ‘Calculate Balance Sheet and CF’.
- Make the required selection. Then click “On Failure”.
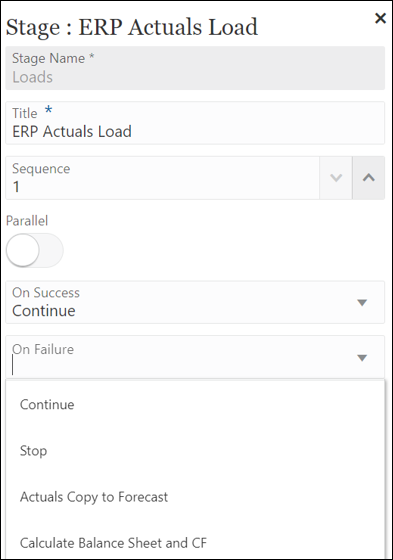
- If the Actuals load to RPT fails, you can do one of the following: a) continue to load Actuals to the FS cube i.e., ‘FS Actuals Load’, b) Stop the Pipeline Execution at this point, c) Skip the Actuals load Stage altogether and proceed to the data copy Stage i.e., ‘Actuals Copy to Forecast”, d) Skip to the last Stage in the Pipeline ‘Calculate Forecast Balance Sheet & CF’.
- This way when you have a failure in any stage of your Pipeline, you can still choose to perform other actions in your business process that are not impacted by the failed step, or you can also redirect the Pipeline execution to a “cleanup” step like notifying Administrators of the failure via an e-mail.
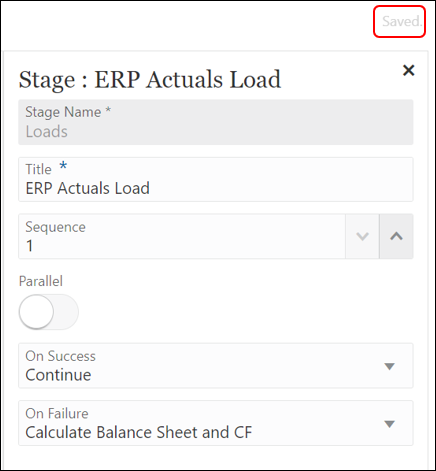
- Make the required “On Failure” selection. The Pipeline is auto-saved.
Using these Execution controls will give users of EPM Pipelines incredible flexibility in managing their business processes without having to use complex scripting our external tools.
Thank you for sharing good information.