Importance of Jira Automation
Project automation in Jira is necessary because it saves time, increases productivity, and improves team cooperation. In this blog, I’ll teach you how to automate various activities in Jira, reducing your workload and providing you with a detailed report. Which will also allow you to focus on other important aspects.
“Focus on the important things. Let automation do the rest.”
What is JIRA
JIRA is a Software Testing/Bug Tracking Tool developed by the Australian Company Atlassian. Jira has risen in popularity over time, with more than 180,000 users in 190 countries. It’s a bug-tracking software that also enables agile project management.
Jira REST APIs are used to remotely connect to Jira Server Applications. The Jira Server platform provides a REST API for basic capabilities like issues and workflows, or you may develop any other type of interface.
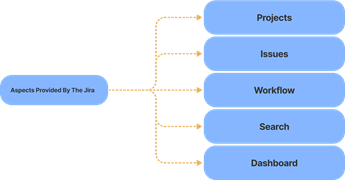
Projects: It is used to manage the defects very effectively.
Issue: It is used to track and manage the defects/issues.
Workflow: Processes the Issue/Defect life cycle.
Search: Find with ease. Through Jira, we can know what happened in the earlier versions and how many defects occurred in the earlier projects.
Dashboards: A dashboard is a display you see when you log in to the Jira to keep track of the assignments and issues you are working on.

What is Automation
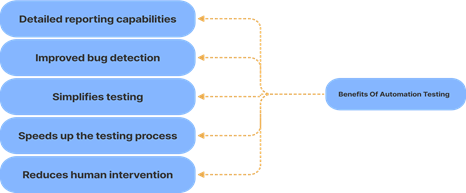
Automation frees you up to focus on the important job by Eliminating the need for Manual, Repetitive Chores and ensuring that it follows tight standards. It Checks for bugs, faults, and any other issues that may arise during the creation of a product.
Because it works Swiftly and Efficiently, it can drastically reduce the time it takes to evaluate products. Developers and production managers will have more time on their hands, which they may devote to other project elements. As a result, it can significantly increase productivity.
Automating Jira
Using Jira APIs such as REST APIs and Java APIs, you can Extend Jira’s Capability to meet your business needs. So, are you ready to dive deeper into Jira APIs? If that’s the case, Let’s Get Started. This blog will teach you more about Jira and show you how to use its fantastic capabilities.
You can use this REST API Documentation to Build Add-ons for JIRA, develop integrations between JIRA and other applications, or script interactions with JIRA.
Also, we must make sure that we are using the JIRA server, so we must rely on JIRA Server API and not the cloud. Hence refer to the below link because we will be interacting with our JIRA server from a local machine. With the help of a connection, you can play around by hitting the links and getting the response populated with the local host software.
URI Structure
JIRA’s REST APIs provide access to resources (data entities) via URI paths. To use a REST API, your application will make an HTTP request and parse the response. The JIRA REST API uses JSON as its communication format and the standard HTTP methods like GET, PUT, POST, and DELETE.
http://host:port/context/rest/api-name/api-version/resource-name
After hitting every API, you can check the response by asserting the response code we got back. A few of them which are used widely are listed below:
Code and Description
- 1xx: Informational: The request has been received, and the process continues.
- 2xx: Success means the action was successfully received, understood, and accepted.
- 3xx: Redirection: Further action must be taken to complete the request.
- 4xx: Client Error: The request contains incorrect syntax or cannot be fulfilled.
- 5xx: Server Error: The server failed to fulfill an apparently valid request.
JSON Response Structure
- Successful request:
{
“success”: true,
“payload”: {
/* Application-specific data would go here. */
}
}
- Failed request:
{
“success”: false,
“payload”: {
/* Application-specific data would go here. */
},
“error”: {
“code”: 123,
“message”: “An error occurred!”
}
}
Creating a new session and Storing the key
Step 1:
As we are using The JIRA server, open postman and hit the URL:
http://localhost:8000 /rest/auth/1/session
Step 2:
Go under the Body section and select “raw” and select JSON (application/JSON)
Under this, enter your user credentials in the following format
{“username”: “myuser”, “password”: “mypassword”}
Step 3:
Verify the creation of a new session and return the requested session information, which will look like the following:
{
“session”:
{
“name”:”example.cookie.name”,
“value”:”6E3487971234567896704A9EB4AE501F”
}
}
Conclusion: Congratulations, you successfully logged in to the application and Created a Session as well.
And now, we are all set to perform operations on the account with the help of the session cookie. Let’s try some of the essential operations we can use on JIRA with the help of REST APIs.
Creating Issue
Creates an issue or a sub-task from a JSON representation. Please look at the link containing all the data and steps to create a new issue. The data is provided to us by the Atlassian Documentation.
We have to use a POST request to create an issue. And the link we must use is /rest/api/2/issue.
Step 1:

As we are using The JIRA server, open postman and enter the URL:
http://localhost:8000/rest/api/2/issue
Step 2:
Select the “POST” method
Step 3:
Go under the Body section, select “raw” and select JSON(application/JSON) in place of Text
{
“fields:
{
“project”:
{
“key”: “RES”//projectKey
},
“summary”: “Occurred Defect”,
“description”: “This is my first bug”,
“issuetype”: {
“name”: “Bug”
}
}
}
Step 4:
Go to the Headers tab and enter the key as “Cookie” and value as JSESSIONID= “yourSessionKey.”
Step 5:
Verify that you get the response in such a manner:
{
“id”: “1001”,
“key”: “RES-1”,
“self”: “http://localhost:8000/rest/api/2/issue/1001”
}
Conclusion: Congratulations, you have successfully created your first bug with the help of REST API.
Delete Issue
Delete API is used to delete an existing issue.
Step 1:
Open postman and enter the URL:
http://localhost:8000 /rest/api/2/issue/{issueIdOrKey}
Step 2:
Select the “DELETE” method
Step 3:
Go to the Headers tab and enter the key as “Cookie” and value as JSESSIONID= “yourSessionKey.”
Step 4:
Verify that the Status code we got is 204
Conclusion: Congratulations, you just deleted an issue with the help of Rest API.
Note: As you noticed, we barely touch the JIRA Dashboard, and our API request is working for us.
Add Comment
Add Comment API is responsible to add a new comment to an issue.
Step 1:
Open postman and enter the URL:
http://localhost:8000/rest/api/2/issue/{issueIdOrKey}/comment
Step 2:
Select the “POST” method
Step 3:
Go under the Body section, select “raw” and select JSON(application/JSON) in place of Text
Step 4:
Enter the below value
{
“body”: “Hello, this is my first comment from REST API”,
“visibility”: {
“type”: “role”,
“value”: “Administrators”
}
}
Step 5:
Go to the Headers tab, enter the key as “Cookie,” and value JSESSIONID= “yourSessionKey.”
Step 6:
Verify that the Status code we received is “201”. This means that the comment was added successfully.
Conclusion: Congratulations, you have successfully added a comment with the help of REST API.
Update Comment
Updates an existing comment using its JSON representation:
Step 1:
Open postman and enter the URL:
http://localhost:8000/rest/api/2/issue/{issueIdOrKey}/comment/{id}
Note: You will get the comment id when it is generated from the received JSON response.
Step 2:
Select the “PUT” method
Step 3:
Go under the Body section, select “raw” and select JSON(application/JSON) in place of Text
Step 4:
Enter the below value
{
“body”: “Hello, this is my updated comment from REST API”,
“visibility”: {
“type”: “role”,
“value”: “Administrators”
}
}
Step 5:
Go to the Headers tab and enter the key as “Cookie” and value as JSESSIONID= “yourSessionKey”
Step 6:
Verify that the Status code we received is “200”. This means that the comment was updated successfully.
Conclusion: Congratulations, you have successfully updated your existing comment with the help of REST API.

Conclusion: We are now familiar with JIRA and Automating it using REST APIs to perform POST, PUT, DELETE, and GET operations. Basics of JSON Response Structure. More specifically, you learned the Key Features of Jira that make it so popular among Developers. In addition, you understood the detailed steps to work with Jira APIs.

Happy Coding!
Great Information, Really Helpful!
Very Insightful read! Kudos to the author.
Thankyou Mangesh Sonwane.
Thankyou Uddesh Tidke.
Excellent! Blog is very informative.
Thankyou Soo Much Manjusha Ma’am !
the Blog is informative and interesting. The visuals and code helped to understand this topic better. The way blog is written kept me interested still the end.
Thankyou Rushabh Maske.
Great!! Informative and helpful. Thank you for this precise content.
Thankyou Jayshri!
Nice blog
Whoa! That’s Amazing! Very informative and content is also good ..covered basics to a very good level. Keep growing and Thanks for sharing this information! 👍🏻
Thankyou Akanksha !
Well done, keep going!
Very informative blog Sanket and you did really covered all the topics well.
Kudos to you!
Very well explained..keep going. Waiting for your next blog.