
Many companies have been pouring efforts into automated machine learning (AutoML). It automates many best practices and is an abstraction to make machine learning easier to approach for developers with no prior experience. Open-sourced by the AWS, “AutoGluon” is one of these AutoML libraries. AutoGluon is faster, more robust, and much more accurate than many other public and commercial AutoML platforms as shown by their paper here. Additionally, there’s a great youtube video by Dr Jonas Mueller (the author of the paper), which gives an overview of AutoGluon and covers highlights from his paper. After this preliminary research into AutoGluon, I wanted to explore more deeply how approachable the library really is and the quality of predictions with default settings and no optimizations.
Nearly everyone today has a database or spreadsheets to drive their business, so I decided to use these data types for my exploration and tests to find out if you can quickly gain business value using AutoGluon. There are two shapes of data that AutoGluon can predict in a table column: classification, or regression. Classification is when the answer is from a list with known constants. Regression is when the value could be a floating point number therefore having near infinite possibilities.
Classification
First, let’s focus on Classification. Suppose you have a database table with missing data. Maybe the data is forever lost. Maybe the data will be filled in eventually in the future, but you want to predict what it will be. In either case, you can use machine learning to find patterns in the known data to predict the missing data.
In a simplified sense, this process of finding a pattern is also known as ‘training the model’. With autoML, this can be as easy as a single line of code. All you need to do is export the filled-out / known rows that you want to use for training and provide the column names you want to predict in the future. Below is what the code looks like.
predictor = TabularPredictor(label=column, path=save_path).fit(training_data, presets='best_quality')
When the predictor is created, it is saved to disk so that it can be loaded quickly in the future. Next, export the rows we want to predict, and provide them to the predictor. This 1 line of code below provides you the column of predictions.
y_pred = predictor.predict(test_data)
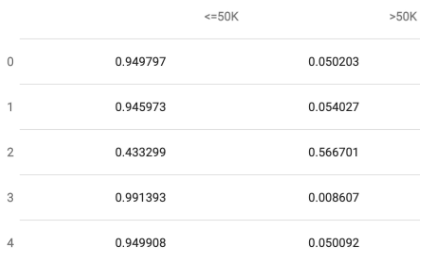
But, you don’t just want to make a prediction, you want to know the quality of that prediction too. Suppose the column you wanted to predict is whether a final sale price of an item will be under $50,000 or above $50,000. In case of classifications, it’s also possible to know the probabilities of the predictions. Especially when the prediction is nearly 50/50, you may want to consider storing the probability along with the prediction. This 1 line of code below provides you with predictions and there probabilities.
pred_probs = predictor.predict_proba(test_data)

To truly understand the final business value of these predictions, however, we need to test the accuracy of the data by comparing the predictions to the actual data. Instead of making predictions and waiting for actual data to come in from your business, you can segregate your existing data and create training data & backtest from a known data source. For example, use the last month as test data and the previous 11 months as training data. As long as your training data does not include your test data then your test is valid.
test_data = # last month to predict
y_test = test_data[col_label]  # column to predict
test_data_nolab = test_data.drop(columns=[col_label])  # delete column
y_pred = predictor.predict(test_data_nolab)# predict
perf = predictor.evaluate_predictions(y_true=y_test, y_pred=y_pred, auxiliary_metrics=True)# compare actuals with predictions
Output:
{"accuracy": 0.8397993653393387,
"balanced_accuracy": 0.7437076677780596,
"mcc": 0.5295565206264157,
"f1": 0.6242496998799519,
"precision": 0.7038440714672441,
"recall": 0.5608283002588438}
Above is how you can receive the predictions and discover the accuracy of the predictions. There’s a shortcut method if you only want to evaluate accuracy. The single line below is doing the same instructions as above to create predictions and evaluate the accuracy of those predictions.
predictor.evaluate(test_data)
In a nutshell…
In quick review, just create two separate data sets: training data and test data. Training data is what you’ll use to generate a predictor. Test data is what you’ll be inserting into the predicator and receive predications & their probabilities. Finally, you’ll evaluate the real accuracy of the predictions.
Regression
Suppose the column you wanted to predict is a floating-point numeric value. This type of prediction is called Regression instead of Classification. Generating predictions use the same APIs, however understanding the quality of the predictions and the accuracy of the prediction is going to require knowledge of statistics and experience with machine learning. In this type of prediction, you aren’t interested in achieving the ‘right’ answer, but instead a relatively ‘close’ prediction within some level of confidence. Therefore, it’s not the probability of the ‘right’ answer that is interesting, but the probability that the prediction is relatively close to the actual answer. There are various metrics that provide different points of view into this situation. Depending on your business data, certain metrics would be better than others to use for training and evaluating.
Optimization
It’s amazing to see the high-quality results of AutoGluon with only default parameters. Take a look at a blog post from AWS showing AutoGluon achieving the top 1% scores in a data science competition with a few lines of code. This blog post inspired me to try out a competition to see firsthand how well I could do. With purely the defaults and no optimizations, I achieved 78% accuracy on Kaggle’s Titanic competition. AutoGluon was easy to quickly get a high-quality result using no ML expertise. Using expertise, you can improve predications further with typical ML concepts like Feature Engineering.
Conclusion
Using AutoGluon with no ML expertise, you can generate predictions, understand quality of those predictions, and evaluate accuracy in an easy & approachable way. With ML expertise, experts are now empowered to quickly focus on optimizations without needing to tediously create the first quality prototype. AutoML is an exciting evolving space introducing ML to non-experts and making experts more productive. As modern deep learning techniques are being automated, we will continue to see AutoGluon solve additional common prediction problems such as time series data.
My team frequently works within product teams to help them build cloud native applications while showing the benefits of new innovative tooling like AutoGluon for machine learning. Contact us to see how we can help your organization too.