The benefits of implementing workflow in Sitecore does not come without its cons. As with any business process, the more stop gates you add to getting your content live makes the work more cumbersome. In our Simple Workflow, you have to lock and edit to create a “Draft” item. After saving your changes, you then have to submit your item for approval. After it is approved, you then have to publish the item. Imagine if you created a new page and added 15 new components that each come with their own new data source items. You would have to submit the page item and each of the 15 data source items individually. Doing that multiple times can significantly hinder a content author’s ability to produce content in a timely fashion. In this blog post, we will be creating PowerShell scripts that content authors can run in the Content Editor that will do all the leg work for them.
PowerShell Scripts for Authors
$currentItem = Get-Item .

Get-ChildItem -Recurse -Path $currentItem.FullPath -WithParent | Where-Object { $_."__Workflow State" -eq '{<Insert the Guid of the Draft State in your workflow>}' } |
        ForEach-Object {
            Write-Host "Submitting for approval:" $_.Name
            $_.Editing.BeginEdit()
            $_.Fields["__Workflow State"].Value = "{<Insert the Guid of the Awaiting Approval State in your workflow>}"
            foreach ($version in $_.Versions.GetVersions($true))
            {
                if($version.Locking.IsLocked())
                {
                    $version.Editing.BeginEdit()
                    $version.Locking.Unlock()
                    $version.Editing.EndEdit()
                }
            }
            $_.Editing.EndEdit()
        }
Insert your “Draft” state and “Awaiting Approval” state guids where appropriate in the script above. This script will take the current item you are running it on and move the current item and its children that are in the “Draft” state into the “Awaiting Approval” state. It will also unlock the items that have changed states.
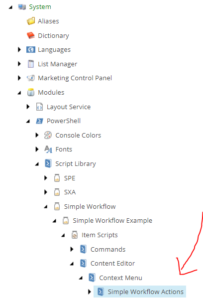
Then save it in the following location below to make it accessible in the Content Editor.

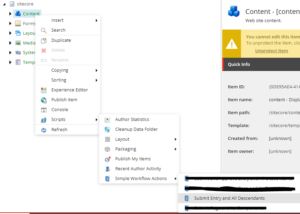
Saving the script in this folder structure makes it possible for you to access this script on any given item by right clicking it. Below is what this looks like:

PowerShell Scripts for Approvers and Admins
$currentItem = Get-Item .

Get-ChildItem -Recurse -Path $currentItem.FullPath -WithParent | Where-Object { $_."__Workflow State" -eq '{<Insert the Guid of the Draft State in your workflow>}' } |
        ForEach-Object {
            Write-Host "Submitting for approval:" $_.Name
            $_.Editing.BeginEdit()
            $_.Fields["__Workflow State"].Value = "{<Insert the Guid of the Approved State in your workflow>}"
            foreach ($version in $_.Versions.GetVersions($true))
            {
                if($version.Locking.IsLocked())
                {
                    $version.Editing.BeginEdit()
                    $version.Locking.Unlock()
                    $version.Editing.EndEdit()
                }
            }
            $_.Editing.EndEdit()
        }
Insert your “Draft” state and “Approved” state guids where appropriate in the script above. This script will take the current item you are running it on and move the current item and its children that are in the “Draft” state into the “Approved” state. It will also unlock the items that have changed states. Save this script in the same folder location as the previous script. It will be accessible in the same way too.
Preventing Authors from Submitting and Approving Content via PowerShell Script
Access the Security Editor and update the permissions on the Author role. Deny Read access to the PowerShell script that allows content authors to move items from the “Draft” state to the “Approved” state. This will hide the option to run these scripts in an item’s context menu.
Conclusion
This blog post concludes the mini-series! I hope it was helpful in explaining how to implement workflow in Sitecore for your company. Feel free to leave comments below if you have any questions!

