
Recently, I faced a situation where I needed to create a navigable 3D house within a website. In this house, a user would be able to look around a room by clicking and dragging their point of view, similar to street view on Google Maps. Additionally, there would be clickable hotspots that would allow the user to “walk” over and look at a specific item in the room. I came to realize this is no easy task, especially when it comes to camera movement. This site was built using the Javascript library Three.js on top of a React v6 single page application. Here are a few things I learned the hard way while creating this 3D house.
Click and drag camera
The first issue that needed to be resolved was the click and drag camera movement. Three.js offers a couple of base camera views to get us started. The one I went for was the Perspective Camera. This is a great start, but the camera needed a couple of tweaks to make it move how I wanted.
First, out of the box the camera moves whenever the mouse moves on the page instead of when you click and drag. This issue was fairly easy to resolve, but in resolving it, some of the main functionality of the Perspective Camera was changed. In order to move the camera only when the mouse is held down, we needed to tap into the document’s mousedown, mousemove, and mouseup event listeners, as shown below.
document.addEventListener('mousedown', onDocumentMouseDown, false);
document.addEventListener('mousemove', onDocumentMouseMove, false);
document.addEventListener('mouseup', onDocumentMouseUp, false);
This allowed me to call specific methods when the browser detects the mouse being pressed, being moved, and being lifted respectfully. Within the onDocumentMouseDown function, I am noting the starting X and Y positions of the mouse for later, as well as setting a variable called isUserInteracting to true. This variable is set to false within the onDocumentMouseUp method, thus tracking whether or not the user has the mouse held down. Subsequently, in the onDocumentMouseMove method, nothing happens unless isUserInteracting is set to true. Now we can get into the logic of actually moving the camera.
By default, the camera movement in the Perspective Camera doesn’t act the way I wanted it to. It moves up when your mouse goes up, and down when you mouse goes down. Same with left and right. You can see an example below of this in a proof-of-concept 3D room that I set up.
For many use cases that people have using Three.js, this is perfectly acceptable. But, since I am trying to mimic an intuitive way someone might click and drag a camera in a room (similar to Google Maps), this would not suffice. So, the next thing that needed to be done was to rewrite the camera logic.
I updated the camera logic by using Three.js’ camera.lookAt function to look at different points in 3D space as the user clicks and drags. To do this, X, Y, and Z coordinates for the points in 3D space need to be calculated for each small movement of the mouse. First, in the onDocumentMouseMove method, I take the starting X and Y positions of the mouse click previously mentioned and do some calculations with it. I also used the X and Y positions of where the mouse has moved to during the drag to determine what I am calling the latitude (lat) and longitude (lon). The calculations are shown below.
lon = (downPointer.x - event.clientX) * dragFactor + downPointer.lon;
lat = (event.clientY - downPointer.y) * dragFactor + downPointer.lat;
Now, I will break down how this calculation works. To calculate the longitude, we start by calculating the difference between where the mouse was when the click happened (downPointer.x) and where the mouse is currently in the dragging process (event.clientX). This is then multiplied by what I call a dragFactor. This is simply a factor to modify how fast the camera moves when dragging. This was tweaked as needed, but I ended up with 0.2. From there, downPointer.lon is added to the sum. This variable is the value of what the previous lon variable was after the last drag (initializing as 0).
The latitude is calculated in a similar way. Before moving forward, it is ensured that the lat variable is between -85 and 85 degrees. This is to make sure that the user can’t look too far up or down and flip the camera in a strange way. This is ensured by the following code:
lat = Math.max(-85, Math.min(85, lat));
From there, I needed to define two more variables, phi and theta, by converting lat and lon to radians. Additionally, lat needs to be first subtracted by 90 degrees.
const phi = THREE.Math.degToRad(90 - lat);
const theta = THREE.Math.degToRad(lon);
Finally, we are able the calculate the X, Y, and Z values of the 3D point we will be pointing the camera towards. This is done using trigonometry. The formulas are as follows:
camera.target.x = radius * Math.sin(phi) * Math.cos(theta);
camera.target.y = radius * Math.cos(phi);
camera.target.z = radius * Math.sin(phi) * Math.sin(theta);
There is one variable shown above that I haven’t talked about yet: radius. This was the trickiest variable to figure out how to calculate and will be talked about in detail in the next section.
The last thing that needs to be done is a simple camera.lookAt(camera.target). This will be called for every small movement the mouse makes when being dragged and appear seamless, as shown in the following gif.
Fixing camera weirdness
Now I’m going to get into how that radius variable is calculated and the issues I found along the way to discover this.
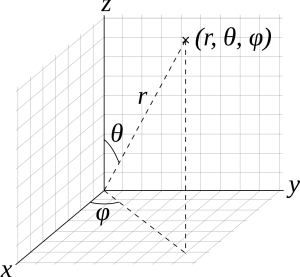
Mathematically, the radius variable represents the radial distance the marker being looked at is from the camera. The formulas being used to calculate the X, Y, and Z coordinates are tried and true formulas in mathematics shown below, along with a graphic that helps explain what each of the other variables represent.
x = r sin(ϕ) cos(θ)
y = r sin(ϕ) sin(θ)
z = r cos(ϕ)
In other blogs, articles, and Stack Overflow questions about Three.js camera movement, it is stated that the radius variable can be a fixed number, such as 500 (example here). This works for the initial camera position, but as soon as the camera moves to a hotspot marker, the math falls apart. After the movement, the first point that is calculated when trying to drag the camera is off by a certain amount, causing a jump in the camera, shown in the gif below.
To remedy this issue, the radius needs to be calculated initially and recalculated upon every camera movement. To calculate the correct length of the radius, the 3D version of the Pythagorean theorem can be used: √(x2 + y2 + z2). In code, this looks like the following using the Math.hypot shortcut:
radius = Math.hypot(x, y, z);
The radius needs to be calculated initially, after each camera movement in the onDocumentMouseMove method, and at the end of the method moving the camera to a specific hotspot marker.
Now we’re done, right?! Wrong! This didn’t fully solve the issue in all cases! Depending on the room or the marker/camera location, there would be even more weirdness with the camera. The click and drag would sometimes seem locked into a certain area, as shown in the gif below.
As you can see, even though the drag is continuing to the left, the camera starts looking to the right. How can this be solved?
I discovered that this issue was being caused when the 3D point being calculated to look at was too close to the camera position. This means that the radius variable is very small and acting weird when moving around the nearby camera position. The solution I figured out was to calculate a 3rd point along the same vector path of the camera position and the point calculated from the Pythagorean theorem, but much further away from the camera. Here is the function I made to calculate this new point.
const getNewPointOnVector = (p1, p2) => {
  let distAway = 200;
  let vector = {x: p2.x - p1.x, y: p2.y - p1.y, z:p2.z - p1.z};
  let vl = Math.sqrt(Math.pow(vector.x, 2) + Math.pow(vector.y, 2) + Math.pow(vector.z, 2));
  let vectorLength = {x: vector.x/vl, y: vector.y/vl, z: vector.z/vl};
  let v = {x: distAway * vectorLength.x, y: distAway * vectorLength.y, z: distAway * vectorLength.z};
  return {x: p2.x + v.x, y: p2.y + v.y, z: p2.z + v.z};
}
Using this newly calculated point for the camera to look at, my camera dragging issues were solved.
Rotation vs Quaternion
The last issue that I came across when creating this 3D room experience is changing the camera orientation when clicking on a hotspot marker. I originally implemented this by modifying the camera’s rotation and position using Tween.js, which seemed like a logical solution. Tween.js is a great and easy to use tweening engine for animations. Tweening the position worked just fine, but tweening the rotation of the camera proved to be problematic in certain cases. The camera would spiral to its new orientation, which looked dizzying. This turns out to be a problem known as gimbal lock. An example is shown below.

To fix this, I researched the right way to change orientation in 3D space to avoid gimbal lock. In this research, I discovered something called quaternions. Quaternions are used pretty regularly in 3D computer graphics to calculate three-dimensional rotations. Mathematically, a quaternion is a complex number with 4 dimensions. Without going into more detail about what a quaternion is, let’s just focus on how it solved my issue. Quaternions provide a much quicker and more effective way to transition the orientation of the Three.js camera compared to its rotation property. Originally, using rotation, the function to move to a marker was as follows.
function cameraToMarker(marker) {
  const currentCamPosition = {x: marker.cameraPositionX, y: camera.position.y, z: marker.cameraPositionZ};
  const storedMarkerPosition = new THREE.Vector3(marker.positionX, marker.positionY, marker.positionZ);
  const newCameraTarget = getNewPointOnVector(currentCamPosition, storedMarkerPosition);
  const markerPosition = new THREE.Vector3(...Object.values(newCameraTarget));
  const startRotation = new THREE.Euler().copy(camera.rotation);
  camera.lookAt(storedMarkerPosition);
  const endRotation = new THREE.Euler().copy(camera.rotation);
  camera.rotation.copy(startRotation);

  new TWEEN.Tween(camera.rotation)
    .to(
      {
        x: endRotation.x,
        y: endRotation.y,
        z: endRotation.z,
      }, 500)
    .easing(TWEEN.Easing.Quadratic.InOut)
    .onComplete(() => {
      new TWEEN.Tween(camera.position)
        .to({
          x: marker.cameraPositionX,
          y: camera.position.y,
          z: marker.cameraPositionZ,
        })
        .easing(TWEEN.Easing.Quadratic.InOut)
        .onUpdate(() => {
          camera.lookAt(storedMarkerPosition);
        })
        .onComplete(() => {
          camera.lookAt(storedMarkerPosition);
          radius = Math.hypot(...Object.values(markerPosition));
          phi = Math.acos(markerPosition.y / radius);
          theta = Math.atan2(markerPosition.z, markerPosition.x);
          lon = THREE.Math.radToDeg(theta);
          lat = 90 - THREE.Math.radToDeg(phi);
        })
        .start();
    })
    .start();
}
As you can see, I was tweening the rotation to the endRotation variable, which contained the camera.rotation after using camera.lookAt to get the rotation value after looking at the marker position. The call to camera.lookAt doesn’t actually look at that position because, two lines later, I am copying the camera rotation back to its original value. Subsequently, I was tweening the camera.position, which was working just fine.
There are some other noteworthy things about this function. You can see that I am generating a newCameraTarget using the getNewPointOnVector function described in the previous section. Additionally, I am setting the radius, phi, theta, lon, and lat once the animation is complete so that the click and drag functionality works as expected after the camera movement.
The update to use quaternions was simple enough. All that was needed to be done was to change the variables startRotation and endRotation to startQuaternion and endQuaternion and get their values using camera.quaternion.clone() instead of the THREE.Euler. Problem solved, right? Wrong again!
There was one more issue that I still faced after all of this! Occasionally, the camera movement would whip to one side before correctly setting the orientation. This was caused by tweening between quaternions, or slowly changing one quaternion value into another. The way quaternions are supposed to be altered is through “spherical linear interpolation”, or slerp. Conveniently, Three.js has a slerp method we can tap into. I then changed the outer tween described above to the following.
let time = {t: 0};
new TWEEN.Tween(time)
 .to({t: 1}, 500)
 .easing(TWEEN.Easing.Quadratic.InOut)
 .onUpdate(() => {
    THREE.Quaternion.slerp(startQuaternion, endQuaternion, camera.quaternion, time.t);
})
Tweening an arbitrary time variable from 0 to 1 over 500 milliseconds and calling Three.js’ slerp method in the onUpdate method is what resolved this issue. Take a look at how the camera moves after these updates.
I have covered each of the most painstaking issues I encountered when working with Three.js. As I was working, I kept wishing there was a blog specifically outlining these issues, and now there is. I hope this blog post allows you to make awesome Three.js camera movements the easy way.
READY TO GROW YOUR CAREER?
At Perficient, we continually look for ways to champion and challenge our talented workforce with interesting projects for high-profile clients, encourage personal and professional growth through training and mentoring, and celebrate our people-oriented culture and the innovative ways they serve Perficient and the community.
Learn more about what it’s like to work at Perficient at our Careers page.
Go inside Life at Perficient and connect with us on LinkedIn, YouTube, Twitter, and Instagram.
Thanks so much that last point about slerp is a life saver! Been looking all over the place for a solution to this. Just a note that function is now depreceated, something like this works instead:
const qm = new THREE.Quaternion();
qm.slerpQuaternions(startQuaternion, endQuaternion, time.t);
camera.quaternion.copy(qm);