
A common scenario for a customer calling into a call center is for a customer wishing to change their delivery time or date. Using AWS Services, it’s possible to automate this, reducing wait time and the cost of having a person look up dates and relay these to a customer.
In this tech tutorial we’ll be focusing on returning three possible dates and times from a database to an Amazon Connect instance. This post will assume previous basic knowledge of how certain parts of AWS work, but we’ve linked to tutorials that will show you how to get that knowledge if you’re not sure how.
AWS Services used:
- Amazon Connect
- Amazon Lambda
- Amazon DynamoDB
Architecting a solution – the bigger picture:
Before we get started, let’s take a step back and think about the problem we’re trying to solve: As a customer, I want to be able to call into a contact center, be given some options for changing my current delivery date, choose one, and then hear a confirmation that it worked.
When trying to arrive at solutions in programming, I have personally found that starting small is the way to go. Rather than overwhelm ourselves with trying to get back every date and time at once, lets break it down. This approach, at least for me, has made it much easier to learn and build on top of the fundamentals in AWS.
Off the top of my head, I think I’ll need an Amazon Connect flow, probably some SSML speech, and a DynamoDB table to return the date and time values. I will also need a Lambda function to return the table info to Amazon Connect, so that it can be read back to the customer.
Breaking it down further, what do I need first? Well, I would need a date and time to make this work. That’s the key information the customer requires, so the DynamoDB table should be what I work on first. Then I can set up a simple Amazon Connect flow and Lambda function to test it out.
Part 1: Setting up a date and time table with DynamoDB:
DynamoDB is a NoSQL, serverless database system that’s part of AWS. If you’re not sure about how to set up a DynamoDB table, please read through the information offered in the Amazon Web Services documentation before proceeding with this tutorial. The following steps assume basic knowledge of DynamoDB and how to set key: value pairs.
When designing our solution, we should think about what the best way to return date and time is. Should we split them into two columns? If we think logically about what has to happen, a caller will phone in and expect to hear the three earliest dates and times for re-scheduling their delivery. We want these values saved in the database.
Because date and time has its nuances, we’re going to make this simple by limiting it to one value that encompasses both date and time – we’ll use an epoch timestamp. Epoch just serves as a reference point from which time is measured.
The first thing you will need to do is make a test date and time and convert that to a timestamp. You can use an online time converter to change yours. Choose the ‘Human Date to Timestamp’ option.
For testing purposes, we chose July 22, 2019 at 9:30 a.m. as our first test point. When converted, it gave us this:
- 1563787800
This is equivalent to:
- 07/22/2019 @ 9:30am (UTC)
- 2019-07-22T09:30:00+00:00 in ISO 8601
- Mon, 22 Jul 2019 09:30:00 +0000 in RFC 822, 1036, 1123, 2822
- Monday, 22-Jul-19 09:30:00 UTC in RFC 2822
- 2019-07-22T09:30:00+00:00 in RFC 3339
One of the nuances with timestamps and Amazon Connect is that it doesn’t always parse things the way we logically think it would. For this example, we ran through a number of tests before coming to the conclusion that in order for the timestamp to be read back correctly, it needed to be stored with a few extra zeroes at the end. To that end, we’ve amended the example above, and the rest of the examples we made.
Let’s make our table. We called ours table ‘DeliverTable3’ and here’s how we set it up:
- Table Name: DeliverTable3
- Primary partition key: uniqueID (String)
- Primary sort key: Date (Number)

Now that our table is ready. We can start testing with one of the values with the Lambda function we’ll create next.
Part 2: Writing the Amazon Lambda Function:

AWS Lambdas allow you to run code in a server-less environment. This tutorial assumes a basic understanding of how Lambda functions work and that you know how to create a basic one. For a good introduction and tutorials to AWS Lambda functions, please refer to the documentation on the Amazon Web Services website.
With regards to returning information from a DynamoDB table, that’s basic enough. After we string the data, here is what we are left with:
INFO Stringing the data
{
    "Items": [
        {
            "Date": 1563787800000,
            "uniqueID": "1"
        },
        {
            "Date": 1563804000000,
            "uniqueID": "1"
        },
        {
            "Date": 1563893100000,
            "uniqueID": "1"
        }
    ],
    "Count": 3,
    "ScannedCount": 3,
    "LastEvaluatedKey": {
        "Date": 1563893100000,
        "uniqueID": "1"
    }
}
But, we’ll have to make some changes within the Lambda to get the response needed to be fed back to Amazon Connect.
We know that we have an Epoch Timestamp from the DynamoDB table. But if we return this figure: ‘1563787800000′ to Amazon Connect, it will read it out as a large number. So we need to split the timestamp into separate date and time values, make sure they’re in the right formats, and then return those values to Amazon Connect.
To solve this, lets reverse engineer the solution. We know from a previous post that Amazon Connect can take in a date of the format: YYYY-MM-DD and that it can take in time in the format HH:MM or HMS. How can we ensure that these types of values get returned?
Let’s take a look at the date part first. We will need to use some Javascript methods to split apart our timestamp. A quick search online reveals that these might work:
- getDate()
- getMonth()
- getFullYear()
Using these methods and our response, here’s how we can parse it:
var a = data.Items[0].Date
var saved = new Date(a);
var formattedDate = ('0' + saved.getDate()).slice(-2) + '-' + ('0' + (saved.getMonth() + 1)).slice(-2) + '-' + saved.getFullYear();
When I test out these methods, the formattedDate value returns me the date value in the format I want.
Now, let’s parse the time portion. Another quick search reveals that using the method ‘toLocaleTimeString’ might be useful for us to apply to the timestamp we have:
"timeA": new Date(data.Items[0].Date).toLocaleTimeString("en-US"), Testing it out, we find that .toLocaleTimeString(“en-US”) returns us the correct time in a format that is easily understandable by Amazon Connect.
By manipulating the data into the format we want within the Lambda function, we make it a lot easier on ourselves. Because of the work we did above, our final result now looks like this:
Here is the final result
{ dateA: '22-07-2019',
timeA: '9:30:00 AM',
dateB: '22-07-2019',
timeB: '2:00:00 PM',
dateC: '23-07-2019',
timeC: '2:45:00 PM' }
Now, all we have to do is send these values back to Amazon Connect.
Part 3: Building an Amazon Connect Contact flow:
This tutorial assumes a basic knowledge of how to build a basic contact flow in Amazon Connect. For information on Amazon Connect, please visit the AWS documentation.
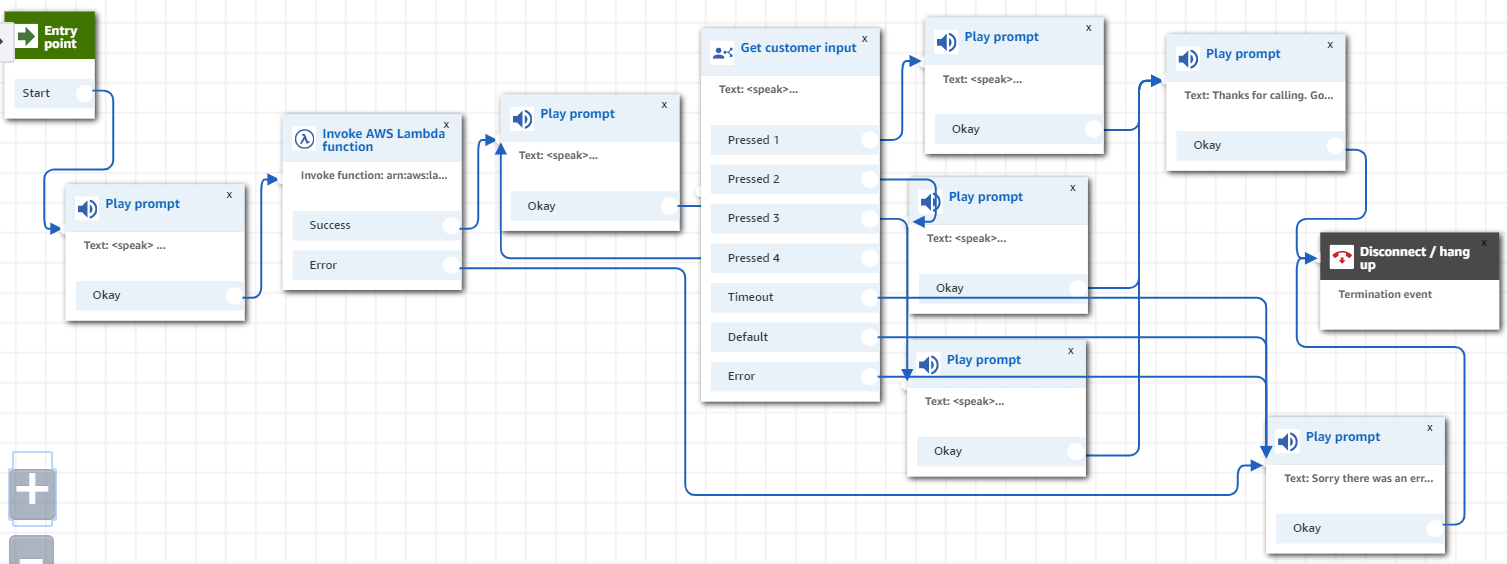
We’re going to build out a basic flow that asks a caller which of the 3 dates in our table they want to switch their delivery to:
Here is the flow diagrammed:
Building the Contact Flow with SSML and external attributes:
We’re going to be using SSML to read back the date and time values to the customer. As for the actual values, they’re going to take the following basic format:
- $.External.date
- $.External.time
For our use case, we’ll replace ‘date’ and ‘time’ with the values we created and saved in our Lambda function:
- dateA
- dateB
- dateC
- timeA
- timeB
- timeC
The final speaking block for reading back the three earliest dates will look something like this:
<speak>
The earliest delivery dates are
<break time="0.5s"/> option A <break time="0.5s"/> <say-as interpret-as="date" format="dmy">$.External.dateA</say-as>. at <say-as interpret-as="time" >$.External.timeA</say-as>. or
<break time="0.5s"/> Option B <break time="0.5s"/> <say-as interpret-as="date" format="dmy">$.External.dateB</say-as>. at <say-as interpret-as="time" >$.External.timeB</say-as>. or
<break time="0.5s"/>Option C <break time="0.5s"/>
<say-as interpret-as="date" format="dmy">$.External.dateC</say-as>. at <say-as interpret-as="time" >$.External.timeC</say-as>.
</speak>
Notice how we inserted a break time to make the speech more realistic. You can play around with inserting your own break time elements.
The customer will hear all these dates and choose one. Below you’ll see the confirmation speech they hear after selecting one of the options in a ‘Get Customer Input’ block:
<speak>
You have selected <say-as interpret-as="date" format="dmy">$.External.dateA</say-as>. at <say-as interpret-as="time" >$.External.timeA</say-as>.
</speak>
And that’s it. Using a DynamoDB table, Amazon Lambda, a few Javascript Methods and Amazon Connect, we were able to successfully bring back the dates and times available for rescheduling a delivery, and have the customer select the one that suited them best – no agent required.
For more information on how Perficient can help you make the most of Amazon Connect, please get in touch with us.