
Amazon Connect Streams (Streams) is a JavaScript API that enables browser-based integrations with the Amazon Connect contact center. This series of blog posts covers three basic scenarios using Streams:
- Subscribing to Streams Events (Part 2)
- Creating a Custom User Experience (Part 2)
Source code from this post is on GitHub at: https://github.com/phmiller/streams-examples
Source code and documentation for Streams is on GitHub: https://github.com/aws/amazon-connect-streams
As I was working through these samples, I was impressed by how smooth it went and how reliably Streams worked. Kudos to the Amazon Connect team for making it easy to get from nothing to something in a short time.
With that said, let’s get into it!
Amazon does not distribute a pre-built version of Streams, so before we get started with our application we need to get the source from GitHub and build the Streams JavaScript file with make. This approach should work out of the box for developers on a Linux and Mac, but for my fellow Windows developers we have a few extra steps to take.
The best way to get going on Windows is to first install the console emulator cmder from http://cmder.net/ . Select the “full” version and you now have a Windows command line on steroids, with all the standard Unix commands, git command line, and lots of neat graphical options to tweak.
After cmder, we also need the make build tool for Windows. Download and install this from http://gnuwin32.sourceforge.net/packages/make.htm .
At this point, you should be able to open cmder, key in “make” and see an error message similar to “no targets specified and no makefile found”. If the command line cannot find make, you may have to update your PATH variable to include the path to make. Great, now we’re all set to join our Linux and Mac friends!
Cloning and building from GitHub
Follow the instructions at: https://github.com/aws/amazon-connect-streams to clone Streams from GitHub and then invoke make to generate the connect-streams JavaScript file. In short:
- Open your terminal of choice and change directories to wherever you want to put the Streams code for now
- Get the Streams code by keying in “git clone https://github.com/aws/amazon-connect-streams“
- Build the “connect-streams-version.js” file by keying in “make” in the newly created amazon-connect-streams directory
As of this writing, the latest version is 1.2.0, so the output file should be connect-streams-v1.2.0.js. This is the file we will include in our application use Streams.
I was surprised to see a makefile being used for a JavaScript project, so I took a look. I’ve reproduced it below with inline comments about what’s going on:
 #
 # Minimal Makefile for amazon-connect JS.
 # Concatenates JS assets in the correct order.
 #

 # Invokes git to grab the version number of the library (i.e. v1.2.0)
 VERSION = $(shell git describe --tags)
 # Sets the output file name using this version number
 OUTPUT_JS = 'amazon-connect-$(VERSION).js'

 # A list of the all the individual JavaScript source files that make up Streams
 SOURCE_FILES = src/aws-client.js \
 src/sprintf.js \
 src/log.js \
 src/util.js \
 src/event.js \
 src/streams.js \
 src/client.js \
 src/transitions.js \
 src/api.js \
 src/core.js \
 src/ringtone.js \
 src/softphone.js \
 src/worker.js

 # Sets a rule (build task) of "all" that invokes $(OUTPUT_JS)
 all: $(OUTPUT_JS)

 # Defines what $(OUTPUT_JS) is
 $(OUTPUT_JS): $(SOURCE_FILES)
 # $^ is a special macro which represents what's to the right of the ":"
 # $@ is a special macro which represents what's to the left of the ":"
 # So the below command is really "cat $(SOURCE_FILES) > $(OUTPUT_JS)"
 # ...which means to concatenate all the source files into the output file
 cat $^ >$@

 clean:
 rm -f $(OUTPUT_JS)

 # What rule to run when you invoke the makefile with no parameters
 .DEFAULT_GOAL := all

.PHONY: clean css
All of the sample applications we will build must be on the Amazon Connect Application Integration whitelist for Streams to work correctly. More specifically the domain of the application (please use HTTPS), must be on the whitelist. The purpose of the whitelist is to protect the CCP from being loaded in the iframe of malicious webpages. Check out the instructions on the Streams GitHub page: https://github.com/aws/amazon-connect-streams#whitelisting .
Be careful to log into the AWS Console and go the “Amazon Connect virtual contact instances” page (https://console.aws.amazon.com/connect/home?region=us-east-1#) to find your Amazon Connect instance and the Application Integration whitelist. Don’t be like me and look fruitlessly in your Amazon Connect instance Dashboard.
When running your own Streams API application locally, make sure you add localhost, plus the appropriate port number to the whitelist.
Sidebar: What if I don’t?
If you don’t like following directions or are just curious and try to initialize Streams and the CPP without adding your application to the whitelist, the CCP will not load and you will get some distinctive errors in the JavaScript console. Namely:
Refused to display '{your_ccp_url}' in a frame because it set 'X-Frame-Options' to 'sameorigin'
For more details on X-Frame-Options and origins see: https://developer.mozilla.org/en-US/docs/Web/HTTP/Headers/X-Frame-Options

You can see the full code for this sample by cloning my GitHub repository and checking out the “sample-1-embedding-ccp” tag. Keep in mind that Streams applications, like Amazon Connect, only work in Chrome and Firefox
Thanks for sticking around through all the setup! Time to get cracking and see what Streams can do.
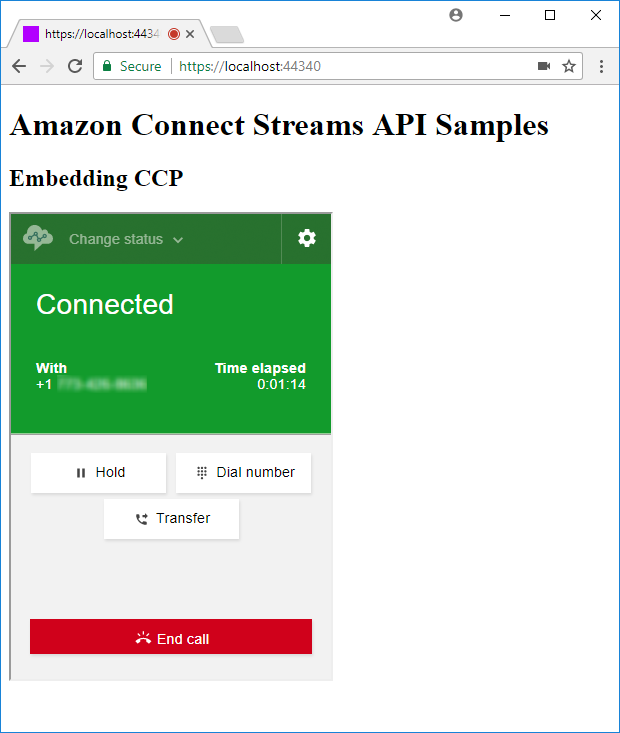
Our first sample application uses Streams to embed the Amazon Connect Contact Control Panel (CCP) in a host HTML and JavaScript web application. This sample application lets you change your status and handle contacts through the default CCP user experience. To keep it simple, I’ll use inline JavaScript and avoid any client side JavaScript frameworks. We end up with just a few lines of JavaScript code and minimal HTML in our index.html:
 <!DOCTYPE html>
 <html>
 <body>
 <div id="myApp">
 <h1>Amazon Connect Streams API Samples<h1>
 <h2>Embedding CCP</h2>
 </div>
 <div id="containerDiv" style="width: 320px; min-width: 200px; height: 465px; min-height: 400px; ">
 <!--Amazon CCP will go here-->
 </div>
 </body>
 </html>
 <script src="amazon-connect-v1.2.0.js"></script>
 <script type="text/javascript">
 //replace with the CCP URL for your Amazon Connect instance
 var ccpUrl = "your_CCP_Url";

 connect.core.initCCP(containerDiv, {
    ccpUrl: ccpUrl,
    loginPopup: true,
    softphone: {
    allowFramedSoftphone: true
    }
 });
 </script>
Let’s dig into how this works by examining the HTML and JavaScript more closely.
Depending on how fast you scanned the index.html code above, you may have noticed that a comment in the JavaScript telling us to replace the ccpUrl variable assigment with the CCP URL of our instance.
The CCP URL is the direct URL to your Amazon Connect instance’s CCP. To find this URL, just open the CCP from your Amazon Connect instance and grab the URL from the address bar. It should be something like: “https://AmazonConnectInstanceName.awsapps.com/connect/ccp#/” Copy that URL into the JavaScript and we now have a good ccpUrl variable.
Positioning the CCP on Screen
Streams needs a DOM element to put the CCP in. More precisely it will insert an iframe within this DOM element to host the CCP. The GitHub documentation suggests providing a div element with an id of “containerDiv”, as we do in the above HTML. We provide this element to the Streams initCCP method.
Sidebar: Tricky browsers
If you take a closer look at the JavaScript, you can see we pass a containerDiv variable to the initCCP method without explicitly declaring it:
    //containerDiv was never defined
    connect.core.initCCP(containerDiv, {
You might expect to have to use document.getElementbyId or jQuery to grab the DOM element and assign it to this variable. Instead it just works.
This may be old hat if you’ve done a lot of web development, but what’s going on here is that the browser is automatically creating global variables for elements with id’s. So the containerDiv variable is already the DOM element for div with id “containerDiv”.
To see this further, you can open the JavaScript console and key in “myApp” to see that a myApp variable exists and is assigned to the proper DOM element. This is pretty convenient and broadly supported across browsers, but you may want to explicitly grab the element into a variable anyway in production code. Being web development, of course opinions vary (https://stackoverflow.com/questions/23121526/javascript-access-dom-elements-without-getelementbyid).
Initializing the CCP
When you load the Streams JavaScript file, the Streams library loads itself into the “connect” global object. To initialize Streams and load the CCP, you have to use the connect.core.initCCP method, passing in the container div and the CCP URL. You also have to set some flags to configure the CCP:
connect.core.initCCP(containerDiv, {
    ccpUrl: ccpUrl,
    loginPopup: true,
    softphone: {
        allowFramedSoftphone: true
    }
});
Flags, flags
The full list of flags and what they do is in the documentation on GitHub at: https://github.com/aws/amazon-connect-streams/blob/master/Documentation.md#connectcoreinitccp
Two flags of interest for this example are loginPopup and softphone.allowFramedSoftphone.
loginPopup should be set to true. This means that if/when your login to Amazon Connect expires and you need to login, the Streams API will open a pop-up window to the Amazon Connect login page.
softphone.allowFramedSoftphone should also be set to true. This allows audio to flow through from Amazon Connect to the CCP in the iframe. If this is set to false, incoming calls will ring in your application and you will be able to try and accept them through the CCP, but the calls will never be connected.
If set to true, when the CCP is loaded the first time, you will see some log messages in the JavaScript console indicating that the voice engine has been initialized:
[INFO]: VoiceRingtoneEngine initialized.
[INFO]: QueueCallbackRingtoneEngine initialized.
Set softphone.allowFramedSoftphone to false if you plan on having your agents use the default CCP and just want to get event notifications (covered in part 2) to your application.
Taking a Call
Go ahead and place a call to the sample application. You should be able to accept the incoming call in the CCP and take any call control actions you need. It is impressive how little code we need to do this, but at this point our application is not all that interesting versus the default CCP. In the next sample we will enrich our application by subscribing to events from Streams and reacting to incoming contacts and agent status changes.
Sidebar: Pop-ups and Login
You may notice that the first time you visit the sample application, a new tab or window will open to Amazon Connect’s login page. After entering your credentials, that window becomes the CCP. For our examples, you should close that CCP window once you log in and navigate back to the sample application window. I will come back and update this post if I can find a way to get around this behavior.
Stay tuned for the second part of this post, covering Streams events and custom experiences!
To learn more about what we can do with Amazon Connect, check out Helping You Get the Most Out of Amazon Connect
Hi, I tried aboeve step, but after i launch it on browser, the CCP login keeps on reloading/refreshing so I’m not able to login.
The CCP login popup window keeps reloading? Or the CCP itself? Do you see any messages in the browser’s JavaScript console?
Hi, great posts. Re your comment on ‘Pop-ups and Login’ – did you find any other way to close down that CCP pop up? I did find a reference on an AWS forum which mostly works..
connect.agent(subscribeToAgentEvents);
then in function subscribeToAgentEvents:
const w = window.open(”, connect.MasterTopics.LOGIN_POPUP);
if (w) {
w.close();
}
I am unsure if there are circumstances were this wouldn’t work though.. but when the agent state changes (logs in), it closes down that window nicely.
I’ve also seen a number of forum posts on the topic. Something like that gets you close. If it is vital to close the CCP window after you login, you can disable the auto-login from your Streams app, pop the CCP manually in your application code, hold onto a reference to that window and close it when you get a login event for the Agent
What would the jQuery look like for the “connect.core.initCCP” I can’t seem to get it just right.
I don’t quite understand. initCCP is failing? And you want to use jQuery?
Great instructions! – I’m hitting a problem with what seems to be the whitelisting as I’m receiving ‘Refused to display ” in a frame because it set ‘X-Frame-Options’ to ‘sameorigin’.’ errors in the browser console. I’ve included the origins in the application integration section of Connect using the format ‘https://domainname.com but still with no luck. Can anybody provide any advice?
I am facing issue in running the Makefile I am doing in on windows. I have tried the software you mentioned in the post. I have googled it but didn’t find the solution that work for me, can you guide me a bit more on how to work with it.