In the last post related to Amazon Connect we walked through the steps necessary to set up an SNS topic and write a Lambda function that will send a text message to this topic. Now it’s time to take a look at Connect contact flows and set up a call flow menu that will make use of the AWS services we created previously.
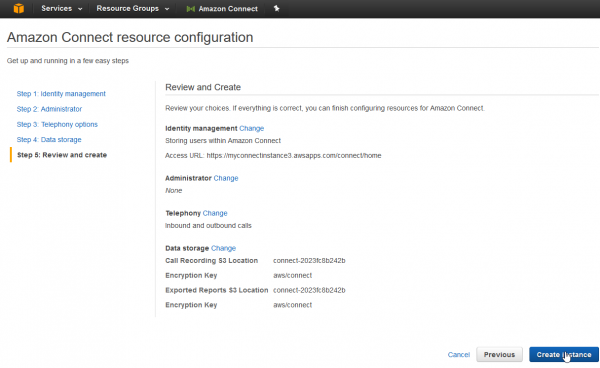
To get started using Amazon’s call center functionalities navigate to the Connect service on your AWS console and select the option to add a new cell center instance. This will open up a menu asking for some basic information such as the URL your agents and supervisors should use to log into Connect, the main administrator’s details (you can add additional supervisors or administrators from within Connect itself), type of calls you would like to handle (for the purpose of this post you will need to make use of incoming calls ) and finally where you want to store recordings and reporting data. Review your choices and create the new Connect instance.
Once an instance is created you can log in directly via the access URL or use the AWS console to select the instance and log in as an administrator. Either way, the first time you log in, the dashboard will present you with an interactive configuration guide covering the necessary steps to get started with your call center. You can follow the guide to claim a phone number, set hours of operations and create queues or navigate directly to the relevant sections using the left side menu.
“Hours of operation” can be accessed from the left side menu, by hovering over the third icon (Routing) and selecting “Hours of Operation”.
This will open a page with all of your current cell center hours. Select the “Add new hours” button in the top right side of the page and enter your call center’s hours (for testing purposes it’s best to enter some very short hours). Alternatively you can simply modify the “basic hours” template Connect has out of the box.
Once done setting up your business hours hover over “Routing” again, select “Queues” and on the new page use the “Add new queue” button in the top right side of the page.
In the new window enter all the necessary details and make sure you select the hours of operation you created previously. You don’t need to worry too much about the outbound settings, maximum contacts in queue or quick connects right now. For a basic inbound call center where your agents won’t be doing many, or any transfers you can leave all these settings blank and just add your main number as an outbound caller ID.
With everything set up navigate to “Contact Flows” and select the “Create contact flow” button in the top right side of the page. Make sure you select the basic contact flow, not one of the drop down options as these are more limited, specialized types of contact flows.
This will open a new, blank contact flow. Feel free to name it anything you want and add a description.
At this point you have a few option, depending on how you would prefer setting up the call center. Ultimately you will want to check the business hours you set up and branch based on the time the call reached the call center. The “out of hours” option can transfer the callers to a simple menu that invokes our SMS Lambda function or we can invoke the Lambda function within the same contact flow. It largely depends on how often you will make use of the SMS function and how comfortable you are working with large contact flows. For the purpose of this post we will set everything up within one contact flow, but this approach is not recommended if you already have an intricate menu that handles checking hours of operation or if you plan on sending the same text message in multiple points of the contact flow.
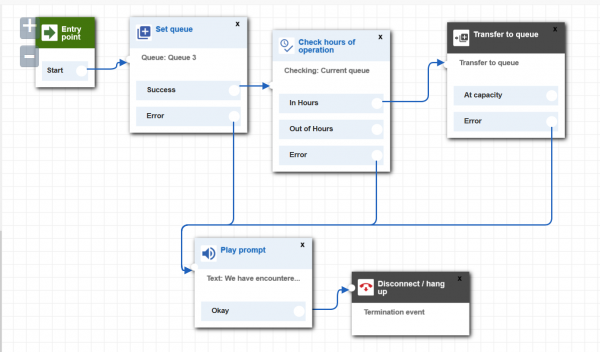
Start by adding a set queue node and a check hours of operation node. You can find the set queue node within the set sub-menu on the left side and check hours of operation underneath the branch section.
It’s a good idea to route each error branch to a play prompt node which will let the caller know what type of error occurred and then either disconnect the call or transfer to another call flow or phone number. You can also transfer the caller to the queue if they are calling within the hours of operation. This will be the default path most callers will encounter.
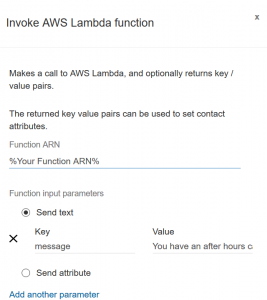
Add an invoke AWS Lambda function node from the integrate tab and enter the ARN for the SMS function you created previously. Also make sure you add a function input parameter labeled “message”. This will be the text message that will go out to all topic subscribers when the function is invoked.
Save and publish your call flow then navigate to the phone numbers section of Amazon Connect and point a phone number to your new flow.
Now you are ready to test the entire set-up by placing a call. The call will be routed to your call flow which will invoke the SMS Lambda function which in turn will push a message to your SNS topic. Within seconds all your subscribers should receive a text message letting them know someone called after hours.
Optional Modifications
As a last step, you should make sure all errors within the call flow are treated appropriately and your caller hears a message letting them know someone will reach out as soon as possible.
If you want to send out the customer’s number as a text message, simply use the system variable “Customer Number” as the Function input parameter. Alternatively, you can add a second variable within your function to grab the customer number from the Contact Data JSON Connect sends to Lambda when invoking the function.
As you can tell there are many ways you can quickly and easily combine Amazon Connect with the other AWS services to offer a great customer experience. Hopefully this post provided you the starting blocks to create your own integration. Learn how to get the most from Amazon Connect by emailing Craig Reishus.


Hi, i have tried to create a contact flow, but somehow it is ot successful.
my sns and lambda tested working. but the contact flow doesnt work. can i have a detail contact flow.
Hi Sony,
Since I don’t know your exact use case I’m assuming the contact flow does not trigger Lambda properly, this seems to be a commonly encountered issue. Please share the exact issue you are seeing if that is not the case.
As long as you are using the AWS invoke node the issue is most likely not with the contact flow, but some settings around it, which would not necessarily translate from our environment to yours.
Do you know if Amazon Connect triggers the Lambda function? If you have not set up CloudWatch logging this will be a good place to start troubleshooting. http://docs.aws.amazon.com/lambda/latest/dg/monitoring-functions-logs.html
If Connect is not even triggering Lambda it could be that it does not have proper permissions to do so. Make sure you add the appropriate permissions via the AWS CLI.
If Connect does trigger Lambda but the function does not see any input it could be due to the way you are naming your variables if you are passing any in. Try to log the JSON payload so you can identify where the attribute is saved. You will be able to see this in the CloudWatch logs.
Finally if Connect triggers Lambda but no response is received, make sure the function does not time out and we are reading the proper value in the return JSON.
This guide should help ensure Connect communicates with Lambda properly: http://docs.aws.amazon.com/connect/latest/adminguide/connect-lambda-functions.html