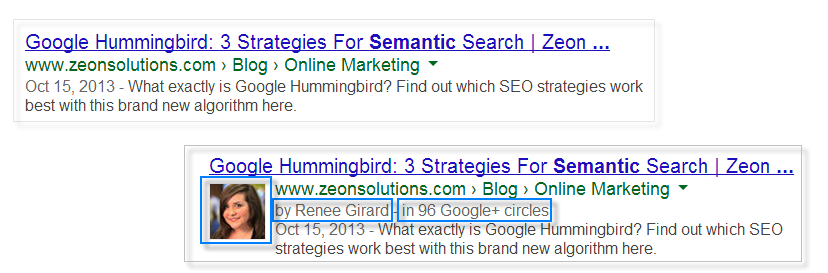
By now, you’ve probably started seeing people’s faces show up in Google’s search engine result pages and understand that these rich snippets are a product of Google Authorship. Though there are many different ways to claim your Authorship, we’ve found that the three methods detailed below are the fastest and most effective.
Option One: EMAIL VERIFICATION
If you have an email address on the same domain as your content, you will need to verify your email:
First, go to https://plus.google.com/authorship. Then click the link on #5, enter your email address of where you contributed to. You will only need to complete this step once. Next, click done, check your email for a message from Google, click the verification link, and you have just claimed your Authorship! P.S. Keep reading for troubleshooting and find out ways to increase showing up as a rich snippet.
Option Two: REL=AUTHOR TAG & GOOGLE+ RECIPROCAL LINK

If you don’t have an email address on the site where your content is housed, you will need to create a text link to your profile and add the rel=”author” parameter. The link can be added to your author byline, about the author section, or to any text in your article. Once you figure out where you want it, just copy and paste your Google+ profile URL and add ?rel=author to the end.

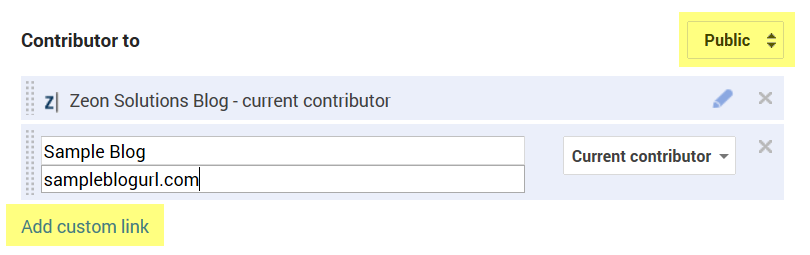
The second step is to add a reciprocal link on your profile. You can do this by going to your profile, clicking the “About” tab, then scrolling down to the Links section. Once you click “edit” you can add the name of the site and the URL by adding a custom link under the “Contributor To” section as shown above. “Public” must be set for Authorship to work properly.
Option Three: GOOGLE AUTHORSHIP FOR WORDPRESS
If you own or have access to the WordPress site you are writing for, SEO Ultimate is by far the easiest way to implement your Authorship. The complete SEO plugin offers a Author Highlighter feature which adds a “Google+ Profile URL” field under the WordPress user profile editor. The Author Highlighter generates code that automatically appends the rel=author tag to your author page, posts, and more. Just download the extension, and click “Profile” under the right navigation. There, you can add your profile URL, click save, and your done!

Tip: TROUBLESHOOTING GOOGLE AUTHORSHIP
You can verify that your Authorship is working with the Structured Data Testing Tool in Google Webmaster Tools. To start, enter your web content’s URL and hit the “preview” button. If you’ve followed all these steps, you should see something similar to the screenshot below and then eventually, a rich snippet in Google’s result pages.

Still no luck? Here are some additional things to consider:
Is the “help others discover my profile” option checked under the Google+ privacy settings? This allows your profile to be indexed.
Is your profile photo a recognizable headshot?
Does your byline on each page of your content follow “By First Name Last Name” or “Author: First Name Last Name”? Since the word “by” is a trigger word for Google, this part is essential!
Does that name match the name on your Google+ profile?
Is that content readable by search engines? No flash or JavaScript allowed. You can check this by disabling JavaScript under your browser settings.
Remember, just because you’ve successfully implement your Authorship doesn’t guarantee that Google will show your content as a rich snippet. In many cases, Google Authorship can take up to several weeks to start showing up in the SERPs. You can maximize your chances by following this guide as well as with the following tips:
1. Add the verified email address to the “About” section of your Google+ profile. You can edit the settings and make it private. This helps Google make the association between your profile and your content.
2. Add a variety of industry leaders to your Google+ circles. Higher rankings are determined by both the quantity of circles you are in and the quality of those profiles.
3. Fill out as much as you can in your profile. This helps validate your identity.
Any other tips on setting up Google Authorship that we haven’t mentioned? We’d love to hear about them in the comments!