This post will demonstrate how to use Grunt and Grunt plugins with AEM archetype projects. The purpose of front-end technologies integrated with AEM projects is to automate various tasks like Sass lint, compile Sass into CSS, minify CSS, merge JS files, JS error checking, and minify JS.
With the use of front-end technologies like Node, Grunt with an AEM project comes into the picture when a design team wants to write an entirely new dialect of JavaScript like Coffee Script. They might use different JavaScript testing libraries to unit test their code. Before handing over the code to an AEM developer, they will try to use task runners like Gulp or Grunt to compile and minify the code. This code is often so optimized it becomes difficult to read, difficult to edit, and difficult to debug. An inadvertent consequence of this process is that the AEM developer becomes dependent on the design team for even the smallest change.
What if instead of taking compiled, minified code from the design team, we did the compilation, minification in our build process? What if we receive the raw Sass, Less, or Coffee Script file right from the front-end developers? Rather than making the integration process more complicated, we can afford to learn few more programming languages that’d make the process smooth for the entire development team.
Code demonstration:
For the demonstration, we’re going to build a site based on a sample template. We will use “AEM project archetype” as a starting point for AEM projects. With the help of the AEM eclipse plugin, it indeed becomes piece of cake to create an AEM project. You can download the base project from here.
The next steps will require having Node.js installed, but in the case of an AEM project, Maven will download a local copy of Node.js. This will allow the project to run on machines where Node.js is not installed.
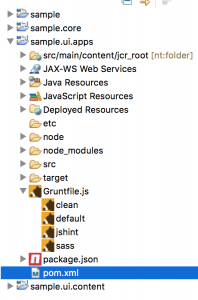
As a next step, in the ui.apps pom.xml, add dependencies to download Node and Grunt.
<plugin>
            <groupId>com.github.eirslett</groupId>
            <artifactId>frontend-maven-plugin</artifactId>
            <version>1.4</version>
            <executions>
                <execution>
                    <id>install node and npm</id>
                    <goals>
                        <goal>install-node-and-npm</goal>
                    </goals>
                    <configuration>
                        <nodeVersion>v6.11.0</nodeVersion>
                        <npmVersion>3.10.10</npmVersion>
                    </configuration>
                </execution>
                <execution>
                    <id>npm install</id>
                    <goals>
                        <goal>npm</goal>
                    </goals>
                    <configuration>
                        <arguments>install</arguments>
                    </configuration>
                </execution>
                <execution>
                    <id>grunt build</id>
                    <goals>
                        <goal>grunt</goal>
                    </goals>
                </execution>
            </executions>
</plugin>
Note: Make sure to copy/paste this code in ui.apps pom.xml under the “VAULT PACKAGE PLUGIN” section.
Once the dependencies are added to your pom file, run “mvn clean install” from the root of ui.apps under sample. The “front-end-maven-plugin” will download Node.js and NPM in parallel to sample.ui.apps (if they are not already there) and run Node.js and NPM from this directory. Node.js will install the dependencies indicated in the package.json file and run the Grunt task. The beauty of this solution is Node.js and NPM do not have to be installed on the machine where this build is running. More information on this great plugin can be found here.
Expand project under sample.ui.apps and create the following files.
- package.json – this file holds various metadata relevant to the project. The file is used to give information to npm that allows it to identify the project as well as handle the project’s dependencies.
- Gruntfile.js – Grunt is a JavaScript task runner, a tool used to automatically perform frequently used tasks such as minification, compilation, unit testing, linting, etc. It uses a command-line interface to run custom tasks defined in a file (known as a Gruntfile) .
- Dependencies added in package.json
{
 {
  "name": " sample ",
  "version": "1.0.0",
  "dependencies": {

  },
  "devDependencies": {
    "grunt": "^1.0.1",
    "grunt-cli": "^1.2.0",
    "grunt-contrib-clean": "^1.1.0",
    "grunt-contrib-jshint": "^1.1.0",
    "grunt-sass": "^2.0.0"
  }
}

Tasks defined in Gruntfile.js
module.exports = function(grunt) {
    // Project configuration.
    grunt.initConfig({
    pkg: grunt.file.readJSON('package.json'),
    clean: ['src/**/main.js'],
    sass: {                              // Task
      dist: {                            // Target
        options: {                       // Target options
          style: 'expanded'
        },
        files: {                         // Dictionary of files
          'src/main/content/jcr_root/etc/designs/sample/clientlib-site/css/main.css': 'src/**/main.scss'       // 'destination': 'source'
        }
      }
    },
    jshint: {
        all: ['Gruntfile.js', 'src/**/*.js']
      }
    });
    // Load required modules
    grunt.loadNpmTasks('grunt-sass');
    grunt.loadNpmTasks('grunt-contrib-clean');
    grunt.loadNpmTasks('grunt-contrib-jshint');

    // Task definitions
    grunt.registerTask('default', ['clean', 'sass', 'jshint']);
};
Adding the Scss and js files.
Create folders named scss and js under “src/main/content/jcr_root/etc/designs/sample/clientlib-site”
Download the SaaS and JS files from here. Unzip downloaded folders and copy/paste SaaS and JS folders from filesystem to project (in Eclipse) under client-site.
Path for clientlib-site where SaaS/Js folders requires to be added “src/main/content/jcr_root/etc/designs/sample/clientlib-site”

Build Sample Page Template.
Let’s create a template to show for demo purposes. Usually I break the html into components, but since it’s for demonstration, we will use as it is. Open up “apps/sample/components/structure/page/partials/body.html” and add the following content:
<!DOCTYPE html>
<html lang="en">
<head>
<meta charset="UTF-8">
<meta name="viewport" content="width=device-width, initial-scale=1.0">
<meta http-equiv="X-UA-Compatible" content="IE=edge">
<title> - POC Workflow Sample</title>
<link href="./main.css" rel="stylesheet">
<link rel="stylesheet" type="text/css" href="https://cloud.typography.com/7901534/7014552/css/fonts.css" />
</head>
<body>
<!-- Google Tag Manager -->
<noscript><iframe src="//www.googletagmanager.com/ns.html?id=GTM-N58S75>m_auth=4Z8z1P62GrTwxM_4TZaFag>m_preview=env-6>m_cookies_win=x"
height="0" width="0" style="display:none;visibility:hidden"></iframe></noscript>
<script>(function(w,d,s,l,i){w[l]=w[l]||[];w[l].push({'gtm.start':
new Date().getTime(),event:'gtm.js'});var f=d.getElementsByTagName(s)[0],
j=d.createElement(s),dl=l!='dataLayer'?'&l='+l:'';j.async=true;j.src=
'//www.googletagmanager.com/gtm.js?id='+i+dl+'>m_auth=4Z8z1P62GrTwxM_4TZaFag>m_preview=env-6>m_cookies_win=x';f.parentNode.insertBefore(j,f);
})(window,document,'script','dataLayer','GTM-N58S75');</script>
<!-- End Google Tag Manager -->
<header>
<ul>
<li><a href="#">Maecenas faucibus</a></li>
<li><a href="#">Euismod Venenatis</a></li>
<li><a href="#">Praesent</a></li>
<li><a href="#">Donec id elit</a></li>
<li><a href="#">Donec ullamcorper</a></li>
<li><a href="#">Duis mollis</a></li>
</ul>
</header>
<main>
<div>
<h1>Sample Page</h1>
<p>Vestibulum id ligula porta felis euismod semper. Cum sociis natoque penatibus et magnis dis parturient montes, nascetur ridiculus mus. Fusce dapibus, tellus ac cursus commodo, tortor mauris condimentum nibh, ut fermentum massa justo sit amet risus. Duis mollis, est non commodo luctus, nisi erat porttitor ligula, eget lacinia odio sem nec elit. Integer posuere erat a ante venenatis dapibus posuere velit aliquet. Integer posuere erat a ante venenatis dapibus posuere velit aliquet. </p>
<p>Sed posuere consectetur est at lobortis. Donec sed odio dui. Etiam porta sem malesuada magna mollis euismod. Morbi leo risus, porta ac consectetur ac, vestibulum at eros. </p>
<p>Vivamus sagittis lacus vel augue laoreet rutrum faucibus dolor auctor. Fusce dapibus, tellus ac cursus commodo, tortor mauris condimentum nibh, ut fermentum massa justo sit amet risus. Morbi leo risus, porta ac consectetur ac, vestibulum at eros. Maecenas sed diam eget risus varius blandit sit amet non magna. Sed posuere consectetur est at lobortis. </p>
<p>Lorem ipsum dolor sit amet, consectetur adipiscing elit. Integer posuere erat a ante venenatis dapibus posuere velit aliquet. Cras justo odio, dapibus ac facilisis in, egestas eget quam. Lorem ipsum dolor sit amet, consectetur adipiscing elit. Vivamus sagittis lacus vel augue laoreet rutrum faucibus dolor auctor. Nulla vitae elit libero, a pharetra augue. </p>
</div>
</main>
<footer>
<ul>
<li><a href="#">sample footer link</a></li>
<li><a href="#">another footer link</a></li>
<li><a href="#">more footer link</a></li>
<li><a href="#">yup, footer link</a></li>
</ul>
</footer>
<!-- jQuery -->
<script src="./jquery.min.js"></script>
<script src="./script.js"></script>
</body>
</html>
Build the sample project now:
- mvn clean install -PautoInstallPackage
The “ui.apps” package should be successfully installed. Once the build is successfully done, expand client-site folder. Under css folder, main.css file has been successfully generated as per task defined in Gruntfile.js. On the page load, main.css styles will apply on page.
Navigate to http://localhost:4502/sites and create a page using the “Sample Site Content Page” template. Your page should match the following screenshot: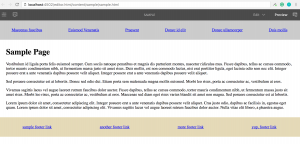
Let us know how it worked, and if you have any questions around using Grunt with AEM.