
The Why…
Salesforce Marketing Cloud Engagement is incredibly powerful at orchestrating customer journeys, but it was never designed to be a system of record. Too often, teams work around that limitation by copying large volumes of data from source systems into Marketing Cloud data extensions—sometimes nightly, sometimes hourly—just in case the data might be needed in a journey. This approach works, but it comes at a cost: increased data movement, synchronization challenges, latency, and ongoing maintenance that grows over time.
Custom Activities, which are surfaced in Journey Builder, open the door to a different model. Instead of forcing all relevant data into Marketing Cloud ahead of time, a journey can request exactly what it needs at the moment it needs it. When you pair a Custom Activity with MuleSoft, Marketing Cloud can tap into real-time, orchestrated data across your enterprise—without becoming another place where that data has to live.
Example 1: Weather
Consider a simple example like weather-based messaging. Rather than pre-loading weather data for every subscriber into a data extension, a Custom Activity can call an API at decision time, retrieve the current conditions for a customer’s location, and immediately branch the journey or personalize content based on the response. The data is used once, in context, and never stored unnecessarily inside Marketing Cloud.
Example 2: Enterprise Data
The same pattern becomes even more compelling with enterprise data. Imagine a post-purchase journey that needs to know the current status of an order, a shipment, or a service case stored in a system like Data 360. Instead of replicating that operational data into Marketing Cloud—and keeping it in sync—a Custom Activity can call MuleSoft, which in turn retrieves and aggregates the data from the appropriate back-end systems and returns only what the journey needs to proceed.
Example 3: URL Shortener for SMS (Real-Time)
While Marketing Cloud Engagement does provide it own form of a URL shortener, some companies want to use Bitly. Typically in order to use a Bitly URL we would have to move our logic to Server Side Javascript (SSJS) so the API call to Bitly could be made in the SSJS, and then we could use the URL in our text message. SSJS forces us to use Automation Studio which cannot be run in real-time and must be scheduled. This is very important to note, that being able to do API calls within the flow of a Journey is very powerful and helps to meet more real-time use cases. With these Custom Activities we can ask Mulesoft to call the Bitly API which returns the shortened URL so then it can be used in the email or SMS message.
This is where MuleSoft truly shines. It acts as a clean abstraction layer between Marketing Cloud and your enterprise landscape, handling authentication, transformation, orchestration, and governance. Marketing Cloud stays focused on customer engagement, while MuleSoft owns the complexity of integrating with source systems. The result is a more scalable, real-time, and maintainable architecture—one that reduces data duplication, respects system boundaries, and enables richer, more contextual customer experiences.
The How….
Part 1 – Hosted Files
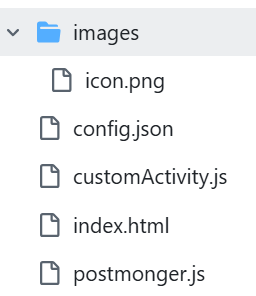
Every Marketing Cloud Custom Activity starts with hosted files. These files provide the user interface and configuration that Journey Builder interacts with, making them the foundation of the entire solution. At a minimum, this includes five main files/folders.
- index.html – This is what you see in Journey Builder when you click on the Custom Activity to configure it.
- config.json – This holds the Mulesoft endpoint to call and what output arguments will be used.
- customactivity.js – The javascript that is running behind the index.html page.
- postmonger.js – More javascript to support the index.html page
- A folder called images must exist and a single icon.png image should exist in it. This image is shown within Journey Builder.
These files tell Marketing Cloud how the activity behaves, what endpoints it uses, and how it appears to users when they drag it onto a journey. While the business logic ultimately lives elsewhere, within Mulesoft in our example, hosted files are what make the Custom Activity feel native inside Journey Builder.
In this pattern, hosted files are intentionally lightweight. Their primary responsibility is to capture configuration input from the marketer—such as which API operation to call, optional parameters, or behavior flags—and pass that information along when the journey executes. They are not responsible for complex transformations, orchestration, or direct system-to-system integrations. By keeping the hosted files focused on presentation and configuration, you reduce coupling with backend systems and make the Custom Activity easier to maintain, update, and reuse across different journeys.
A place to do a simple proof of concept is on GitHub if you want to try this yourself. You can easily create these four files and one folder in a repo. If you use GitHub, then you do have to use the Pages functionality in GitHub to make that repo public. This public URL will then be used when we configure the ‘Installed App’ in Marketing Cloud Engagement later.
One thing I had to overcome is that the config.json gets cached at the Marketing Cloud server level as talked about in this post. So when I had to make changes to my config.json, I would create a new folder (v2 / v3) in my repository and then use that path in my Installed Package in the Component added in Journey Builder.
Part 2 – API Server – Mulesoft
The Five Endpoints.
The five endpoints that have to be developed in Mulesoft are…
| Endpoint | Called When | Per Contact? | Returns outArguments? |
|---|---|---|---|
/save |
User saves config | ❌ | ❌ |
/validate |
User publishes | ❌ | ❌ |
/publish |
Journey goes live | ❌ | ❌ |
/execute |
Contact hits activity | ✅ | ✅ |
/stop |
Journey stops | ❌ | ❌ |
For the save, validate, publish and stop in Mulesoft they need to return a 200 status code and can return an empty JSON string of {} in the most basic example.
For the execute method, it should also return a 200 status code and simple json that looks like this for any outArguments… { status: “myStatus” }
The Security.
Part 3 – Journey Builder – Custom Activities
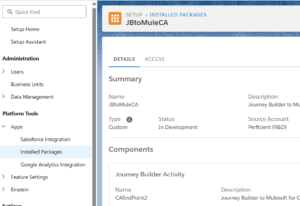
- Go to the ‘Installed Package’ in setup and create a new app following these steps.
- When you add your ‘Component’ to the Installed App selecting ‘Customer Updates’ in the ‘Category’ drop-down worked for me.
- My ‘Endpoint URL’ had a format like this: https://myname.github.io/my_repo_name/v3/
- Create a new Journey
- Your new Custom Activity will show up in the Components panel on the left-hand side. Since we selected ‘Customer Updates’ in step 1 above, our ‘Send to Mulesoft V3a’ Custom Activity shows in that section. The name under the icon comes from the config.json file. The image is the icon.png from the images folder.
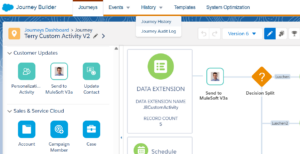
- Once you drag your Custom Activity onto the Journey Builder page you will be able to click on it to configure it.
- The user interface from the index.html will display when you click on it so you can configure your Custom Activity. Note that this user interface could be changed to collect whatever configuration needs to be collected.

- When the ‘Done’ buttons are clicked on the page, then the javascript runs and saves the configuration details into the Journey Builder itself. In my example the gray and blue ‘Done’ buttons are hooked to the same javascript and really do the same thing.
Part 4 – How to use the Custom Activity
outArguments
"arguments": {
   "execute": {
     "inArguments": [],
     "outArguments": [
       {
         "status": "DefaultStatus"
       }
     ],
     "url": "https://mymuleAPI.partofurl.usa-e1.cloudhub.io/api/marketingCloud/execute",
     "useJwt": false,
     "timeout": 60000,
     "retryCount": 3,
     "retryDelay": 3000,
     "concurrentRequests": 5
   }
 },
The second place is lower in the config.json file in the schema section and describes the actual data type for my output variable. We can see the status variable is a ‘Text’ field, that has access = visible and direction = out.
"schema":{
      "arguments":{
          "execute":{
              "inArguments": [],
              "outArguments":[
                  {
                      "status":{
                          "dataType":"Text",
                          "isNullable":true,
                          "access":"visible",
                          "direction":"out"
                      }
                  }
              ]
          }
      }
  }
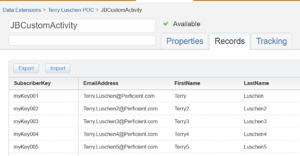
Note in the example below that I did not use a typical status value like ‘Not Started’, ‘In Progress ‘ and ‘Done’. That would have made more sense. 🙂 Instead I was running five records through my journey with various versions of my last name: Luschen, Luschen2, Luschen3, Luschen4 and Luschen5. So Mulesoft was basically received these different spellings through the json being passed over, parsed it out of the incoming json and then injected it into the response json in the status field. This is what the incoming data extension looked like.
An important part of javascript turned out to be setting the isConfigured flag to true in the customActivity.js file. This makes sure Journey Builder understands that node has been configured when the journey is ‘Validated’ before it is ‘Activated’.
activity.metaData = activity.metaData || {};
activity.metaData.isConfigured = true;
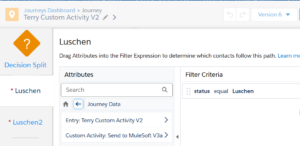
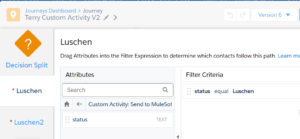
Now that we have our ‘status’ field as an output from Mulesoft via the Custom Activity, I will describe how it can be used in either a Decision Split or some AmpScript.
Decision Split
AmpScript
The Wrap-up…
As you let the flexibility of these Custom Activities sink in, it really creates a lot of flexible patterns. The more data we can surface to our marketing team, the more dynamic, personalized and engaging the content will become. While we all see more campaigns and use cases being developed on the new Agentforce Marketing, we all know that Marketing Cloud Engagement has some legs to it yet. I hope this post has given you some ideas to make your Marketing team look like heros as they use Journey Builder to its fullest potential!
I want to thank my Mulesoft experts Anusha Danda and Jana Pagadala for all of their help!
Please connect with me on LinkedIn for more conversations! I am here to help make you a hero with your next Salesforce project.
Example Files…
Config.JSON
{
  "workflowApiVersion": "1.1",
  "metaData": {
    "icon": "images/icon.png",
    "category": "customer",
    "isConfigured": true,
    "configOnDrop": false
  },
  "type": "REST",
  "lang": {
    "en-US": {
      "name": "Send to MuleSoft V3a",
      "description": "Calls MuleSoft to orchestrate downstream systems V3a."
    }
  },
  "arguments": {
    "execute": {
      "inArguments": [],
      "outArguments": [
        {
          "status": "DefaultStatus"
        }
      ],
      "url": "https://myMuleAPI.rajrd4-1.usa-e1.cloudhub.io/api/marketingCloud/execute",
      "useJwt": true,
      "timeout": 60000,
      "retryCount": 3,
      "retryDelay": 3000,
      "concurrentRequests": 5
    }
  },
  "configurationArguments": {
    "applicationExtensionKey": "MY_KEY_ANYTHING_I_WANT_MULESOFT_TEST",
    "save":    { "url": "https://myMuleAPI.rajrd4-1.usa-e1.cloudhub.io/api/marketingCloud/save",    "useJwt": true },
    "publish": { "url": "https://myMuleAPI.rajrd4-1.usa-e1.cloudhub.io/api/marketingCloud/publish", "useJwt": true },
    "validate":{ "url": "https://myMuleAPI.rajrd4-1.usa-e1.cloudhub.io/api/marketingCloud/validate","useJwt": true },
    "stop":    { "url": "https://myMuleAPI.rajrd4-1.usa-e1.cloudhub.io/api/marketingCloud/stop",    "useJwt": true }
  },
  "userInterfaces": {
    "configModal": { "height": 480, "width": 480 }
  },
  "schema":{
      "arguments":{
          "execute":{
              "inArguments": [],
              "outArguments":[
                  {
                      "status":{
                          "dataType":"Text",
                          "isNullable":true,
                          "access":"visible",
                          "direction":"out"
                      }
                  }
              ]
          }
      }
  }
}
Index.html
<!doctype html>
<html lang="en">
<head>
  <meta charset="utf-8" />
  <title>Terry – JB → Mule Custom Activity</title>
  <meta name="viewport" content="width=device-width, initial-scale=1" />
  <style>
    body { font-family: system-ui, -apple-system, Segoe UI, Roboto, Arial, sans-serif; margin: 24px; }
    label { display:block; margin-top: 16px; font-weight:600; }
    input, select, button { padding: 8px; font-size: 14px; }
    button { margin-top: 20px; }
    .hint { color:#666; font-size:12px; }
  </style>
</head>
<body>
  <h2>Send to MuleSoft – Custom Activity</h2>
  <p class="hint">Configure the API URL and (optionally) bind a Journey field3.</p>

  <label for="apiUrl">MuleSoft API URL</label>
  <input id="apiUrl" type="url" placeholder="https://api.example.com/journey/execute2" style="width:100%" />

  <label for="fieldPicker">Bind a field from Entry Source (optional)</label>
  <select id="fieldPicker">
    <option value="">— none —</option>
  </select>

  <button id="done">Done</button>

  <!-- Postmonger must be local in your repo - ADD BEGIN AND CLOSE BRACKETS BELOW-->
  script src="./postmonger.js"></script
  <!-- Your Postmonger client logic - ADD BEGIN AND CLOSE BRACKETS BELOW-->
  script src="./customActivity.js?v=2026-02-02v1"></script
</body>
</html>
CustomActivity.js
/* global Postmonger */
(function () {
  'use strict';

  // Create the Postmonger session (bridge to Journey Builder)
  const connection = new Postmonger.Session();

  // Journey Builder supplies this payload when we call 'ready'
  let activity = {};
  let schema = [];
  let pendingSelectedField = null;  // holds saved token until options exist

  document.addEventListener('DOMContentLoaded', () => {
    // Listen to JB lifecycle events
    connection.on('initActivity', onInitActivity);
    connection.on('requestedTokens', onTokens);
    connection.on('requestedEndpoints', onEndpoints);
    connection.on('requestedSchema', onRequestedSchema); // common pattern in field pickers
    connection.on('clickedNext', onDone);

    // Signal readiness and request useful context
    connection.trigger('ready');
    connection.trigger('requestTokens');
    connection.trigger('requestEndpoints');

    // Optionally, ask for Entry Source schema (undocumented but widely used in the field)
    connection.trigger('requestSchema');

    // Bind UI
    document.getElementById('done').addEventListener('click', onDone);
  });

  function onInitActivity (payload) {
    activity = payload || {};
    // Re-hydrate UI if the activity is being edited
    try {
      const args = (activity.arguments?.execute?.inArguments || [])[0] || {};
      if (args.apiUrl) document.getElementById('apiUrl').value = args.apiUrl;
      if (args.selectedField) document.getElementById('fieldPicker').value = args.selectedField;
      pendingSelectedField = args.selectedField;
    } catch (e) {}
  }

  function onTokens (tokens) {
    // If you ever need REST/SOAP tokens, they arrive here
    // console.log('JB tokens:', tokens);
  }

  function onEndpoints (endpoints) {
    // REST base URL for BU, if you need it
    // console.log('JB endpoints:', endpoints);
  }

  function onRequestedSchema (payload) {
    schema = payload?.schema || [];
    const select = document.getElementById('fieldPicker');

    // Keep current value if re-opening
    const current = select.value;
    // Reset options (leave the first '— none —')
    select.length = 1;

    // Populate with Entry Source keys (e.g., {{Event.APIEvent-UUID.Email}})
    schema.forEach(col => {
      const opt = document.createElement('option');
      opt.value = `{{${col.key}}}`;
      opt.textContent = col.key.split('.').pop();
      select.appendChild(opt);
    });

    if (current) select.value = current;
    if (pendingSelectedField) select.value = pendingSelectedField;

  }

  function onDone () {
    const apiUrl = document.getElementById('apiUrl').value?.trim() || '';
    const selectedField = document.getElementById('fieldPicker').value || '';

    // Validate minimal config
    if (!apiUrl) {
      alert('Please provide a MuleSoft API URL.10');
      return;
    }
    // alert(selectedField);

    // Build inArguments that JB will POST to /execute at run time
    const inArguments = [{
      apiUrl,            // static value from UI
      selectedField      // optional mustache ref to Journey Data
    }];

    // Mutate the activity payload we received and hand back to JB
    activity.arguments = activity.arguments || {};
    activity.arguments.execute = activity.arguments.execute || {};
    activity.arguments.execute.inArguments = inArguments;

    activity.metaData = activity.metaData || {};
    activity.metaData.isConfigured = true;

    // Tell Journey Builder to save this configuration
    connection.trigger('updateActivity', activity);
  }
})();