Introduction
In this blog, we’ll explore how to connect OpenAI’s API with a Spring Boot application, step by step.
We’ll cover the setup process, walk through the implementation with a practical example.
By integrating OpenAI with Spring Boot, you can create solutions that are not only powerful but also scalable and reliable.
Prerequisites
- Java 17+
- Maven
- Spring Boot (3.x recommended)
- OpenAI API Key (get it from platform.openai.com)
- Basic knowledge of REST APIs
OpenAI’s platform helps developers to understand how to prompt a models to generate meaningful text. It’s basically a cheat sheet for how to communicate to AI so it gives you smart and useful answers by providing prompts.
Implementation in Spring Boot
To integrate OpenAI’s GPT-4o-mini model into a Spring Boot application, we analyzed the structure of a typical curl request and response provided by OpenAI.
API docs reference:
https://platform.openai.com/docs/overview
https://docs.spring.io/spring-boot/index.html
Curl Request
<html>
curl https://api.openai.com/v1/chat/completions \
  -H "Content-Type: application/json" \
  -H "Authorization: Bearer YOUR_API_KEY" \
  -d '{
    "model": "gpt-4o-mini",
    "messages": [
      {"role": "assistant", "content": "Hello"},
      {"role": "user", "content": "Hi"}
    ]
  }'
</html>

Note-
“role”: “user” – Represents the end-user interacting with the assistant
“role”: “assistant” – Represents the assistant’s response.
The response generated from the model and it looks like this:
{
  "id": "chatcmpl-B9MBs8CjcvOU2jLn4n570S5qMJKcT",
  "object": "chat.completion",
  "created": 1741569952,
  "model": "gpt-4o-mini-2025-04-14",
  "choices": [
    {
      "index": 0,
      "message": {
        "role": "assistant",
        "content": "Hello! How can I assist you today?",
        "refusal": null,
        "annotations": []
      },
      "logprobs": null,
      "finish_reason": "stop"
    }
  ],
  "usage": {
    "prompt_tokens": 19,
    "completion_tokens": 10,
    "total_tokens": 29,
    "prompt_tokens_details": {
      "cached_tokens": 0,
      "audio_tokens": 0
    },
    "completion_tokens_details": {
      "reasoning_tokens": 0,
      "audio_tokens": 0,
      "accepted_prediction_tokens": 0,
      "rejected_prediction_tokens": 0
    }
  },
  "service_tier": "default"
}
Controller Class:
In below snippet, we will explore a simple spring boot controller to interact with Open AI’s API. When end user sends a prompt to that url (e.g /bot/chat?prompt=what is spring boot), the controller reads the model name and API url from applocation.properties file. It then creates a request using prompt provided and sends it to Open AI using rest call(RestTemplate). After verifying the request, OpenAI sends back a response.
@RestController
@RequestMapping("/bot")
public class GenAiController {

    @Value("${openai.model}")
    private String model;

    @Value(("${openai.api.url}"))
    private String apiURL;

    @Autowired
    private RestTemplate template;

    @GetMapping("/chat")
    public String chat(@RequestParam("prompt") String prompt) {
        GenAiRequest request = new GenAiRequest(model, prompt);
        System.out.println("Request: " + request );
        GenAIResponse genAIResponse = template.postForObject(apiURL, request, GenAIResponse.class);
        return genAIResponse.getChoices().get(0).getMessage().getContent();
    }
Configuration Class:
Annotated with @Configuration, this class defines beans and settings for the application context. Pulling the Open API key from properties file and the a customized RestTemplate is created and configured to include the Authorization Bearer <API_KEY> header in all requests. This setup ensures that every call to OpenAI’s API is authenticated without manually adding headers in each request.
@Configuration
public class OpenAIAPIConfiguration {

    @Value("${openai.api.key}")
     private String openaiApiKey;

    @Bean
    public RestTemplate template(){
        RestTemplate restTemplate=new RestTemplate();
        restTemplate.getInterceptors().add((request, body, execution) -> {
            request.getHeaders().add("Authorization", "Bearer " + openaiApiKey);
            return execution.execute(request, body);
        });
        return restTemplate;
    }

}
Require getters and setters for request and response classes:
Based on the Curl structure and response, we generated the corresponding request and response java classes with appropriate getters and setters with selected attributes to repsesent request and response object. These getter/setter classes help turn JSON data into objects we can use in code, and also turn our code’s data back into JSON when interacting to the OpenAI API. We implemented a bot using the gpt-4o-mini model, integrating it with a REST controller and also handled the authentication via the API key.
//Request
@Data
public class GenAiRequest {

    private String model;
    private List<GenAIMessage> messages;

    public List<GenAIMessage> getMessages() {
        return messages;
    }

    public GenAiRequest(String model, String prompt) {
        this.model = model;
        this.messages = new ArrayList<>();
        this.messages.add(new GenAIMessage("user",prompt));
    }
}

@Data
@AllArgsConstructor
@NoArgsConstructor
public class GenAIMessage {

    private String role;
    private String content;

    public String getContent() {
        return content;
    }
    public void setContent(String content) {
        this.content = content;
    }
}

//Response
@Data
@AllArgsConstructor
@NoArgsConstructor
public class GenAIResponse {

    private List<Choice> choices;

    public List<Choice> getChoices() {
        return choices;
    }

    @Data
    @AllArgsConstructor
    @NoArgsConstructor
    public static class Choice {

        private int index;
        private GenAIMessage message;
        public GenAIMessage getMessage() {
            return message;
        }
        public void setMessage(GenAIMessage message) {
            this.message = message;
        }

    }

}
Essential Configuration for OpenAI Integration in Spring Boot
To connect your Spring Boot application with OpenAI’s API, you need to define a few key properties in your application.properties or application.yml file:
- server.port: Specifies the port on which your Spring Boot application will run. You can set it to any available port like 8080, 9090, etc. (The default port for a Spring Boot application is 8080)
- openai.model: Defines the OpenAI model to be used. In this case, gpt-4o-mini is selected for lightweight and efficient responses.
- openai.api.key: Your secret API key from OpenAI. This is used to authenticate requests. Make sure to keep it secure and never expose it publicly.
- openai.api.url: The endpoint URL for OpenAI’s chat completion API. (This is where your application sends prompts and receives responses)
server.port=<add server port>
openai.model=gpt-4o-mini
openai.api.key=	XXXXXXXXXXXXXXXXXXXXXXXXXXXX
openai.api.url=https://api.openai.com/v1/chat/completions
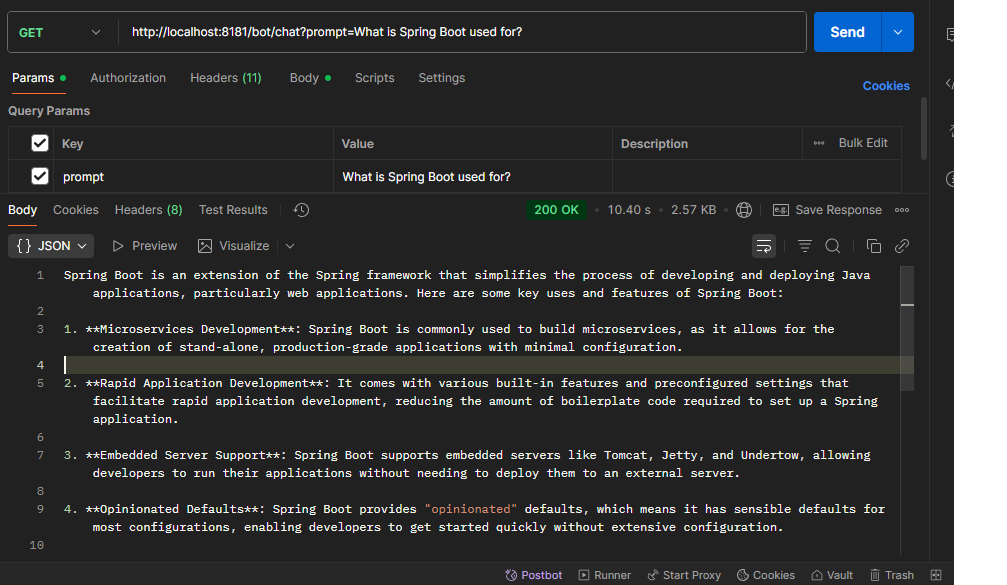
Postman Collection:
GET API: http://localhost:<port>/bot/chat?prompt=What is spring boot used for ?
Content-Type: application/json
Usage of Spring Boot + OpenAI Integration
- AI-Powered Chatbots: Build intelligent assistants for customer support, internal helpdesks, or onboarding systems.
- Content Generation Tools: Automate blog writing, email drafting, product descriptions, or documentation, generate personalized content based on user input.
- Code Assistance & Review: Create tools that help developers write, refactor, or review code using AI, Integrate with IDEs or CI/CD pipelines for smart suggestions.
- Data Analysis & Insights: Use AI to interpret data, generate summaries, answer questions about datasets combine with Spring Boot APIs to serve insights to dashboards or reports.
- Search Enhancement: Implement semantic search or question-answering systems over documents or databases, use embeddings and GPT to improve relevance and accuracy.
- Learning & Training Platforms: Provide personalized tutoring, quizzes, and explanations using AI & adapt content based on user performance and feedback.
- Email & Communication Automation: Draft, summarize, or translate emails and messages, integrate with enterprise communication tools.
- Custom usages: In a business-to-business context, usage can be customized according to specific client requirements.