
Introduction
Serverless is changing the game—no need to manage servers anymore. In this blog, we’ll see how to build a serverless blogging platform using AWS Lambda and Python. It’s scalable, efficient, and saves cost—perfect for modern apps.
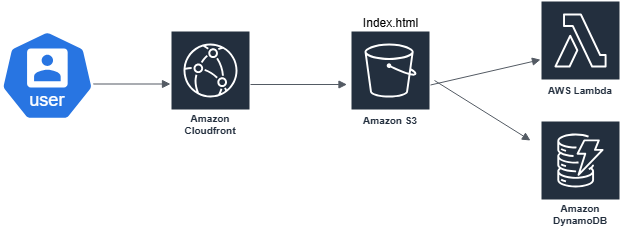
How It Works
Prerequisites
Before starting the demo, make sure you have: an AWS account, basic Python knowledge, AWS CLI and Boto3 installed.
Demonstration: Step-by-Step Guide
Step 1: Create a Lambda Function
Open the Lambda service and click “Create function.” Choose “Author from scratch,” name it something like BlogPostHandler, select Python 3.x, and give it a role with access to DynamoDB and S3. Then write your code using Boto3 to handle CRUD operations for blog posts stored in DynamoDB.
Step 2: Set Up API Gateway
First, go to REST API and click “Build.” Choose “New API,” name it something like BlogAPI, and select “Edge optimized” for global access. Then create a resource like /posts, add methods like GET or POST, and link them to your Lambda function (e.g. BlogPostHandler) using Lambda Proxy integration. After setting up all methods, deploy it by creating a stage like prod. You’ll get an Invoke URL which you can test using Postman or curl.

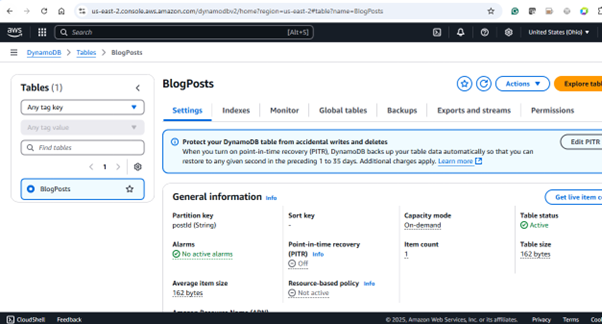
Step 3: Configure DynamoDB
Open DynamoDB and click “Create table.” Name it something like BlogPosts, set postId as the partition key. If needed, add a sort key like category for filtering. Default on-demand capacity is fine—it scales automatically. You can also add extra attributes like timestamp or tags for sorting and categorizing. Once done, hit “Create.”
.

Step 4: Deploy Static Content on S3
First, make your front-end files—HTML, CSS, maybe some JavaScript. Then go to AWS S3, create a new bucket with a unique name, and upload your files like index.html. This will host your static website.
After uploading, set the bucket policy to allow public read access so anyone can view your site. That’s it—your static website will now be live from S3.
{
    "Version": "2012-10-17",
    "Statement": [
        {
            "Sid": "PublicReadGetObject",
            "Effect": "Allow",
            "Principal": "*",
            "Action": "s3:GetObject",
            "Resource": "arn:aws:s3:::your-bucket-name/*"
        }
    ]
}
After uploading, don’t forget to replace your-bucket-name in the bucket policy with your actual S3 bucket name. This makes sure the permissions work properly. Now your static site is live—S3 will serve your HTML, CSS, and JS smoothly and reliably.
Step 5: Distribute via CloudFront
Go to CloudFront and create a new Web distribution. Set the origin to your S3 website URL (like your-bucket-name.s3-website.region.amazonaws.com, not the ARN). For Viewer Protocol Policy, choose “Redirect HTTP to HTTPS” for secure access. Leave other settings as-is unless you want to tweak cache settings. Then click “Create Distribution”—your site will now load faster worldwide.

To let your frontend talk to the backend, you need to enable CORS in API Gateway. Just open the console, go to each method (like GET, POST, DELETE), click “Actions,” and select “Enable CORS.” That’s it—your frontend and backend can now communicate properly.

Additionally, in your Lambda function responses.(We already added in our lambda function), make sure to include the following headers.
Results
That’s it—your serverless blogging platform is ready! API Gateway gives you the endpoints, Lambda handles the logic, DynamoDB stores your blog data, and S3 + CloudFront serve your frontend fast and globally. Fully functional, scalable, and no server headaches!

Conclusion
Building a serverless blog with AWS Lambda and Python shows how powerful and flexible serverless really is. It’s low-maintenance, cost-effective, and scales easily perfect for anything from a personal blog to a full content site. A solid setup for modern web apps!