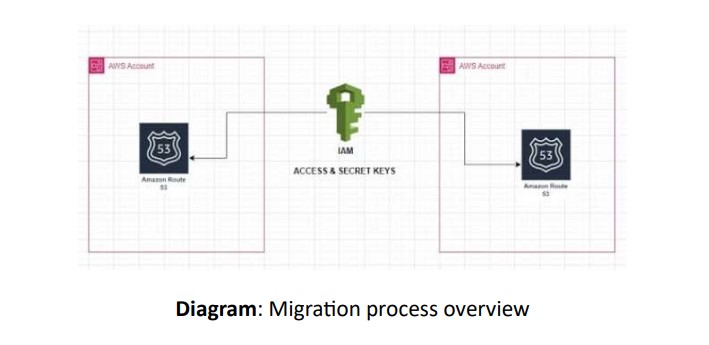
Transferring Route 53 hosted zone records between AWS accounts using the CLI involves exporting the records from one account and then importing them to another. Here’s a step-by-step guide:
Migration of DNS Hosted Zones in AWS
The primary objective of this process is to migrate Route 53 hosted zone records seamlessly between AWS accounts while ensuring minimal disruption to DNS functionality. This involves securely transferring DNS records, preserving their integrity, maintaining availability, and ensuring linked AWS resources remain accessible. Additionally, cross-account DNS access may be implemented as needed to meet business requirements.

Objectives:
- Migration Process Overview
- Prerequisites
- Configuration Overview
- Best Practices
- Conclusion
Prerequisites:
- Account Permissions: Ensure you have AmazonRoute53FullAccess permissions in both source and destination accounts. For domain transfers, additional permissions (TransferDomains, DisableDomainTransferLock, etc.) are required.
- Export Tooling: Use the AWS CLI or SDK for listing and exporting DNS records, as Route 53 does not have a built-in export feature.
- Destination Hosted Zone: Create a hosted zone in the destination account with the same domain name as the original. Note the new hosted zone ID for use in subsequent steps.
- AWS Resource Dependencies: Identify resources tied to DNS records (such as EC2 instances or ELBs) and ensure these are accessible or re-created in the destination account if needed.
Configuration Overview:
1. Crete EC2 Instance and Download the cli53 in Using Below Commands:
- Use the AWS CLI53 to list DNS records in the source account and save them to a JSON file:
Wget https://github.com/barnybug/cli53/releases/download/0.8.16/cli53-linux-amd64
Note: Linux can also be used, but it requires cli53 dependency and AWS credentials
- Move the cli53 to the bin folder and change the permission

2. Create Hosted Zone in Destination Account:
- In the destination account, create a new hosted zone with the same domain name using cli or GUI:
- Take note of the new hosted zone ID.
3. Export DNS Records from Existing Hosted Zone:
- Export the records using cli53 in ec2 instance using below command and remove NS and SOA records from this file, as the new hosted zone will generate these by default.

Note: Created Microsoft.com as dummy hosted zone.
4. Import DNS Records to Destination Hosted Zone:
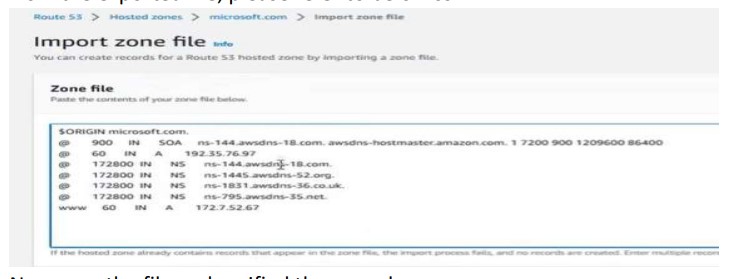
- Use the exported JSON file to import records into the new hosted zone for that just copy all records from the domain.com.txt file

- Now login to other AWS route53 account and just import the records those copied from the exported file, please refer to below ss
- Now save the file and verified the records

5. Test DNS Records:
- Verify DNS record functionality by querying records in the new hosted zone and ensuring that all services resolve correctly.
Best practices:
When migrating Route 53 hosted zones between AWS accounts, applying best practices helps ensure a smooth transition with minimal disruption. Here are key best practices for a successful Route 53 hosted zone migration:
1. Plan and Document the Migration Process
- Detailed Planning: Outline each step of the migration process, including DNS record export, transfer, and import, as well as any required changes in the destination account.
- Documentation: Document all DNS records, configurations, and dependencies before starting the migration. This helps in troubleshooting and serves as a backup.
2. Schedule Migration During Low-Traffic Periods
- Reduce Impact: Perform the migration during off-peak hours to minimize potential disruption, especially if you need to update NS records or other critical DNS configurations.
3. Test in a Staging Environment
- Dry Run: Before migrating a production hosted zone, perform a test migration in a staging environment. This helps identify potential issues and ensures that your migration plan is sound.
- Verify Configurations: Ensure that the DNS records resolve correctly and that applications dependent on these records function as expected.
4. Use Route 53 Resolver for Multi-Account Setups
- Centralized DNS Management: For environments with multiple AWS accounts, consider using Route 53 Resolver endpoints and sharing resolver rules through AWS Resource Access Manager (RAM). This enables efficient cross-account DNS resolution without duplicating hosted zones across accounts.
5. Avoid Overwriting NS and SOA Records
- Use Default NS and SOA: Route 53 automatically creates NS and SOA records when you create a hosted zone. Retain these default records in the destination account, as they are linked to the new hosted zone’s configuration and AWS infrastructure.
6. Update Resource Permissions and Dependencies
- Resource Links: DNS records may point to AWS resources like load balancers or S3 buckets. Ensure that these resources are accessible from the new account and adjust permissions if necessary.
- Cross-Account Access: If resources remain in the source account, establish cross-account permissions to ensure continued access.
7. Validate DNS Records Post-Migration
- DNS Resolution Testing: Test the new hosted zone’s DNS records using tools like dig or nslookup to confirm they are resolving correctly. Check application connectivity to confirm that all dependent services are operational.
- TTL Considerations: Set a low TTL (Time to Live) on records before migration. This speeds up DNS propagation once the migration is complete, reducing the time it takes for changes to propagate.
8. Consider Security and Access Control
- Secure Access: Ensure that only authorized personnel have access to modify hosted zones during the migration.
9. Establish a Rollback Plan
- Rollback Strategy: Plan for a rollback if any issues arise. Keep the original hosted zone active until the new configuration is fully tested and validated.
- Backup Data: Maintain a backup of all records and configurations so you can revert to the original settings if needed.
Conclusion
Migrating a Route 53 hosted zone between AWS accounts involves careful planning, especially to ensure DNS records are exported and imported correctly. After migrating, testing is crucial to confirm that DNS resolution works as expected. Cross-account setups may require additional configuration, such as Route 53 Resolver rules, to ensure seamless DNS functionality across environments.

