
Background
Orphan members in OneStream are the members with no parent. Due to this, they are bit difficult to locate using Search Hierarchy feature, since technically they do not sit anywhere in hierarchy. They even do not get captured in grid view. Sometimes, an organization might want to delete them as they are no longer required or maybe align them back into appropriate location in hierarchy. This blog focuses on simple Excel & Notepad++ based techniques, to populate the list of orphan members, and deleting them (if required).
Tools Required
Technique shared in the blog requires 2 software:
- Microsoft Excel
- Notepad++
Notepad++ is an open-source software available free of cost. Microsoft 365 version of Excel is required as this technique uses a function named TEXTSPLIT( ) which was rolled out for 365 version of Excel. Alternatively, Excel for Web can also be used which is always updated, and available via free sign-up of Microsoft Account.
Case Study Showcase
Below is the screenshot of UD1 hierarchy for Product brand-wise.

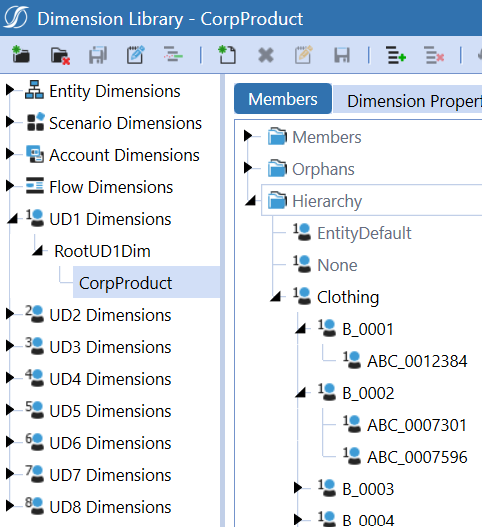
100+ members have become Orphans node, as their relationship was removed to park them outside.
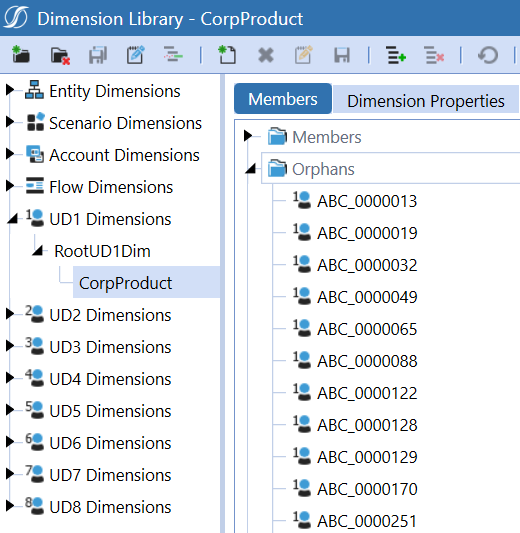
These members were created to incorporate entire catalog but were never purchased / sold. Organization wants to delete them permanently to keep data lightweight for better performance. Deleting 100+ members one-by-one would be herculean task, wasting hours of efforts. Let’s see some simple hacks, to populate list of orphan members. Once the list gets populated, those members can be deleted or re-aligned as desired, using Load/Extract feature.
Population of Orphan Member list
Following are the steps to derive & populate orphan member list:
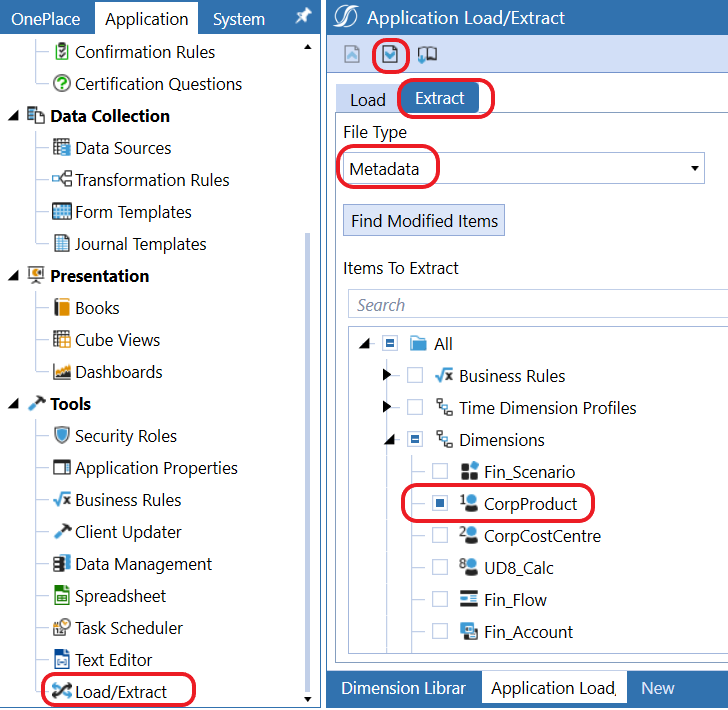
- Go to Application > Load/Extract > Extract. In the dropdown, select Metadata. In the Metadata hierarchy, select the desired dimension. Click extract button which will open file Save As dialog, to save the XML file.
- Open the file using Notepad++ (right-click XML file & choose Edit with Notepad++).
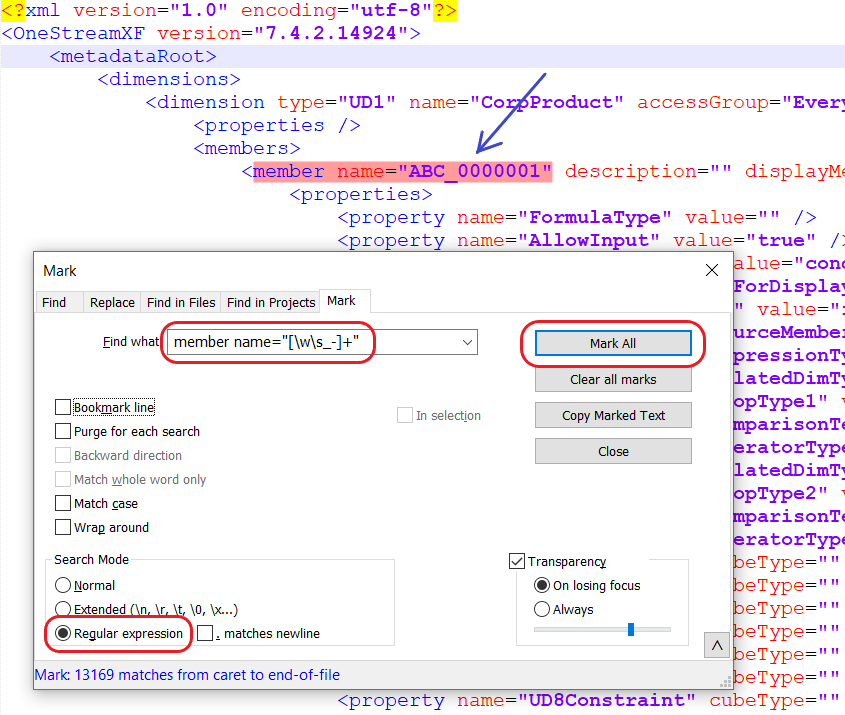
- Next, we will select value of name field of all the members from XML present in the dimension (which includes orphans too). In the Notepad++ go to menu Search > Mark. In Search Mode, select Regular Expression. In Find what textbox, write the pattern member name=”[\w\s_-]+” and then click Mark All button. This will mark text from member tag with value in name XML attribute.
(text matching the pattern is highlighted / marked with red background color)
Pattern Reference: \w = any text/number \s = any space _ = any underscore – = any hyphen + = one or more instances of these characters
- Click Copy Marked Text button, to copy all pattern matching textual instances.
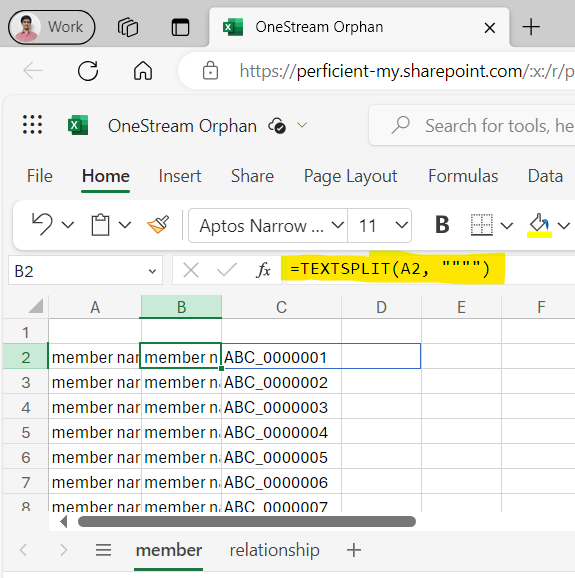
- Open Microsoft Excel, create 2 worksheets named member and relationship. Paste the copied text into worksheet member (as demonstrated below in cell A2)

- In the cell B2, write following formula expression =TEXTSPLIT(A2, “”””) [refer below screenshot – formula], which will split text based on double quotes. The split will span to 3 cells since member name value is enclosed in two double quotes. Copy-paste this formula expression for all the cells (make use of fill handle) This will produce a list of all members (including orphan) in column C.
- Get back to Notepad++ & press Clear all marks, button. Place cursor in the first line.
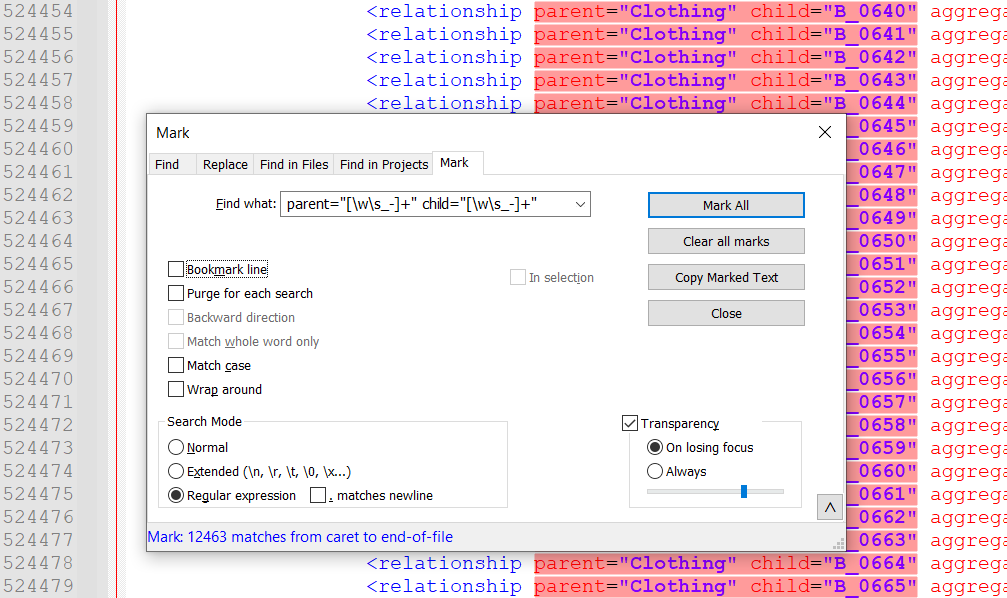
- This time, again invoke Mark dialog as illustrate in step 3 and perform same actions, with expression as parent=”[\w\s_-]+” child=”[\w\s_-]+” which will select parent/child text from relationship part of XML (refer below screenshot obtained to verify accuracy of selection by scrolling to the end of document)
- Repeat the step no 4 to 6, this time copy-pasting text into worksheet relationship as demonstrated in below screenshot.
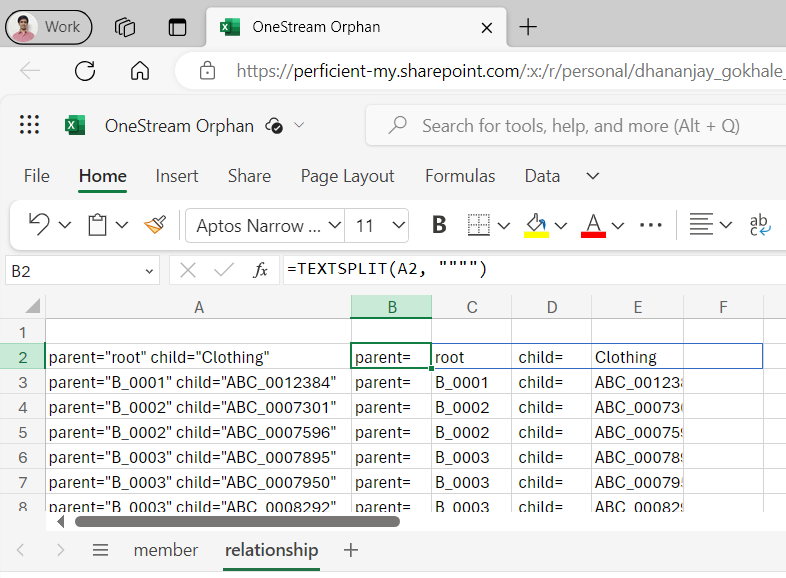
- Column E contains child member and C contains name of parent, representing hierarchy. Technically, every member (excluding root) from worksheet member, should be populated in this list in column E. Member mapped into alternative hierarchy, would be populated multiple times in this list. But an orphan member would never find a place here since it is missing on relationship totally. So, we will setup a VLOOKUP to carve out such instances, as illustrated below in cell F2 with formula expression as =VLOOKUP(C2,relationship!E:E,1,0) and copy-paste it till last row.
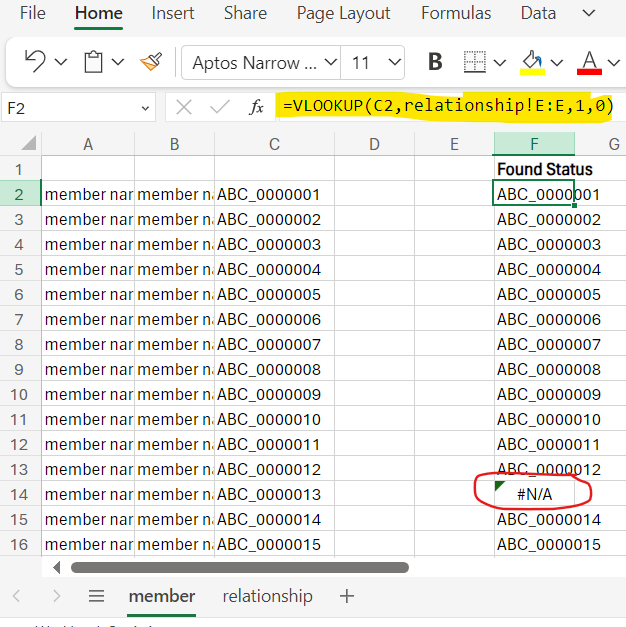
- Apply filter via menu Data > Filter, and check for #N/A in in value filter (i.e. values not found in relationship), which denotes orphan members.
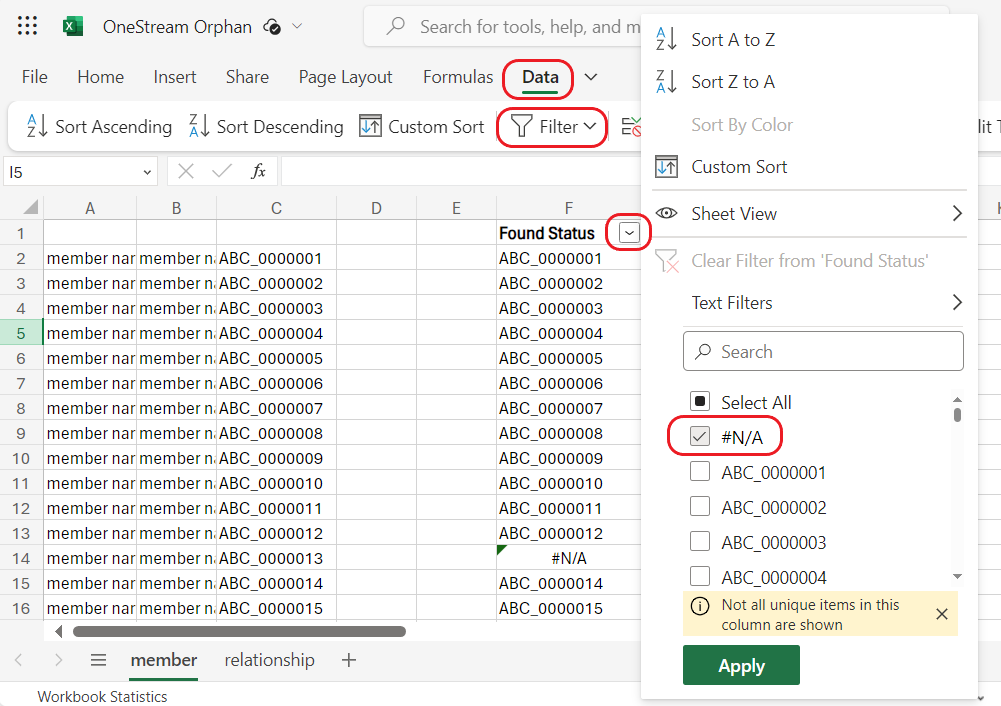
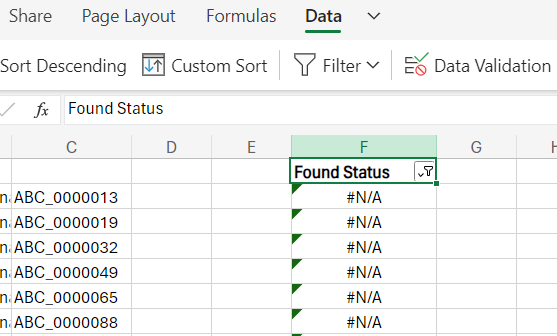
- Below is the result of Orphan members (refer below screenshot)
Deletion of Members
The orphan members identified in above steps, can be deleted (if required), by a simple Excel-based hack. Below are the steps:
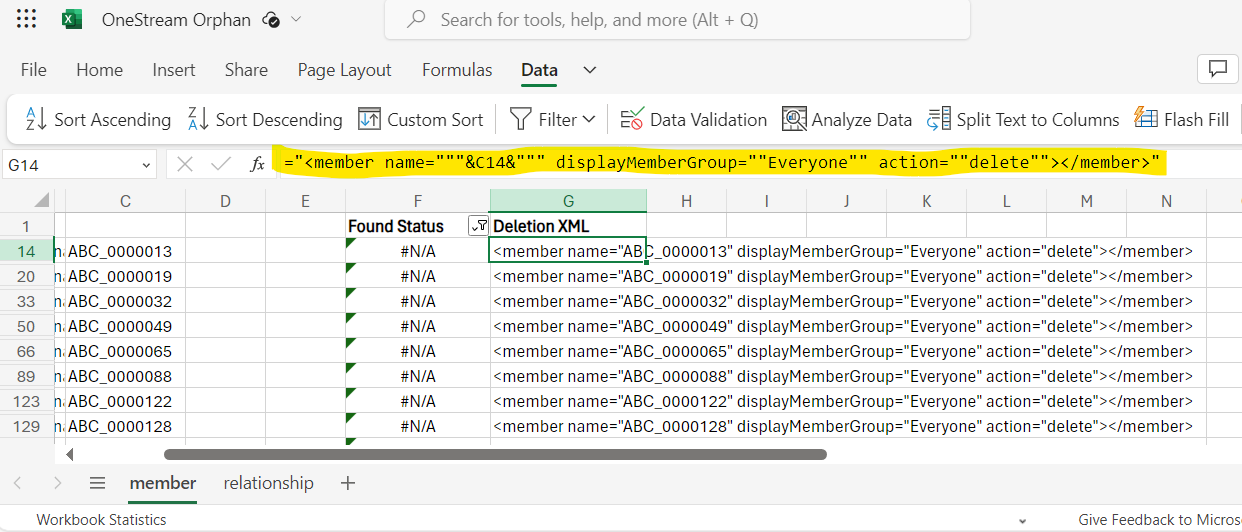
- Extend following columns with formulas as shown in the screenshot below, to generate Member deletion XML. Copy-paste formula till last row. Grab the formula text from below to avoid typing mistake.
=”<member name=”””&C691&””” displayMemberGroup=””Everyone”” action=””delete””></member>”
- Create a new file in Notepad++, copy-paste XML header / footer from exported XML file, as shown in below screenshot, which serves as bare-bones for deletion lines.
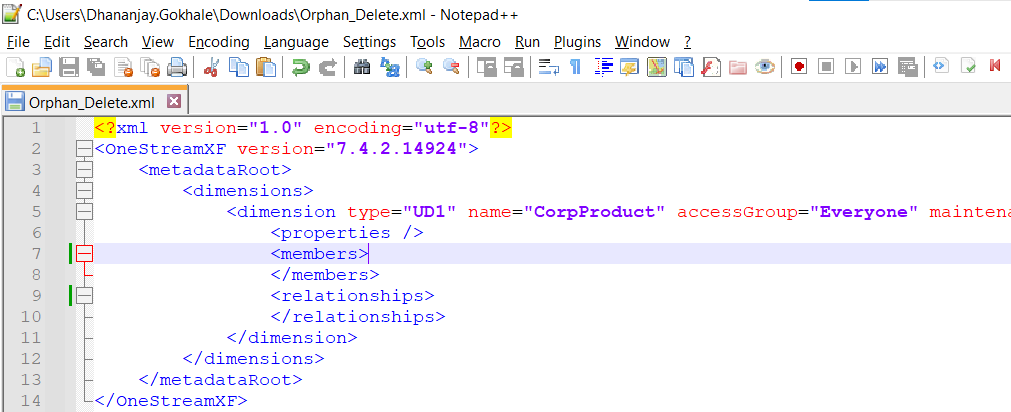
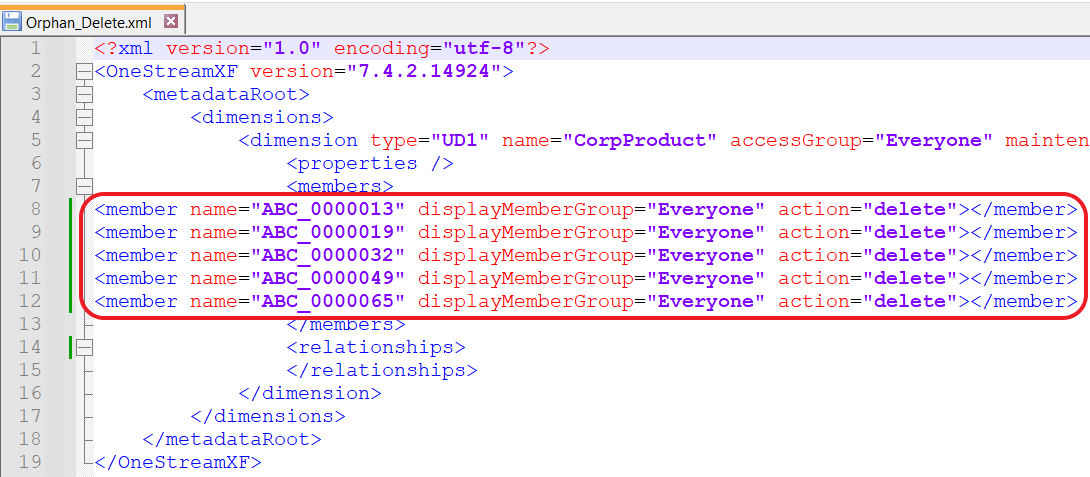
- Copy-paste Deletion XML lines generated via Excel formula for all the orphan members in this XML file between <members></members> XML tags, as shown in below sample screen-clipping for 4-5 members.
- Save the above file in Notepad++
- Import this file in OneStream via Load/Extract menu, which would delete those orphan members.
Precautions
- Always backup entire Dimension hierarchy via Load/Extract menu by exporting it to XML file. This backup XML can be used to revert deletion, provided no further changes were made to hierarchy post deletion.
- Plenty of online backup storage are available for cheap price. It is safe to upload multiple versions of hierarchy backup XML file every time such modifications are made, which might come to the rescue in future.
- It is wise to double-check member list being deleted. OneStream does not provide Undo button like Excel / Word.
- Do not forgot the test things in Development application first and then deploy to Production.
Additional Notes
- This approach assumes that member name consists of letters / number / underscore / hyphen. Any other character used in name would be required to be included in regular expression search pattern.
- Orphan member deletion would fail if any data for it is found loaded. Kindly ensure this before running deletion XML.
- The trick of deletion is generic & works for any member (irrespective of it is orphan or not)