Previously we did a deep dive in to the prerequisites required for Sitecore database upgrade and steps needed to prepare for it.
In this second part of the 3 part blog series, we will go over the steps that need to be performed to do the actual upgrade of databases.
Upgrade Steps
-
- Go to https://dev.sitecore.net/Downloads/Sitecore_Experience_Platform/103/Sitecore_Experience_Platform_103_Update1.aspx and review the steps in the “Prepare for the upgrade” section of the “Upgrade Container Deployment Guide” guide.
- Navigate to the directory C:\sitecoreupgrade\SitecoreContainerDeployment.10.3.1.009452.1448\compose\ltsc2019\upgrade\xp1
- Spot the upgrade.env file and open it for editing.
- Set the values of these environment variables in that file. Make tweaks as needed as per your solution set up.
SQL_DATABASE_PREFIX=Sitecore
SQL_SERVER=IPADDRESSORDOMAINNAMEOFYOURSQLCONTAINER
SQL_USERNAME=sitecoreupgrade
SQL_PASSWORD=sitecoreupgrade
IS_ALWAYS_ENCRYPTED=False
PROCESSING_ENGINE_TASKS_DATABASE_USERNAME=dbo
DATABASE_UPGRADE_FROM_VERSION=9.3.0
DATABASE_UPGRADE_TO_VERSION=10.3.1
- To convert and compress the Sitecore license to base 64 string, run the script present in “ConvertTo-CompressedBase64String” method present in the upgrade guide. Copy the output of the script and use it to set the value of “SITECORE_LICENSE” variable in the upgrade.env file.
- As we are upgrading from Sitecore 9.3.0, login to your local Sitecore instance, select control panel and in “Database” Section, select “Clean up databases”.
- Open powershell in Admin mode and change the directory to “C:\sitecoreupgrade\SitecoreContainerDeployment.10.3.1.009452.1448\compose\ltsc2019\upgrade\xp1”
- Run this docker command to create the SQL Upgrade Container. “docker-compose -f .\docker-compose.upgrade.yml –env-file .\upgrade.env up”
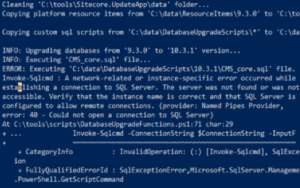
- As the SQL upgrade container starts executing the scripts inside it, you might get this error regarding SQL upgrade container not able to connect with SQL container. This is also mentioned in “Troubleshooting” section of upgrade guide.
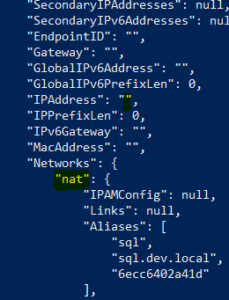
- After some troubleshooting, we discovered that SQL container and SQL upgrade container were not on the same network.
- To review the network for the SQL container, I ran the command “docker inspect ” in PowerShell and navigated down the to the Networks section where the network for sql container was “nat”.
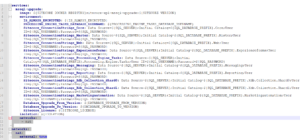
- So to force the SQL upgrade container to use the same network as SQL container, I added the following(highlighted) lines of code to “docker-compose.upgrade.yml” file present inside the C:\sitecoreupgrade\SitecoreContainerDeployment.10.3.1.009452.1448\compose\ltsc2019\upgrade\xp1 folder. Line 24-26 defines the network and line 21-22 tells the container to use that specific network.
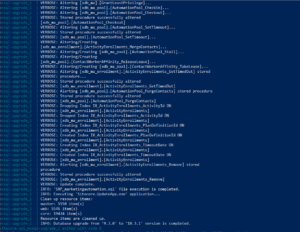
- After making these changes to docker-compose.upgrade.yml file, I re-ran this command “docker-compose -f .\docker-compose.upgrade.yml –env-file .\upgrade.env up” in powershell and this time it ran successfully. To verify that the upgrade script ran successfully, look for log entry similar to “INFO: Database upgrade from 9.3.0 to 10.3.1 version is completed.” Here are some screenshots for reference.
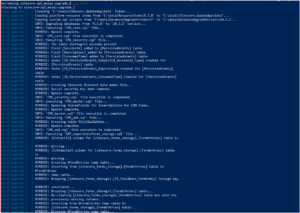
Sitecore database upgrade in progress
By now, we had successfully upgraded the 9.3.0 databases to 10.3.1. To validate the database upgrade, we executed the following steps.
- Start vanilla instance of 10.3.1 via docker compose.
- Verify login to Sitecore.
- Rebuild VS solution (By the time I got to this step, my teammates had already upgraded the VS solution to 10.3.1).
- Take backup of Vanilla 10.3.1 databases on local.
- Enable contained authentication.
- Stop 10.3.1 SQL container.
- Copy the mdf and ldf files for all upgraded databases from localhost volume of 9.3.0 SQL container to a temp folder.
- Inside the temp folder rename the files with same name as the Vanilla 10.3.1 files and copy them to the localhost volume of 10.3.1 SQL container.
- Restart the 10.3.1 SQL container.
At this point, our local website had been upgraded to 10.3.1 databases and code base.
The next step of upgrade was to split core db so that membership info is in a separate database and here are the steps we performed for it.
- Take backup of core db.
- Download the zip from https://dev.sitecore.net/Downloads/Scripts_for_Sitecore_Security_database.aspx and extract its contents to C:\sitecoreupgrade\move membership tables.
- Review the readme and KCD Documentation file.
- Update the parameters in the files as needed. I changed the default value for $server to the IP address of the SQL container.
- Execute the scripts as mentioned in the documentation.
- Make sure update the compose file for solution so that ${SQL_DATABASE_PREFIX}.Core is changed to ${SQL_DATABASE_PREFIX}.Security for the ‘Sitecore_ConnectionStrings_Security’ and ‘Sitecore_Sitecore__IdentityServer__SitecoreMemberShipOptions__ConnectionString’ connection string.
- Validate login to Sitecore works.
This concludes the steps to be performed to upgrade Sitecore databases. In the last part of this blog series, we will take a look at steps that need to be executed after we have upgraded our Sitecore databases to 10.3.1.


Or you can just pull content packages and install them into your 10.3.1 environment. It’s way easier.