

Version Control Basics:
Before beginning with version control, we should know the basic terminologies used in version control. A few terms used in version control are version control, commit, push, pull, and branch.
Version Control: Every change to the code is recorded by version control in the form of a database. If a mistake is made, you can go back in time, compare it to prior iterations, and assist in correcting the error while causing the least interruption to other people working on that code. It’s possible that the code you’re monitoring is infrastructure code or program source code. Any kind of code might be used. Not just software engineers use version control.
Commit: The local repository’s modifications are tracked using the Git commit command. For instance, you might wish to update the online repository with the changes you made after adding new files, editing old files, removing files, etc. You must first commit the changes to the repository before updating the online repository.
Branches: You may also produce what are known as branches from the main code. allowing each team member to work on their assignment independently before merging their modifications into the main code when finished. People may operate without being obstructed by others, thanks to the branches. Additionally, the ability to merge the code back into the main code enables checks to be made to guarantee that there are no code conflicts that can result in problems.
Push: You just created a new public repository for a project, and you want to upload all your files to it. Or maybe you’re continually working on a project from a private GitHub repository for your company, and you want to push the latest changes that you’ve made.
Pull: It is suggested that code from one branch be merged into another branch via pull requests (PRs). As they enable developers to suggest improvements to substantial open-source codebases, PRs are a key tool in the development of open-source software.
Traditional Git Model
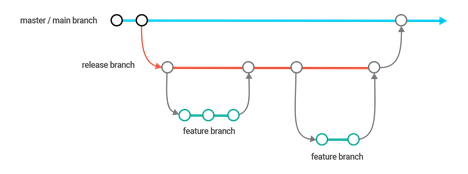
The below figure shows the working of a traditional git model.
Pic Courtesy Copado Inc
Let us have a quick look at how the release process takes place.
- To write a code, the team should first Create Release Branch from the main branch.
- One of the developers will create his First Local Feature Branch and commit his work to it.
- Then he generates a Pull Request so that her coworkers may examine it.
- If the pull request is approved, the feature branch is Merged into the release branch.
Consider a scenario where the business owner decides not to include some of the commits in the release. The developers must pick the commits from the release branch in such a scenario. Imagine a scenario where there are 100s of commits as the team working on the project is large. The situation might become error-prone. Finding the commits that pertain to the feature gets considerably harder if the firm hasn’t developed a naming standard.

After completing all these procedures, they must Manually Resolve any conflicts and reconcile the release branch’s modifications with those made to the main branch and master.
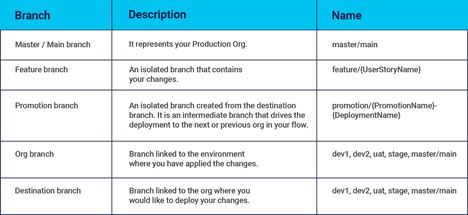
Before we begin with Copado, I want you to clearly understand key terms.
Pic Courtesy Copado Inc
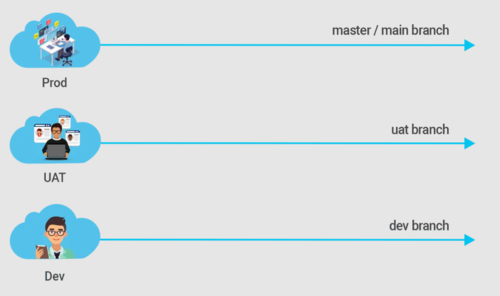
The metadata for your Production environment will be located in your master branch, whilst the metadata for your Dev and UAT environments will be found in the Dev and UAT branches, respectively.
Pic Courtesy Copado Inc
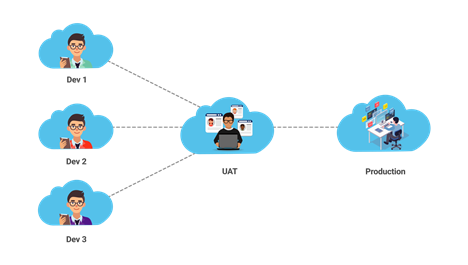
Now, the same company came to a solution to use Copado. The Branching Strategy of Copado attempts to enable the features produced to be separated for whatever length is required. Since just the features you want for your release are included in your package, doing so is simple.
Pic Courtesy Copado Inc
In the figure, we can see that there are Different Dev Environments for every feature. Later the code is moved to the UAT and checked for errors. If the code is running fine, the code is later moved into production. This is a release pipeline followed by Copado.
We must remember that the Production Environment is considered a ‘No Error branch.’ That means the branch is a Stable Environment. The feature branches are created from the main branch, which is the production branch. It is also possible to create multiple feature branches from the promotion branch.
Benefits of Using Copado:
Isolated work: You may easily delete the offending user story and attempt again to create a promotion without the affecting feature branch if a deployment fails.
Time Saver: By automating the construction of the Feature and Promotion branches and merging these branches—the Feature branch into the Source branch and the Promotion branch into the Destination branch.
Traceability: To make it simple to find the branches Copado produces in your repository, it uses a naming scheme for each branch.
Conclusion:
With the help of Copado, working with release management has become easier. If any conflicts are discovered with Copado during the merging, Copado can automatically resolve them through several techniques. You can accurately capture your work in user stories using Copado.