
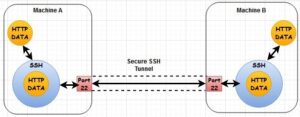
SSH tunneling is the feature offered by the OpenSSH tool, which lets us create a tunnel between two hosts so that data from some other protocol is encapsulated in the SSH header and transferred as SSH data between those two hosts.
SSH comes with authentication and encryption built-in, meaning we can use SSH tunnels to transfer the data from unsecured services between two hosts.
SSH tunneling can be implemented in three ways:
- SSH Tunnel (local port forwarding)
- Reverse SSH Tunnel (remote port forwarding)
- Dynamic SSH Tunnel (dynamic port forwarding)
SSH Tunnel (local port forwarding)
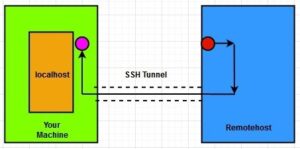
When you create an SSH tunnel with local port forwarding, the SSH tunnel forwards the data from the port on the client machine to the port on the server machine. It is the simplest form of SSH tunnel.
Use the following command to set up the SSH tunnel between your machine and remote machine (given that you have SSH access to the remote machine):
ssh -L 1234:localhost:5678 remoteuser@remotehost
In this command, “-L” refers to the local side listening. With the above command, all the data coming on “port 1234” of your machine will be encapsulated as SSH data and forwarded to “port 5678” of the remotehost. In the above example, “localhost” refers to the localhost IP of a remote machine.

Another implementation of local port forwarding is the following:
ssh -L 1234:farawayhost_IP:5678 remoteuser@remotehost
In this kind of implementation, all the data coming on “port 1234” of your machine will be forwarded to the “port 5678” on the farawayhost machine by remotehost machine (given that farawayhost allows the remote host to send data for port 5678).

Local port forwarding is very useful while accessing the services hosted on a private network. Let’s take a scenario where your office network only allows SSH connections to the inside resources/machines, blocks all other traffic from outside networks, and you want to access the website restricted to your office network securely. In such a case, you can create an SSH tunnel to the machine inside your office network and access the restricted website:
ssh -L 8080:restricted.domain.com:80 remoteuser@remotehost
You can access the restricted website with the URL “http://localhost:8080” in your local machine browser. This is one of many use cases of local port forwarding. One other use case would be to access the database on the server securely without exposing the database ports.
Reverse SSH Tunnel (Remote Port Forwarding)

Reverse SSH tunnel listens to the port on the remote machine and forwards all the data coming on that port to the specified port on your local machine via SSH.
ssh -R 1234:localhost:5678 remoteuser@remotehost
In this command, “-R” refers to the remote side listening and listens to the “port 1234” on the remote machine and forwards all the data from “port 1234” of the remote machine to the “port 5678” on your local machine.
Another implementation of remote port forwarding is the following:
ssh -R 1234:nearhost_IP:5678 remoteuser@remotehost
In this example, all the data from “port 1234” of the remote machine will be forwarded by your local machine to “port 5678” of the nearhost machine.

Now let’s imagine a scenario where a developer is developing an application/website on its local machine and wants to let his/her client/team access that locally hosted website/app for a demo. Often, you do not have a public IP for your local machine (although you can create access to your local machine by configuring NAT rules, it doesn’t always work). You can create a reverse SSH tunnel to a publicly accessible server for “port 80” (or any custom port) and let the end-users (clients or your team members in this example) browse the website using the IP address of this public server on “port 80” (or any custom port that you define in the command) to access the website.
Before you consider implementing a reverse SSH tunnel, the parameter “GatewayPorts” should be set to “yes” in your remotehost’s SSH server configuration file “/etc/ssh/sshd_config.”
Dynamic SSH Tunnel (Dynamic Port Forwarding)
Before we learn about what a dynamic SSH tunnel is, let’s discuss what a proxy and a Socket Secure (SOCKS) proxy are. Simply, a proxy is a service/server that makes a request on your behalf. You must have used HTTP proxy, where your browser connects to a proxy server and that proxy server makes the HTTP request on your behalf and forwards you the response it gets.
Aside from traffic forwarding, proxy servers provide security by hiding the actual IP address of a client.

A SOCKS proxy routes any type of traffic generated by any protocol or program to the actual server on the behalf of the client. Unlike an HTTP proxy, it’s protocol-independent.
Many applications like browsers support a SOCKS proxy where you configure the IP and port of the proxy server. If the proxy is configured on the browser, this request is encapsulated with the SOCKS header where the destination port and IP of your request become the port and IP of the proxy server you configured on your browser.
The proxy server then decapsulates this data and sends the request to the actual IP (IP of the website) and port (80 or 443), where the source IP is the IP of the proxy server.
Let’s demonstrate the Dynamic SSH tunnel by revisiting the example we saw for local port forwarding. In that case, if you want to access multiple restricted URLs in a private network, you will have to create multiple static SSH tunnel sessions to the destination host. This is not a feasible solution.
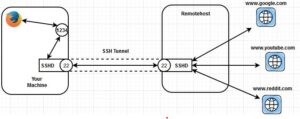
Here comes the dynamic SSH tunnel to the rescue, which leverages the SOCKS protocol. You can implement the dynamic SSH tunnel using the following command:
ssh -D 1234 remoteuser@remotehost
In this case, your SSH tunnel acts as SOCKS proxy listening on “port 1234.” The request is added to “port 1234” of your local machine will be forwarded to the remotehost machine, and the remotehost machine will make the request to the actual server on your behalf.
Your client application should be SOCKS aware. In this case, our client is our browser. We will consider Firefox in our example:
Go to “Settings.” Click “General,” then “Network Settings,” and click the “Settings” button. Select “Manual proxy configuration.” Enter the IP address of your local machine (127.0.0.1 will also work) in the section “SOCKS Host.” Next, enter the port number you specified in the above command (1234 in this example).
Now, whenever you hit any URL, the request will be sent to “port 1234” of your local machine by the browser, which will then be forwarded to the remote host via SSH tunnel, and then the remotehost will make the request to the actual server on your behalf. In this case, all the Domain Name System (DNS) requests by the browser are also made through the remotehost machine.
This kind of implementation is very helpful when you’re connected to a public internet source like a hotel or restaurant Wi-Fi. You can set up a small device like a Raspberry Pi (a small pocket-sized System-on-Chip Computer) in your home network and make it SSH accessible publicly. Connect to the Raspberry Pi by using the dynamic SSH tunnel and configure your browser accordingly. This can protect you from a “Man-In-The-Middle” attack (where an attacker sniffs the data traffic between the source and the destination) while using the public internet.
Easily Utilize SSH Tunneling
SSH tunneling is a very simple feature yet very powerful, enabling secure data transfer over a network. As we’ve discussed, SSH Tunneling doesn’t have any fixed type of use case, but it can come in very handy in different kinds of situations if you know how it works. For more information, contact our experts.
Excellent article thank you.