
This tutorial walks you through how to add multiple hyperlinks inside an image and embed it into a SharePoint page. To add a hyperlink to an image, we want to map the link in the image with its coordinates. You can easily accomplish this through an image map.
Image Maps
An image map allows a user to click on different clickable areas of the image and be linked to different destinations, making it easy to navigate to a different page. By using image mapping, you can define linked areas inside an image, thus allowing the image to have several clickable areas.
There are two ways to create a multi-clickable area in an image:
- Create an image map in classic SharePoint online.
- Create a multi-click image using PowerPoint in modern SharePoint online.
Create an Image Map in Classic SharePoint Online
First, I selected the image below.

Now we’ll create an image clickable area for those numbers. When a user clicks on number 1, then the test 1 page will open. When a user clicks on number 2, the test 2 page will show, and the same for number 3 also.
For that to happen, we need to create the clickable area of the image using the Free Image Map generator. We can upload the image by clicking on the “Select Image from My PC,” or we can also load images from a website by clicking on the “Load Image from Website” button. See below for what you’ll see once it’s uploaded:

After this, select the bubble under “active” on the left, then select “Rect” from the shape dropdown.

Click on number one on the top left corner of the image. Then, click on number one on the bottom right corner. You can adjust the rectangle map area on the image.
Fill in all of the details needed:
- Link (page URL)
- Title (page name)
- Target (_blank)
Clicking “add new area” will allow you to create multiple clickable map areas on the image. Do this to repeat the same process as before for numbers two and three on that image.
Click on “show me the code,” and a code dialog will appear.

Select “all,” copy the code, and change the image source path to where the image will be uploaded, which is in the SharePoint site path like below:

Go to the classic SharePoint site, edit the page, add the script editor web part, and paste the code. It will display as shown in the screenshots below:

Click on, “add a web part.”


Click on the folder, “media and content,” “script editor,” and “add script editor web part.”
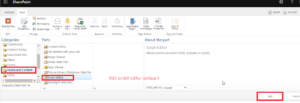
Click on the “insert” button.

Now, try to click on number one.

If we click on number one, it will redirect to the “Test1.aspx” page. It will do the same as for numbers two and three.
Create a Multi-Click Image Using PowerPoint in Modern SharePoint Online
Open PowerPoint, insert the number image, and follow these steps:
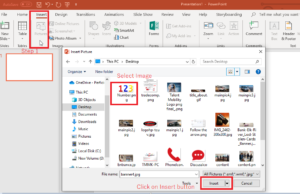
Step 1: Select your image. Click on “insert” to add your picture.

Step 2: Click on “shapes,” select a rectangle shape, draw a rectangle on top of number one, and adjust the area where a user can click for number one.

Step 3: Right click on the rectangle shape and click “link.” Add the URL of where you’ll want the user to end up.

Step 4: A dialog box will appear. Add the URL in the address field and select “ok.”

Step 5: Click on “shape fill” and click “no fill” to make it transparent.

Step 6: Click on “shape outline” and click “no outline” so that the border isn’t visible.
Step 7: Repeat the same steps from 1 to 6 for number 2 and 3.
Step 8: Save the PowerPoint file in a local drive.
Step 9: Go to the SharePoint site page and edit the page.


Step 10: Add the “file viewer” webpart, select that PowerPoint, and save/publish the page.

Then, click on number one on the image. It will navigate to the test 1 page.
Easy SharePoint Knowledge to Utilize
I hope this tutorial will help to implement image mapping in SharePoint online. For any other questions or information on this topic, contact our experts today.