
Sitecore is able to support displaying your web pages in multiple languages. Providing multilingual support helps convince your customers you are providing them with a quality service or product by catering to their preferred languages. This is in fact the application of the behavioral theory called the Endowment Effect. Showing that you understand your customer’s needs will make them more likely to shop with your company over other competitors. Want to learn more about the Endowment Effect and how it applies to your online presence? Read more on that in my colleague Megan Jensen’s blog here. After you have read that, read this blog post to learn how to implement multilingual support in Sitecore with SXA.
Step 1 – Add the language you want to support
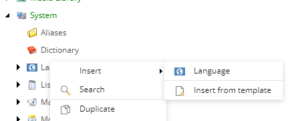
Right-click the Languages node found under /sitecore/system and insert a Language item.
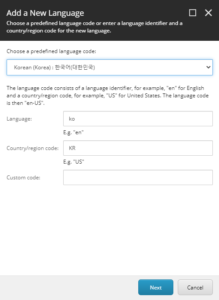
In the Add a New Language dialog box, select the language you want to support using the dropdown at the top. After making a selection there, the fields below the dropdown will auto-populate.
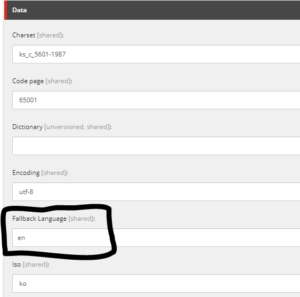
After the language item is created, be sure to set a Fallback Language. While this isn’t a necessary step, I recommend doing this. If a piece of content does not exist in the new language you are adding, you will still want to show content for it in any language you can. This is the purpose of a fallback.
Step 2 – Apply the new language to the SXA site
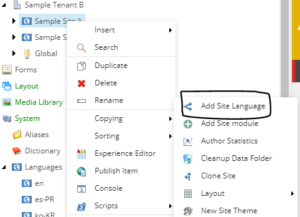

To apply a new language to your SXA site, simply right-click the SXA site node and navigate to the Add Site Language option found nested underneath Scripts.
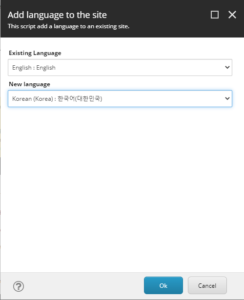
This next dialog window is an important one. After clicking Ok, Sitecore will create a new version of every item in the site for language selected in the New Language dropdown. It will pre-populate every field value with the existing values found on the item in the language selected in the Existing Language dropdown.
Step 3 – Create site definition items
You will need to create CD site definitions for each language you choose to support. Each site definition will need to have its own host name and target host name that are different from the other CD site definition items. The start item (home page item) will be the same for each site definition item since Step 2 has created a new language version on the same Sitecore items your previously supported language versions live on. Yes, this means there will be a different public facing site for each language. For example, since I have added Korean support to my previously English-only sample website, users will navigate to either englishsamplesite.com or koreansamplesite.com.
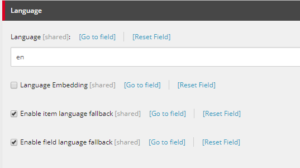
In each of the site definition items, be sure to set the Language field to whatever language that site should be in. Then check either the item language fallback or the field language fallback options. While you can enable both, Sitecore says it will impact performance if you do both. Regardless, you should check at least one of them, so Sitecore knows to fallback to the language we designated as the Fallback Language from Step 1.
If you are on a version of SXA that does not have checkboxes for language fallback options, you will need to set these options in the Other Properties section on the site definition items. The properties to specify are the enableItemLanguageFallback and the enableFieldLanguageFallback properties. Set them to a value of true or false depending on what you need.
If you do not want to have a separate site per language, you can work around this by specifying your links with the query string parameter sc_lang appended to it. For example, if I wanted to navigate to the Korean version of a page, I would append ?sc_lang=ko-KR to the URL. You can create a custom dropdown on your site that represents a language selector. The links in this language selector would append the sc_lang property to the URL. After a user switches languages via the query string, Sitecore will remember to stay in that new language because the selected language is stored in a cookie.
Step 4 – Enable fallback languages in shell
Once you have enabled language fallback on your site definition items in Step 3, you will also need to enable the same settings on the shell as well. Simply patch in the following into your Sitecore config:
<configuration xmlns:patch="http://www.sitecore.net/xmlconfig/">
  <sitecore>
    <sites>
      <site name="shell">
        <patch:attribute name="enableItemLanguageFallback">true</patch:attribute>
        <patch:attribute name="enableFieldLanguageFallback">true</patch:attribute>
      </site>
    </sites>
  </sitecore>
</configuration>
Step 5 – Enable fallback languages in search
Much like Step 4, you will also need to enable language fallback in your search index configurations. Simply add in the following settings into your configs:
<configuration xmlns:patch="http://www.sitecore.net/xmlconfig/" xmlns:search="http://www.sitecore.net/xmlconfig/search/">
  <sitecore search:require="azure">
    <contentSearch>
      <configuration type="Sitecore.ContentSearch.ContentSearchConfiguration, Sitecore.ContentSearch">
        <indexes hint="list:AddIndex">
          <index id="sample_web_index" type="Sitecore.ContentSearch.Azure.CloudSearchProviderIndex, Sitecore.ContentSearch.Azure">
            <enableItemLanguageFallback>true</enableItemLanguageFallback>
            <enableFieldLanguageFallback>true</enableFieldLanguageFallback>
          </index>
        </indexes>
      </configuration>
    </contentSearch>
  </sitecore>
</configuration>
For those paying close attention, we are manipulating the same attributes found in Step 4. This time, however, we are setting the attribute values in the index configuration instead of the site configuration. You will need to ensure that your search provider provides support for the language you are trying to add to your site. If it doesn’t support it, you will need to add that support to your search provider yourself.
Conclusion
That’s a wrap! Be sure to publish all your changes, and your site will then support a new language. Woohoo! Your customers will feel more compelled to shop with your company over others since they will feel more endowed with your service by supporting their preferred language. Let me know in the comment section if you have any questions about enabling multilingual support with Sitecore and SXA!