
In the first part of this series, I discussed the power of Red Hat’s Compliance Operator for securing your OpenShift 4.x clusters. I gave a quick overview of the installation and then walked through how to initiate compliance scans and review the high-level results. I also showed the power of the Compliance Operator by applying all of the automated remediations that come with the operator.
In this section, I’m going to extract the results from my scans and generate a nice OpenSCAP Evaluation Report in html format, as well as a simple task list for the remaining items that require manual remediation.
If you recall from my first post, I ran scans against my worker and master nodes, as well as the OpenShift Container Platform itself. I showed how you can see the results of those scans in the ComplianceScan tab of the operator.
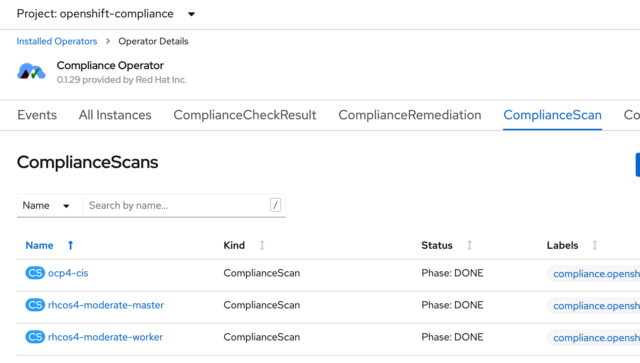
The results from those scans are stored in a persistent volume claim (PVC), one for each scan type. If you go to the openshift-compliance project in the console, you’ll see that it has three PVCs assigned to it:
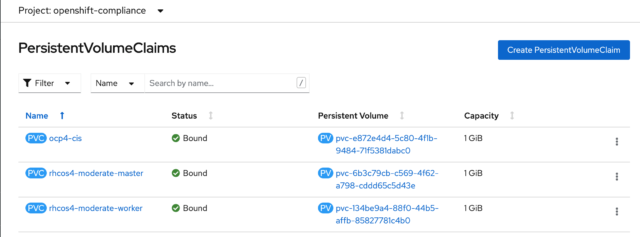
You can see the same thing from the CLI by running this command:
$ oc get pvc -n openshift-compliance
I want to pull the files the scan generated out of those PVCs, and to do that, I’m going to create a pod and mount those volumes.
The Red Hat OpenShift documentation has a simple yaml file that can be used to create this pod and mount the volumes. Here’s what the yaml looks like:
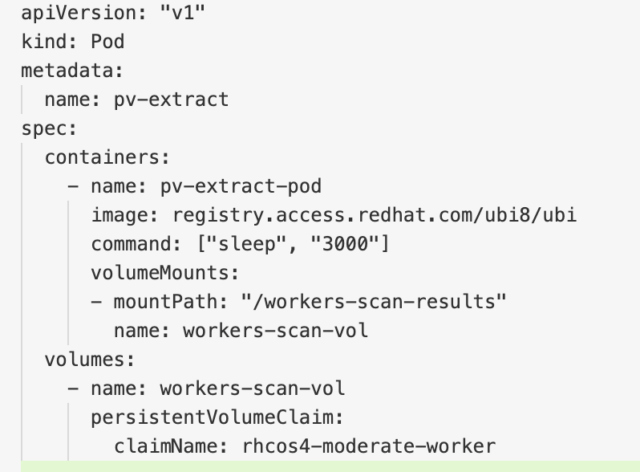
Note that you could mount all three volumes on this single pod. However, you might encounter an issue with this if your PVCs are in different availability zones in a cloud environment, so for this tutorial, I’ll just mount the results of the worker nodes.
I saved this file as pv-extract.yaml and then ran this OpenShift CLI command to create the pod:
$ oc create -f pv-extract.yaml
Give the pod time to create and then you should be able to copy the results from the volume to your local machine. Before I do that, I first created a little directory structure on my bastion host to house all the results. I made a directory called scan-results with subdirectories of master, worker, and ocp. Then, I ran this command:
$ oc cp pv-extract:/workers-scan-results ./scan-results/worker/
After I copied the results, and before I go any further, it’s important to delete that pod, otherwise, the volume won’t be available for the next scan:
$ oc delete pod pv-extract
Now, within that downloaded directory, you’ll see one or more subdirectories were copied from the pod. These are numbered sequentially, beginning with 0. In my case, there are three:
$ ls -l
total 0
drwxr-xr-x. 2 ec2-user ec2-user 224 Apr 14 18:05 0
drwxr-xr-x. 2 ec2-user ec2-user 224 Apr 14 18:05 1

drwxr-xr-x. 2 ec2-user ec2-user 259 Apr 14 18:15 2
If you’ll recall, the default ScanSetting configuration contained a cron style entry to run the scans daily. Each scan result is contained in a separate directory. Also, when I manually initiated a scan it created a separate directory as well.
Let’s work with the number 2 directory, as that contains the results of my scan after I applied all of the automated remediations. You’ll see that in my case, this directory contains three bzip’d files:
$ ls
rhcos4-moderate-worker-ip-10-0-0-1.ec2.internal-pod.xml.bzip2
rhcos4-moderate-worker-ip-10-0-0-2.ec2.internal-pod.xml.bzip2
rhcos4-moderate-worker-ip-10-0-0-3.ec2.internal-pod.xml.bzip2
There is one file for each of the three worker nodes that were scanned.
I want to convert these files to an OpenSCAP report, and to do that, I’ll first need to install OpenSCAP. The machine I’m working on as my bastion host is a RHEL8 machine and the steps below are for that. You might have to adjust these steps somewhat for your OS version. Also, I’m going to run these two commands as root (or you can use sudo):
# curl -L http://copr.fedoraproject.org/coprs/openscapmaint/openscap-latest/repo/epel-\ 8/openscapmaint-openscap-latest-epel-8.repo \
-o /etc/yum.repos.d/openscapmaint-openscap-latest-epel-8.repo
# yum install -y openscap openscap-utils scap-security-guide –skip-broken
Now that I have OpenSCAP installed, I’m going to take one of the worker node bzip2 files and generate an html formatted report with this command:
$ oscap xccdf generate report <worker-filename.xml.bzip2> > \ <worker-filename>.html
For my example, this is what the command looks like:
$ oscap xccdf generate report rhcos4-moderate-worker-ip-10-0-0-1.ec2.internal-pod.xml.bzip2 > \ worker-ip-10-0-0-1.html
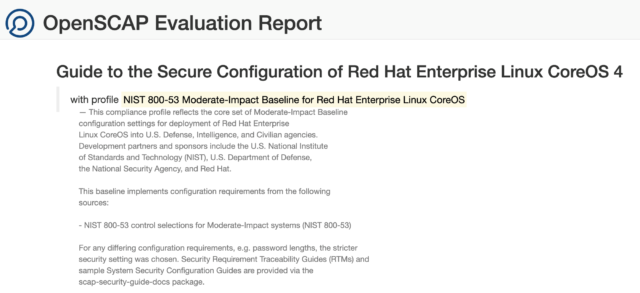
Once that report is generated, I can view it in a web browser, and see that I have a very nicely formatted report, with lots of helpful detail.
Here are a few snippets of what that report looks like:

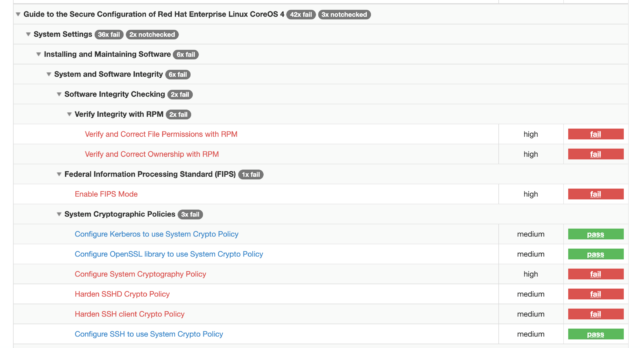
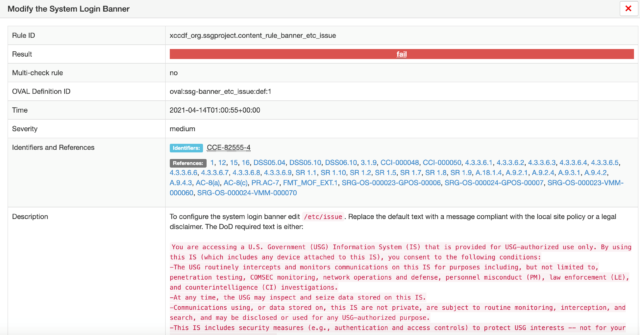
You’ll also see that you have the ability to drill down into each finding by clicking on it:
Remember you’ll want to run this for each volume (worker, master, ocp) and for each bzip2 file. It’s beyond the scope of this blog, but clearly, this type of exercise, where you’ll be running similar steps repeatedly lends itself well to some automation (like Ansible) and/or gitops.
One last thing I’d like to show in this post is a simple way to build a task list of the remaining items. Remember after I ran my scan I ran this command to see the high-level results:
$ oc get compliancecheckresult
It provided a list of all the checks and their status (pass, fail, etc…).
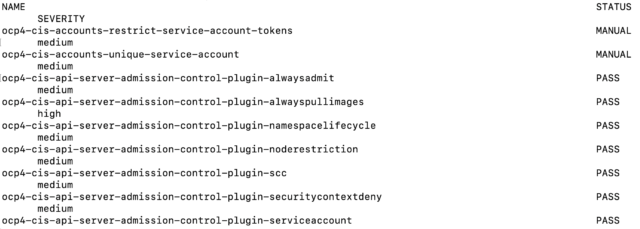
**Note, this is just a sampling. The full list of findings is much longer.
You can change the output format of this command to yaml or json and output that to a file to get all the detailed information. For example:
$ oc get compliancecheckresult -o yaml > checkresult.yaml
You can take this file and convert it to a csv or import it into a simple database, depending on your preference. I like to use one of the online conversion sites, like http://onlineyamltools.com to convert it to a csv, which I can then manipulate in a spreadsheet.
In the next blog, I’ll discuss options for remediating the findings that don’t have an automated fix included with the operator.
References: