
This mini series is about using Power Platform to help streamline the work of healthcare providers and increase patient safety.
Part 1 of this mini series covered how to set up your database – creating entity tables to store the list of directions and the list of conditions, and relating the two tables with a lookup column. You can find previous parts linked below:
This section will cover using power automate to extract lab result values from a response object, using those values to determine which conditions are true and then passing the true condition keys to the Power App.
Initializing Values:
You must initialize all your variables at the top of the power automate flow. Power Automate will not allow you to initialize variables in a nested action.
Note: Make sure your variable type matches the value type in the response object.
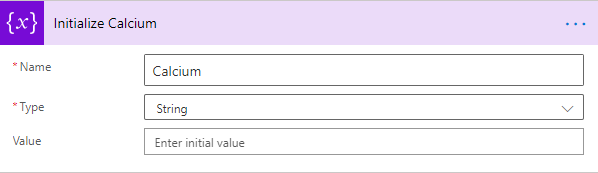
The data available in this example was structured where the values were strings:

Note: For an additional layer of security, you can opt to “Secure Inputs/Outputs” when handling sensitive data. This will hide the data from users viewing the flow run details. (Shown in screenshots below)


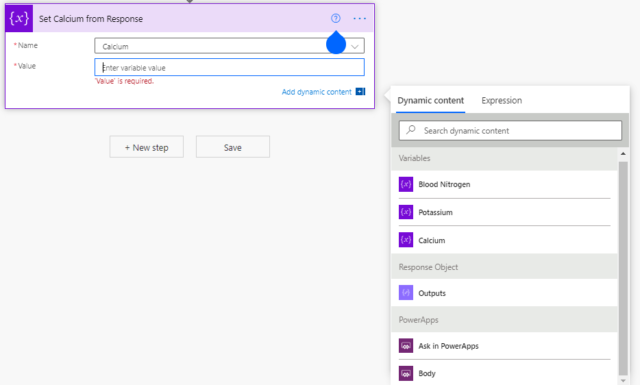
Storing Values from the Response:

Now that the variables are initialized, you need to store the value from the response in the corresponding variables:
To use the output from your response object (or the response from your API call), select the Output from the Dynamic Content pop up:
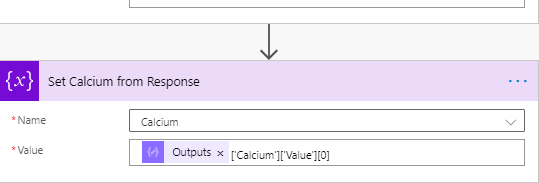
Once you have the output in the Value textbox, you can traverse the response object and get the value of the exact item you need (in the example below, I wanted the value of Calcium)
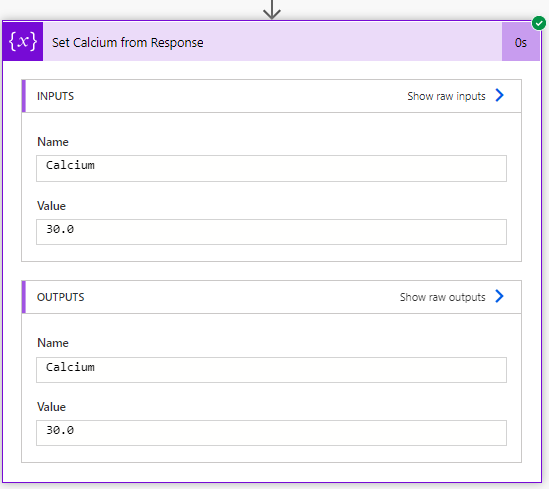
When you run the flow, you can see the value of Calcium variable is set to 30.0 (pulled from the response object)
Setting Up the Conditions:
Now that you have the values stored in their respective variables, you want to use that data to determine which conditions are true using the Condition Control Action.
You will create a new condition block for each of the rows in the ConditionSet entity table we created in Part 1: Applying Power Platform to the Healthcare Industry – Part 1: Setting Up Entities in Microsoft Dataverse
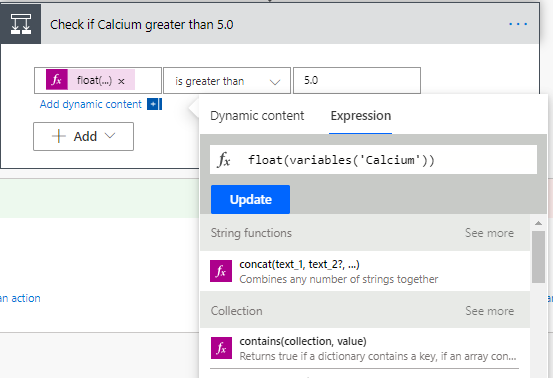
- For the first condition, you want to check if the value of calcium is greater than 5.0.
Note: The value input for a condition action requires a numeric type. If you have been using strings so far, you can use the Expression tab to cast as a float.
Appending true condition values:
After creating each condition, depending on which is true, you need to set a flag saying that this condition is true. In this section you will be appending all the true condition values into one array and then passing those values back to the PowerApp.
- Next you are going to go to the top of your flow and initialize another variable of type Array. In this example the variable is named ConditionSetValues.
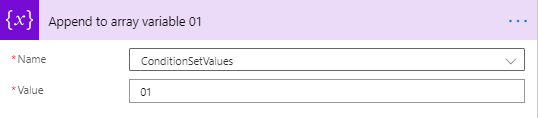
- Inside the true branch of the condition action you created earlier, you will create a new step called “Append to array variable” action and append the corresponding Condition Set value from the Entity (In this example, it is 01).
Now you simply need to repeat this step for all your conditions, matching each condition action to the corresponding ConditionSet entity value.
Formatting your Condition Set Values:
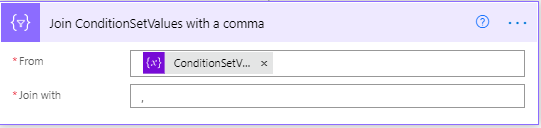
Once you have appended all the corresponding ConditionSet values to their condition action blocks, you need to comma separate the values before sending them back to the PowerApp. You can use the join operation action to comma separate the values.
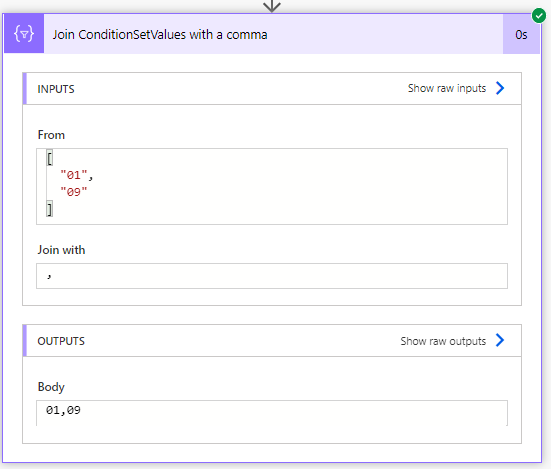
Depending on the values from the response object, you will get a comma separated list of true condition values to send back to your PowerApp:
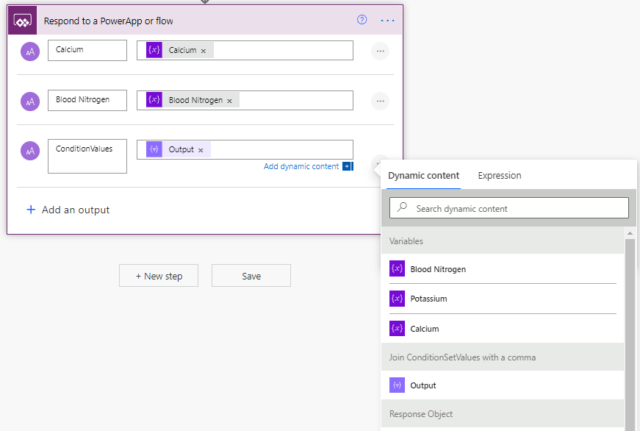
Sending Your Variables back to Power App:
Now that we have a comma separated list of true conditions, the final step is to send them back to your Power App.
- You can do this using the “Respond to a Power App or flow” Action. The output used for the ConditionValues row is the “Join ConditionSetValues with a comma” Output.
(Alternatively, you can set the ConditionSetValues variable to the same output object to store the comma separated values)
Now that you have set up the backend logic using Power Automate, you can move on to Part 3 of this miniseries which will cover using Power Apps to build out the front end of this app, linked below: