To prevent performance issues for content authors in the Content Editor, Sitecore recommends keeping no more than 10 versions of items. In this blog post of my mini-series, I will go over how to perform an automated cleanup of old, outdated item versions while retaining them in the Archive for historical record. Old versions found in the Archive can be restored for later use if need be.
The PowerShell script
$tenantItem = Get-Item -Path 'master:<insert path to your tenant here>'
$versionsToNotArchive = 10
$archive = [Sitecore.Data.Archiving.ArchiveManager]::GetArchive("archive", $tenantItem.Database)

Get-ChildItem -Path $tenantItem.FullPath -Recurse -WithParent |
    ForEach-Object {
        $versionsNotArchived = 0

        $itemVersionCount = $_.Versions.Count
        if ($itemVersionCount -gt $versionsToNotArchive) {
            $itemVersions = $_.Versions.GetVersions($true) | Sort-Object {[int]($_.Version -replace '(\d+).*','$1')} -Descending
            foreach ($itemVersion in $itemVersions){
                if ($itemVersion.Fields["__Workflow State"].Value -eq "{<Insert the Guid of the Approved State in your workflow>}" -AND $versionsNotArchived -lt $versionsToNotArchive){
                    $versionsNotArchived += 1
                }
                else {
                    if ($itemVersion.Fields["__Workflow State"].Value -eq "{<Insert the Guid of the Approved State in your workflow>}" -AND $versionsNotArchived -ge $versionsToNotArchive) {
                        Write-Host "archiving version" $itemVersion.Version "of" $_.FullPath
                        $archive.archiveVersion($itemVersion)
                    }
                }
            }
        }
    }
Create a PowerShell script in PowerShell ISE. Copy and paste this script above into your new file. You will need to insert the path to your root folder in the first line of the script. You will also need to insert the guid of the “Approved” state item of your workflow in the for loop twice.
Let’s dissect exactly what this script does with an example. Let’s say the script is examining an item that has 15 versions in the Content Editor. Versions 1 – 14 are in the “Approved” state. Version 15 is in the “Draft” state. It will first order the item versions in array from highest numbered version to lowest numbered version. Think of this as ordering from the most recently made version to the oldest made version. It will then start counting from Version 15 down to Version 1 keeping track with the number of “Approved” versions the for loop has passed. After the 10th “Approved” version is reached, any “Approved” version after that will be sent to the Archive. In our example, item versions 1 – 4 will be sent to the Archive while item versions 5-15 will be kept for viewing in the Content Editor.
If you want to keep less approved versions in the Content Editor for your items, simply reduce the $versionsToNotArchive variable in the script above. Also note that the value for $_.Versions.Count is equal to the number of versions that exist for the item in the Content Editor NOT the total number of versions of an item that exist in the archive plus the number of versions that exist for the item in the Content Editor.
Automating the script on a schedule

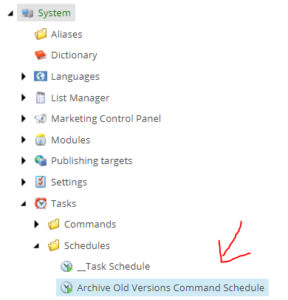
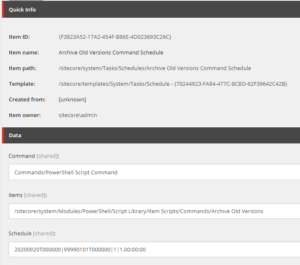
Under /System/Tasks/Schedules, insert a new Schedule item and name it “Archive Old Versions Command Schedule”. Then populate its values with the below:

Replace the value found in Items with the path to the script we created earlier in the blog post. The Schedule value tells Sitecore to run my “Archive Old Versions” script once a week every Sunday until the end of time.
Restoring old versions from the Archive

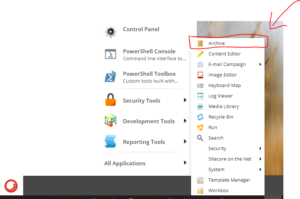
To get to the Archive, navigate to the Sitecore Desktop and open the All Applications submenu. The Archive will be in there.

Simply click on the item and then click Restore. Note that restoring an item will restore ALL versions of the item back into the Content Editor unless if you click on a specific version to restore. It will later be cleaned up by our automated script, but you will be able to view the older versions for a short period of time.

