In my previous post in this mini-series, I went over the creation of the Simple Workflow and its states. In this post, we will go over how to automatically place Sitecore items into the Draft state upon creation. We will cover two approaches to implementing this: setting the Draft state in the Standard Values of items or using the rules engine to assign workflow values on item creation. Using the rules engine is my recommended approach, but there are some scenarios where setting the Draft state in the Standard Values of items can be effective. We will also go over how to apply workflow to pre-existing content if workflows are being implemented post go-live.
Route 1: Setting Draft State in the Standard Values
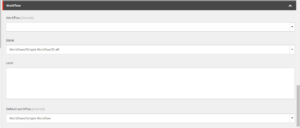
Simply go to the Standard Values item of a template for items you want to be automatically enrolled in the workflow process upon creation. Then update its Workflow accordion fields to place the item into the Simple Workflow.

Very easy, right? There is one major con to this approach that I want to point out. If your Sitecore solution contains multiple tenants for various companies and you want to apply workflow to a template that is used in multiple tenants, you should NOT use this route. Content authors in other tenants will not have configured access to move the content through the workflow. Also, the workflow is specific to a company’s business process. It does not make sense to enforce these workflow rules on another company’s content. If this scenario is one you are in, I highly recommend taking Route 2 over this one.
If your tenant is the only expected tenant in the Sitecore solution or you have a small subset of templates you want to apply workflow to, then Route 1 is certainly effective. Simply add the workflow state information to the Workflow accordion on the Standard Values items of the templates.
Route 2: Using Rules Engine to Enroll Content
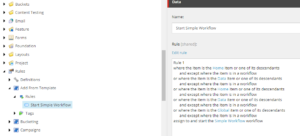
The route I recommend following is creating a rule in Sitecore to automatically place a newly created item in your site into the Draft state of the Simple Workflow. With this route, you can specify the conditions that need to be met in order to get enrolled. If you have multiple tenants in your Sitecore solution, you can specify to only apply this custom workflow on items created under certain sites. To implement this rule, read through this excellent blog post written by Amir Setoudeh. After following the steps written in that blog post, I would recommend making the changes below for this Simple Workflow.
public override void Apply(TRuleContext ruleContext)
{
      if (ruleContext.Item == null) return;
      if (!ID.IsID(workflowid)) return;

      using (new SecurityDisabler())
      {
         using (new EditContext(ruleContext.Item))
         {
            var workflow = Factory.GetDatabase("master")?.WorkflowProvider.GetWorkflow(workflowid);
            if (workflow != null)
            {
               ruleContext.Item.Fields["__Workflow"].Value = "{383BA454-6AFA-44BA-8B80-CB0F17C3A196}";
               ruleContext.Item.Fields["__Default Workflow"].Value = "{383BA454-6AFA-44BA-8B80-CB0F17C3A196}";
               ruleContext.Item.Fields["__Workflow State"].Value = "{2FAE5E8D-E153-4F89-BE87-5F367FCAFEE9}";
            }
         }
      }
}
In the linked blog post, workflow.Start(ruleContext.Item) is used to enroll the content item into the workflow. However, once the content item has made it through the approval process one time, it will no longer get back into the workflow once changes are made to it. My code above allows for content to re-enter the Draft state after being approved if more changes need to be made and approved. If you do not need content to re-enter workflow, then stay in line with the linked blog post.

You will also need to specify the rule of when to apply the workflow to an item. For me, I wanted to apply the workflow when a content author inserted items under specific folders. In the screenshot above, if a user inserted an item under the Global item, it would automatically be enrolled in the Simple Workflow in the Draft state.
Applying Workflow to Pre-Existing Content
You may be getting around to implementing Sitecore workflow for your site’s content authors after tons of content have already being created. In either route you went with above, you will still want to place all pre-existing live content in the Approved state. To do this, I wrote up a PowerShell script that will automatically populate the Workflow accordion fields on every piece of content that is under a specific item (including the specific item). This script can take a very long time if there is a lot of pre-existing content. Be prepared. See that script below:
$folderItem = Get-Item -Path "master:<insert path of item>"

Get-ChildItem -Path $folderItem.FullPath -Recurse -WithParent |
        ForEach-Object {
            Write-Host "Moving to Approved State" $_.Name
            $_.Editing.BeginEdit()
            $_.Fields["__Workflow State"].Value = "{0BE6F9DA-8636-4BDA-887A-F0587FFF17EA}"
            $_.Fields["__Default Workflow"].Value = "{383BA454-6AFA-44BA-8B80-CB0F17C3A196}"
            foreach ($version in $_.Versions.GetVersions($true))
            {
                if($version.Locking.IsLocked())
                {
                    $version.Editing.BeginEdit()
                    $version.Locking.Unlock()
                    $version.Editing.EndEdit()
                }
            }
            $_.Editing.EndEdit()
        }

