
Welcome back to the second blog in our upgrading to Microsoft Teams: IT Admin Edition series. If you are just joining us for the first time, I encourage you to check out the first blog in this series as it covers some important concepts for you IT admins out there! This time we’ll be discussing what the IT admin experience will be like within the Teams Admin Center and PowerShell.
Setting Coexistence Mode (Org-wide)
Let’s start off by showing our IT admins how to set the coexistence mode within the Microsoft Teams admin center. For this you’ll just need to ensure you have the Teams Service Administrator role assigned. Once you are logged into the Teams Admin Center navigate to the Org-wide settings option and then select Teams upgrade.
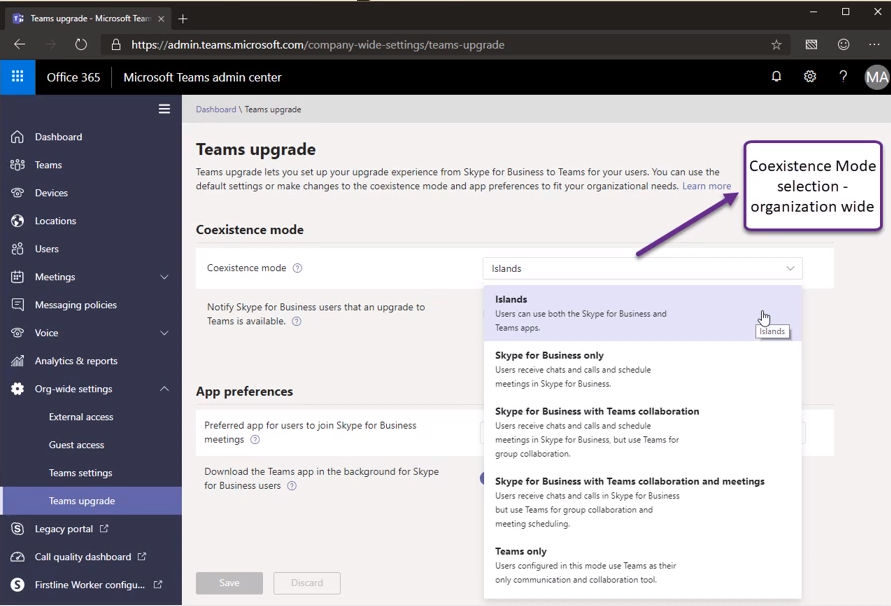
Image provided by Microsoft
In the picture above you’ll notice that we are presented with five different coexistence options. When setting your coexistence mode please be aware that this is an organization wide setting. By default, the coexistence mode will be set to Islands so before changing this make sure to plan accordingly.
Notifying the User (Org-wide)
In the example above you make have also noticed the options of notifying the Skype for Business users that an upgrade to Teams is available. In addition, you can set the preferred app that users will use to join a Skype for Business meeting. Lastly, you’ll have the ability of enabling or disabling the ability to download the Teams app in the background for your existing Skype for Business Users. In the screenshot below you’ll see what this looks like from a client perspective when having the “Notify Skype for Business users that an upgrade to Teams is available” option is enabled.
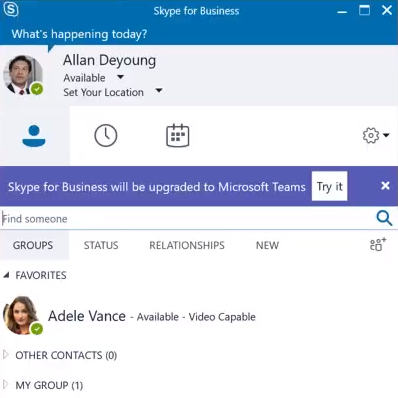

Image provided by Microsoft
Setting Coexistence Mode to TeamsOnly
Let’s say you’re finally ready to make the jump to a strictly Teams Only coexistence mode. Once you set your coexistence mode to Teams Only in the Teams Admin Center this is effectively saying your are prepared for your organization to only utilize Microsoft Teams. As soon as you change the coexistence mode to Teams Only and click “Save” on the bottom of the screen you will get a pop-up prompt with a warning saying, “WARNING: Users will no longer be able to use Skype for Business, except when joining Skype meetings. These users will be Teams only, unless an explicit per-user upgrade policy is set.” Additionally, there will be a box you must check to indicate you understand the effect of this change and then you will be able to “Save” the change. Unless you have set per-user upgrade policies then this will affect EVERYONE in your organization, so please make to plan accordingly.
Setting Coexistence Mode (Per User)
As I just alluded to, you are able to set coexistence mode on a per user basis meaning that this will trump whatever is set in the org-wide settings. You can do this withing the Teams Admin Center by going to Users then locating the particular user and going to their Teams upgrade settings and selecting Edit. You will then see a box pop up on the right hand side of your screen with the Teams upgrade mode options you can select from. In this scenario we’ll be selecting Teams Only mode meaning that this particular user will only utilize their Teams client except in the rare occasion where they need to join a Skype for Business meeting. By default, every user’s coexistence mode will be set to Use Org-wide settings meaning this will use whatever is set as the coexistence mode defined on a tenant level. However as soon as you change this option to something else this will override this setting on a per-user basis.
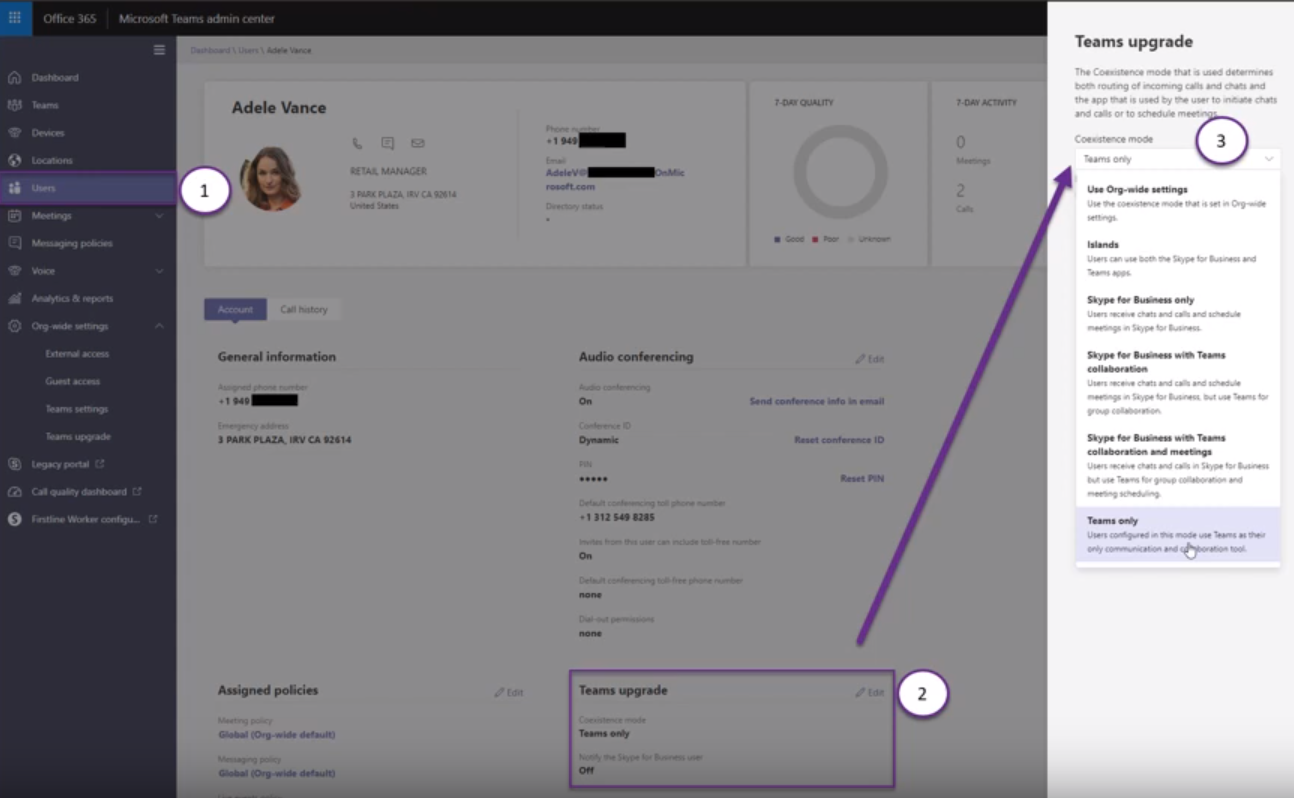
Image provided by Microsoft
Notifying the User (Per User)
We covered what this looks like on a per tenant/organization wide level but we haven’t covered this on a per user basis. Luckily for you, just like with setting your coexistence mode, you can also set how you’d like to notify users on a per-user basis! Giving admins this type of flexibility in whom gets migrated and communicated to is something many admins take for granted and was often times the case in Skype for Business Online where certain policies could only be controlled on an org-wide level. In the screenshot below you’ll see what this looks like from the client’s perspective once you enable the “Notify the Skype for Business user”option.
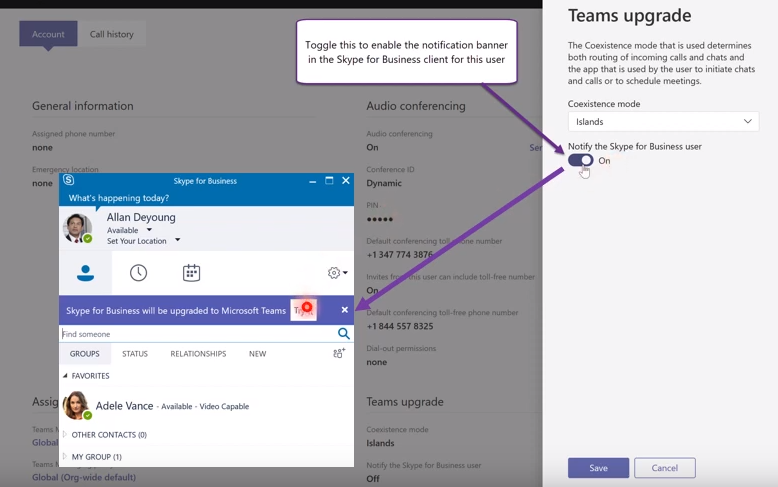
Image provided by Microsoft
PowerShell Reference
Now that we’ve covered what this will look like for admins in the Teams Admin Center, let’s cover what would be required if you opted to do this within PowerShell instead.
| Mode | Microsoft Teams Admin Center | PowerShell (per user) |
|---|---|---|
| Islands | Available | Grant-CsTeamsUpgradePolicy -PolicyName Islands -Identity $SipAddress |
| Islands + Notify the Skype for Business User | Available | Grant-CsTeamsUpgradePolicy -PolicyName IslandsWithNotify -Identity $SipAddress |
| Skype for Business Only | Available (routing only currently) | Grant-CsTeamsUpgradePolicy -PolicyName SfBOnly -Identity $SipAddress |
| Skype for Business Only + Notify the Skype for Business User | Available (routing only currently) | Grant-CsTeamsUpgradePolicy -PolicyName SfBOnlyWithNotify -Identity $SipAddress |
| Teams Only | Available | Grant-CsTeamsUpgradePolicy -PolicyName UpgradeToTeams -Identity $SipAddress |
| Skype for Business with Teams Collaboration | Available | Grant-CsTeamsUpgradePolicy -PolicyName SfBWithTeamsCollab -Identity $SipAddress |
| Skype for Business with Teams Collaboration + Notify the Skype for Business User | Available | Grant-CsTeamsUpgradePolicy -PolicyName SfBWithTeamsCollabWithNotify -Identity $SipAddress |
| Skype for Business with Teams Collaboration and Meetings | Available | Grant-CsTeamsUpgradePolicy -PolicyName SfBWithTeamsCollabAndMeetings -Identity $SipAddress |
| Skype for Business with Teams Collaboration and Meetings + Notify the Skype for Business User | Available | Grant-CsTeamsUpgradePolicy -PolicyName SfBWithTeamsCollabAndMeetingsWithNotify -Identity $SipAddress |
So why would you want to use PowerShell over the Teams Admin Center? Great question! If you plan on assigning some of these coexistence modes to a list/subset of users this is where PowerShell can be very beneficial, as it gives you the ability to assign these coexistence modes in bulk. As of right now (October 2019) there are no capabilities within the Teams Admin Center to assign these various coexistence modes to a batch of users so you’ll have to use PowerShell to accomplish this. As you may notice in the table these cmdlets are catered to only a specific user, however you do have the ability of changing up the script to assign these coexistence modes on a per-tenant level instead.
This concludes our blog series on upgrading to Microsoft Teams: IT Admin Edition. I hope as the IT admin you are feeling more comfortable within the Teams Admin Center and/or PowerShell and that you have gained some knowledge around upgrading to Teams! However, this only touches the tip of the iceberg so I really encourage you to check out some of the other training that Microsoft provides here. Also, I encourage you to check back soon, as it’s almost that time of the year we have all been waiting for…. Microsoft Ignite!! There are over 57 Microsoft Teams sessions planned for Ignite, so make sure you get the sessions added to your calendar ASAP so you don’t miss out!