In the past, call centers worked like this: A customer with an issue would phone into a support line, never knowing how long they’d be on hold for. It could take multiple calls to resolve the issue, creating a less-than-ideal experience for the caller.
In today’s digital-first world, the traditional call center is undergoing a transformation, for the better. No longer restricted to phone communication, savvy call centers incorporate live chat, SMS, email and artificial intelligence to offer customers improved support experiences. In turn, this reduces customer churn and leads to a more positive customer relationship.
Today we’ll be focusing on SMS. Why SMS? With the ubiquity of smartphones, texting has become increasingly popular. A study by OpenMarket found that the majority of millennials rate texting as their preferred method of communication. And with over 5 billion people owning smartphones, not using SMS messaging is a missed opportunity.
In this tutorial, we’ll show you how to automatically send a follow-up survey to customers who call into your AWS contact center, asking for their feedback via text message.
AWS services used:
Non-AWS services used:
Part 1: Create and configure the Pinpoint project.
Amazon Pinpoint helps you engage with your customers by sending them personalized communications through multiple channels.
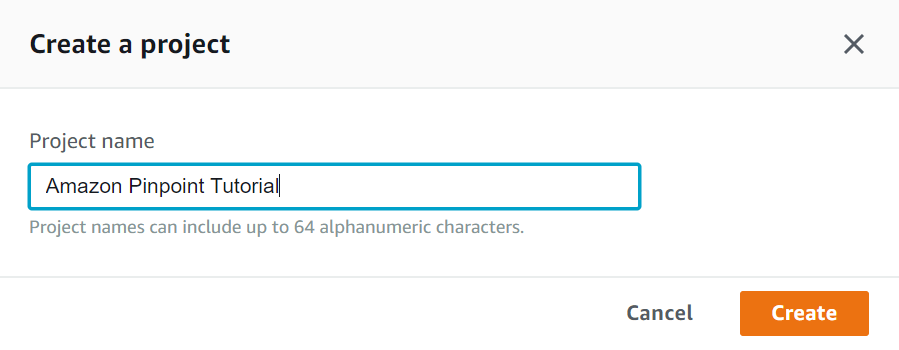
Step 1. Open the pinpoint console and click on ‘Create a project’:
Step 2: Name your project. We called ours ‘Amazon Pinpoint Tutorial’. Once you’ve chosen a name, click ‘Create’.
Step 3: On the next page, configure your project for SMS and voice by selecting ‘SMS and Voice’. Then, click ‘Configure’:
Step 4: Click the box next to ‘Enable the SMS channel for this project’, then click ‘Save changes’:
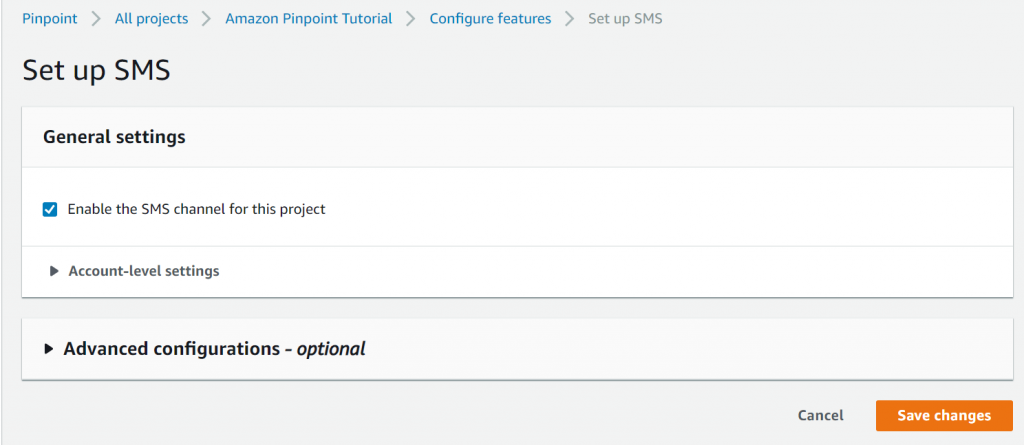
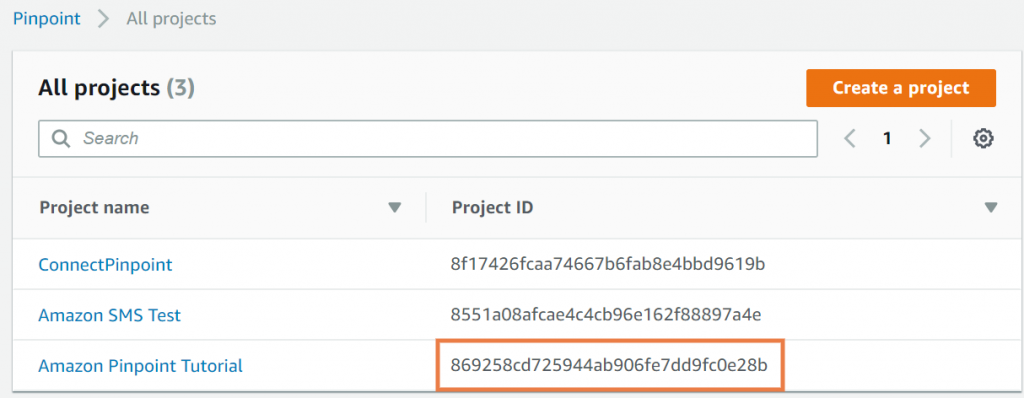
Step 5: On the next screen, make a note of the project ID. You will need it for the Lambda portion of this exercise in Part 2.
Step 6: Review the service limits on this page to make sure they’re applicable for your use case.
Part 2: Set up the Amazon Lambda and test event:
Step 7: Create the Lambda function: Click on ‘Insert link’ > ‘Author from Scratch’. Under ‘Basic information’, name your function. We’ve called it ‘pinpointTutorialSMS’. Under Runtime, choose ‘Node.js 10x’. Leave the permissions set to ‘Create Basic function’. We will change them for the IAM role later.
When you’ve done all of the above, click ‘Create function’.
Step 8: Copy and paste the Lambda code below into your function:
var AWS = require("aws-sdk");
var pinpoint = new AWS.Pinpoint();

//main entry
exports.handler = (event, context, callback) => {
    console.log("Incoming Event: " + JSON.stringify(event));

    //You must have these attributes set in your Contact Flow prior to invoking lambda function
    var destinationNumber = event.Details.ContactData.Attributes.destinationNumber;
    var messageContent = event.Details.ContactData.Attributes.messageContent;

    var params = {
        //ApplicationId must match the ID of the application you created in AWS Mobile Hub
        ApplicationId: "PASTE_YOUR_APPLICATION_ID_HERE",
        MessageRequest: {
            Addresses: {
                [destinationNumber]: {
                    ChannelType: "SMS",
                },
            },
            MessageConfiguration: {
                SMSMessage: {
                    Body: messageContent,
                    MessageType: "TRANSACTIONAL",
                    SenderId: "AWS",
                }
            },
        }
    };

    // Send the SMS
    pinpoint.sendMessages(params, function(err, data) {
        if (err) {
            console.log(err);
            context.fail(buildResponse(false));
        } else {
            console.log("Great Success");
            callback(null, buildResponse(true, "none"));
        }
    });
};

// Return Result to Connect
function buildResponse(isSuccess) {
    if (isSuccess) {
        return {
            lambdaResult: "Success"
        };
    } else {
        return {
            lambdaResult: "Error"
        };
    }
}
Step 9: On line 14 of the code, you’ll see a place for the Application ID. Insert the project ID you saved from Step 5 where it says ‘PASTE_YOUR_APPLICATION_ID_HERE’. Next, scroll down and under ‘Basic Settings’, set the timeout to 8 seconds. Click ‘Save’.
Step 10: Now, let’s update the IAM role for this Lambda function. Navigate to the IAM services ‘Roles’ page and select the role related to this project.
Once you are on the correct Role page, under ‘Permissions’, click ‘Attach Policies’. There are three policies we will be adding:
- ‘CloudWatchLogsFullAccess’ – allows logging of events
- ‘AmazonMobileAnalyticsFullAccess’ – allows full access to mobile analytics
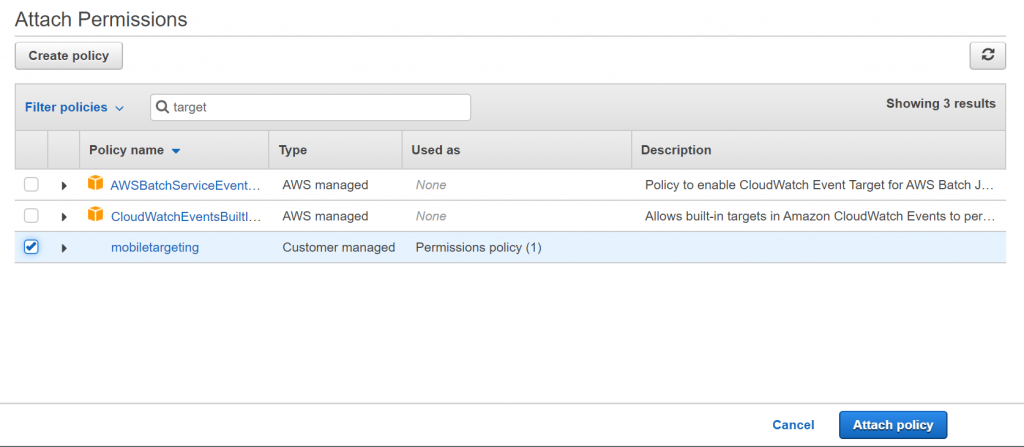
- ‘mobiletargeting’ – needed to send SMS messages through Amazon Connect
As an example, in the image below, we’re adding in the ‘mobiletargeting’ policy to the role permissions.
Step 11: Now that we have the correct role permissions set in the IAM, we’re going to revisit the Lambda to configure a test event. Copy and paste the JSON below into your own environment. Note* Make sure you change the ‘destinationNumber’ value on line 25 to reflect the number you would like the test event message sent to.
{
      "Name":"ContactFlowExecution",
      "Details":{
         "Parameters":{},
         "ContactData":{
            "ContactId":"ASDAcxcasDFSSDFs",
            "InitialContactId":"Acxsada-asdasdaxA",
            "PreviousContactId":"Acxsada-asdasdaxA",
            "Channel":"Voice",
            "InstanceARN":"",
            "InitiationMethod":"INBOUND/OUTBOUND/TRANSFER/CALLBACK",
            "SystemEndpoint":{
               "Type":"TELEPHONE_NUMBER",
               "Address":"01234567"
            },
            "CustomerEndpoint":{
               "Type":"TELEPHONE_NUMBER",
               "Address":"+14805551212"
            },
            "Queue":{
               "Name":"PrimaryPhoneQueue",
               "ARN":""
            },
            "Attributes":{
               "destinationNumber":"+14805551212",
               "messageContent":"testing 123."
            }
         }
      }
   }
Step 12: Run the test event. You should get a lambdaResult with a ‘Success’ value and a message sent to the number you saved on line 25.
Part 3: Create your Customer Survey:
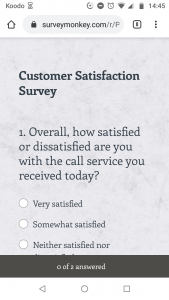
In Part 3, we’ll create a simple, two-question survey that will automatically be sent to your customers via SMS. We used the free version of Survey Monkey to create ours, but you can use anything you like (other options include Typeform or Google Forms). The only requirement is you’ll need to be able to link to the survey with a URL.
These instructions will work for using the free version of Survey Monkey:
Step 13: Create an account if you don’t already have one. Login and click on ‘Design Survey’.
Step 14: You can create a survey from scratch or make one using a template. We chose the ‘Customer Satisfaction’ template. For the purposes of our survey, we removed most of the questions, leaving just two.
Step 15: You can preview your survey on the next page. When you’re happy with it, click ‘Collect Responses’. On the next page, select ‘Get Web Link’. Save this link for Part 4, where we will insert it into the text message that goes out to customers who call into the contact center.
Part 4: Build your Amazon Connect Flow:
The final portion! In this part, we will build out the Amazon Connect contact flow.
Step 16: First, you have to grant permission for your Amazon Connect instance to invoke the Lambda function from Part 2.
Step 17: Once you’ve done that, login to your instance and add a new contact flow that you will begin editing as per the instructions below.
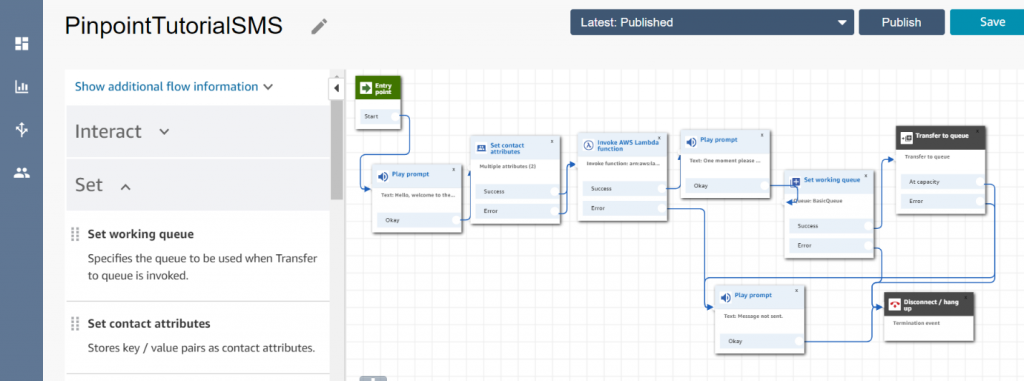
Step 18: Drag in a ‘Play prompt’ block and enter a greeting your customer will hear when they call into your contact center.
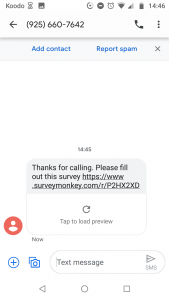
Step 19: Drag in a ‘Set contact attributes’ block. Click on it to open and edit it. Choose ‘Use attribute’, enter ‘destinationNumber’ as the Destination key value, choose ‘System’ as the Type, and ‘Customer Number’ as the Attribute. Next, choose ‘Add another attribute’. This will be a ‘Text’ attribute so no need to change that part. In the Destination key, enter ‘messageContent’. In the ‘Value’ field, enter ‘Thanks for calling. Please fill out this survey https://www.surveymonkey.com/r/P2HX2XD’.
Please note: You can customize the message to your needs. Whatever text you enter here will be sent through to your customer’s phone.
Step 20: Next, add an ‘Invoke AWS lambda function’ block and click to edit it. Select the function you added from Step 16. If executed correctly, the customer should receive the message you entered in the ‘Set Contact Attributes’ block value field.
Step 21: Add a ‘Play prompt’ block, with a message that tells the caller to be patient while we transfer them.
Step 22: Add a ‘Set working queue’ block, specifying the queue you want the caller to be transferred to.
Step 23: Finally, add a ‘Transfer to queue’ block to send the caller through an agent.
A visual overview of this flow is below. For testing purposes, we’ve added in a ‘Play Prompt’ block after the error portion of the ‘Invoke AWS Lambda function’ block. If you hear this message when testing, you can investigate the root of the error by opening up the Cloudwatch logs related to the function.
Receiving the text message with survey link:
If everything works correctly, the caller will have a text message waiting for them once they hang up.
Feel free to play around with the timing of when this message is sent and with the message content.
Possible errors/troubleshooting:
If you haven’t set your permissions properly, the Lambda will fail to execute correctly. Revisit Step 10 to check that you’ve set the policies correctly.
To properly test the flow, you must call in from a mobile phone or phone capable of receiving text messages, in order to verify that it worked.
Applications:
You can use SMS to send post-call information to customers after their call, to send them a message once the wait time is below a certain time, to give them an update on their order status, and more. Anything that can be stored and set as a contact attribute can then be relayed to the customer.
We hope you found this tutorial useful. For information on how Perficient can help your business embrace the cloud-based, omni-channel contact center, please get in touch with us.

