Welcome back to part 3 of our Direct Routing blog series! In this article we’ll discuss voice routing basics and how you can plan for Direct Routing. With that being said, let’s jump right in with the first topic on dial plans.
Dial Plans
What gives Teams users the ability to dial a phone number? Dial plans of course! Depending on how you dial a phone number, the PSTN network will want the number to be dialed in a specific format. What happens if you dialed the phone number in a different way than what the PSTN network accepts? Well, you probably guessed it, the call would fail. Fear not though, this is where dial plans come into play. With the concept of phone number normalization all phone numbers will normalize to E.164 format which includes a “+” then the international dialing code (for a US number this will be 1) then the area code and lastly the local number. For example, +1555123456 would be a number located in the US. Understandably so, users won’t want to dial this long string of digits every time they want to call their favorite pizza place around the corner. Luckily we have dial plans built in to handle these types of scenarios where the number will be normalized to E.164 format “automagically”! Teams already comes with built-in rules for the most common types of normalization however you have the option of configuring custom normalization rules that can be used in scenarios where short digit calling takes place (i.e. dialing extensions directly). So if you wanted to call that pizza shop around the corner you can configure that custom rule to handle the user just dialing the local number and Teams will realize that you are attempting to dial a location in your area code so only the 123456 would be required by the person dialing the number. In addition, if you have colleagues used to just dialing the extension of another colleague they can continue to do this with Teams provided the correct custom rule is in place. I will go into further detail on custom rules that can be created in Teams in a future blog, for those of you that are interested :).
Voice Routing Basics
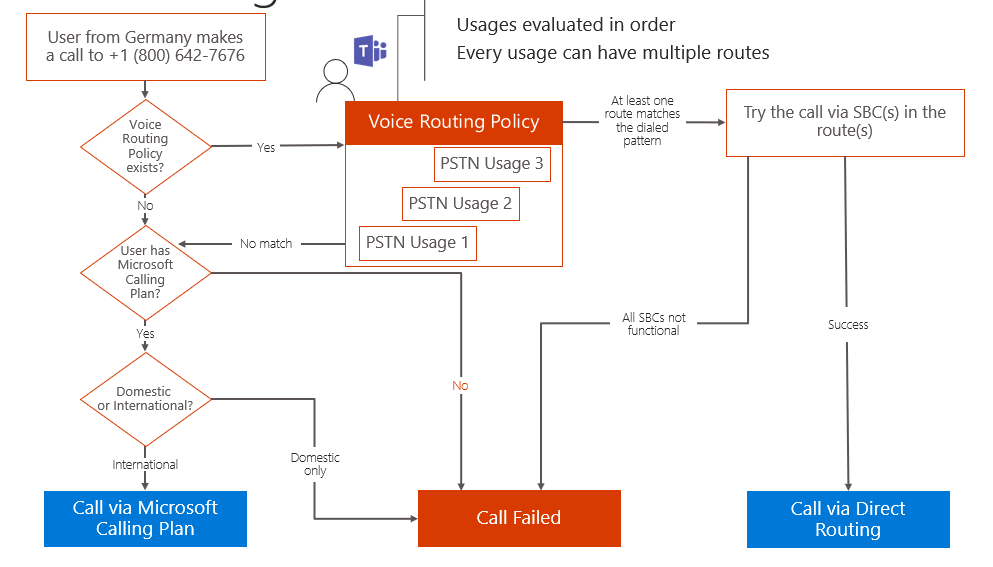
So, now that we know number normalization is possible via dial plans, let’s discuss how all of this “automagically” happens on the back-end by discussing the basics of voice routing. Let’s say we have someone from Germany making a call to someone within the US. The user in Germany tries to call the TFN (toll free number) 1-800-123-4567. The first check by the phone system will be whether or not a voice routing policy exists for this particular user. If not, this user will be unable to use Direct Routing for this call thus they will fallback to the Calling Plan. If the user doesn’t even have a Calling Plan in place, then the call will fail. However, if the user does possess a calling plan the Phone System will then check if the user has a domestic calling plan or an international calling plan assigned. If the user in Germany only had a domestic calling plan, then this call would fail, as they are trying to dial someone internationally. If the user in Germany did however have an international calling plan then the call would go through properly via the Microsoft Calling Plan. So, let’s back up again but this time let’s say the user does have a voice routing policy in place. In this scenario, the user would leverage the Direct Routing method to place the call. Within this voice routing policy there are things called “PSTN usages” which are evaluated in order and can consist of multiple routes. So, to summarize this scenario so far, the phone system will look for the voice routing rule and if so, what are the PSTN usages associated with that policy. If the phone system runs through all PSTN usages and is unable to find a match, meaning the user doesn’t have a voice routing policy that allows them to dial that phone number, then we go back to the original check on whether the user has a Calling Plan license assigned. From there it would follow the same path as the previous scenario and complete successfully provided the user has the proper calling plan in place. Backing up once again, if we did have a match within the voice routing policy where at least one route matches the dialed pattern, then the call will be routed via the SBC (session border controller) in the route. Each route can have multiple SBC’s for the purpose of load distribution as well as fail-over. If this succeeds, then the call would be placed via Direct Routing. However, if all of the SBC’s were down (heaven forbid), then the call would fail. I know we just covered a lot in a short amount of time, so let’s go over how you can properly prepare for Direct Routing.
Preparing for Direct Routing
When it comes to deploying Direct Routing there are several things you’ll need to take into consideration. Here are the steps that you’ll need to consider when preparing for Direct Routing:
- Choose who will be hosting the SBC (self-deployed vs partner hosted)
- Determine which licenses you need and assign appropriately
- Choose the SBC vendor and model
- Configure media bypass
- Configure FQDN & Cetificates
- Configure your firewall
- Determine if multiple SBC’s are needed and how to configure them
- If you are the hoster you’ll need to determine how to host the SBC’s
Self-deployed SBC vs Hosted SBC
Direct Routing gives you the option of deploying the SBC yourself or having someone host the SBC on your behalf. Both options have certain advantages and disadvantages that you’ll be able to see in the table below.

As you can see above, one of the key benefits of deploying the SBC yourself includes the ability of having full control over the SBC which means you can make changes on the SBC whenever you want/need. However, this will also mean that you are solely responsible for the SBC’s configuration, patching, and maintenance of the SBC. This will also mean that of course you’ll need to purchase the SBC itself. On the other side of things, if you chose to host your SBC one of the biggest advantages includes not having to purchase, maintain, and host the SBC. However, this will also mean that you will have no control over the SBC’s configuration and will also make the support model more complex in the process.
Note: If you choose a hosted option make sure you understand the partner’s cost structure, support process, and architecture prior to choosing your preferred partner.
Licensing Requirements
If you are looking to leverage Direct Routing in your environment you’ll need to ensure you have the proper licensing. First. and foremost, all users will require a Teams license no matter the circumstance. If they want to use Direct Routing with Microsoft Teams they will also need a Phone System license (included with E5 or Add-on for E1, E3 & E4). If you intend to give your users the ability to call via Direct Routing and via Calling Plan (Domestic/International) then you will also need a Calling Plan license add-on license. Lastly, you have the option of adding Audio Conferencing for your users the ability to add PSTN numbers to their meeting invites so participants can dial-in over the PSTN. Please note that both Calling Plans and Audio Conferencing licenses are considered optional and you are not required to possess these licenses to leverage Teams.
Session Border Controller (SBC) Requirements
In addition to the licensing, you’ll need a certified SBC if you plan on using Direct Routing in your environment. The SBC will serve as the component that connect Teams to the PSTN next hop. The PSTN next hop can include either a 3rd party PBX (Cisco, Avaya, Juniper, Mitel, etc.) or a telephony trunk (SIP, T1, E1, etc.). For the complete list of certified SBC’s, you can take a look here. As far as SBC requirements, you must ensure that Microsoft can communicate to your SBC via your SBC’s FQDN. With that being said, you’ll need to have a FQDN so that Microsoft can locate and find your SBC. It is crucial that the domain be registered with Microsoft (NO“.onmicrosoft.com” domains or sub-domains allowed). For example, if Perficient.com is our domain, this means some valid names for the SBC can include:
- sbc1.perficient.com
- noam.perficient.com
- ussbc1.perficient.com

However, you won’t be able to use something like:
- sbc1.perficient.onmicrsosoft.com
- noam.perficient.onmicrosoft.com
- ussbc1.perficient.onmicrosoft.com
When you go to register this domain, you can find documentation on this process here.
Note: To register your domain you’ll need to ensure you have access to the Office 365 admin center with global administrator privileges
Certificates
There are also a number of certificates required to validate the identity of the trusted SBC. If you only have a single SBC in your environment then you will just put the name of the SBC in the SN (subject name) and you will be all set! However, if you have multiple SBC’s in your environment you can structure your certificates in one of the following manners:
Use Case: Maximizing certificate cost
- Description: If you are looking to pair multiple SBC’s or change them frequently. Use of wildcard certificate
- SN – gw1.perficient.com
- SAN – *.perficient.com
Use Case: Balancing cost and security
- Description: Your company doesn’t change the gateways very often
- SN – gw1.perficient.com
- SAN – gw1.perficient.com, gw2.perficient.com, gw3.perficient.com, gw4.perficient.com
Note: If you decide you need to add another gateway to the mix (gw5.perficient.com), then you will need to change your certificate or get a new certificate. In essence, the more secure you make your SBC’s the less flexible your options become.
Use Case: Maximal security
- Description: Your company wants to assign each gateway its own certificate
- SN – gw1.perficient.com
- SAN – gw1.perficient.com
For a list of all supported CA’s please see the link here.
IP Ranges and Port Requirements
You may be thinking, well I already put in my port ranges for my Teams client, so shouldn’t I be all set? Good thought, but unfortunately wrong…. Simply put, the SBC needs to talk to different FQDN’s and use different ports than your Teams client. The SBC can be setup with either a public IP or can be placed behind a NAT. SIP signaling between the SBC and the SIP proxy in O365 will use TLS/SIP to talk to one another.
- From SIP Porxy –> SBC
- Source Port: 1024 – 65,535
- Destination Port: Defined on SBC
- From SBC –> SIP Proxy
- Source Port: Defined on SBC
- 5061
Media has the same principal as signaling, except in this case the media processor will need to talk to the SBC and vice versa. Media between the media processor in O365 and SBC will use UDP/SRTP to talk to one another.
- From Media Processor –> SBC
- Source Port: 49,152 – 53,247
- Destination Port: Defined on SBC
- From SBC –> Media Processor
- Source Port: Defined on SBC
- Destination Port: 49,152 – 53,247
For the IP ranges, Microsoft provides distinct FQDN’s and IP addresses for each SIP proxy. There are SIP proxies located in 3 different regions around the world (America, Europe, and Asia). The FQDN’s and IP’s for those IP Proxies are as follows:
SIP Proxy
- America
- Traffic manager FQDN
- sip-du-a-us.pstnhub.microsoft.com
- Datacenter FQDNs and IPs
- sip-du-a-uswe2.pstnhub.microsoft.com – 52.114.148.0
- sip-du-a-usea.pstnhub.microsoft.com – 52.114.132.46
- Traffic manager FQDN
- Europe
- Traffic manager FQDN
- sip-du-a-euwe.pstnhub.microsoft.com – 52.114.75.24
- sip-du-a-euno.pstnhub.microsoft.com – 52.114.76.76
- Traffic manager FQDN
- Asia
- Traffic manager FQDN
- sip-du-a-asea.pstnhub.microsoft.com – 52.114.7.24
- sip-du-a-asse.pstnhub.microsoft.com – 52.114.14.70
- Traffic manager FQDN
Note: The SBC will need to talk to all IP’s and FQDN’s from any region for redundancy purposes. So if you are unable to talk to the America FQDN’s then this will fallback to the Europe or Asia FQDN’s.
Media Processor
The media processors have a specific IP range that you will need to allow your SBC to talk to. The IP range is as follows:
- 52.112.0.0/14 (52.112.0.1 – 52.112.255.254)
Media Bypass
Optionally, if you intend on using media bypass in your environment, then there will be a few extra ports and IP ranges. Notice the emphasis on “extra”, meaning you will need to open the following ports below in addition to the ones previously mentioned.
- IP ranges
- Transport relay: 52.112.0.0/14 (52.112.0.1 – 52.112.255.254)
- Media Ports (UDP/SRTP)
- From Transport Relay –> SBC
- Source Port: 50,000 – 59,999
- Destination Port: Defined on SBC
- From SBC –> Transport Relay
- Source Port: Defined on SBC
- Destination Port: 50,000 – 59,999
- From Transport Relay –> SBC
- Internal Media Bypass
- Allow hairpin for internal clients
- External Media Bypass
- SBC will need the additional capabilities of talking to the Media Relays
This concludes today’s blog on Microsoft Teams Direct Routing. In the next blog we’ll be discussing how to leverage multiple SBC’s in your environment as well as how to manage Direct Routing. I hope you have found this blog article helpful, and I hope you’ll tune in for the next one soon!