As some of you probably know, Sitecore 9 is the first version to use Sitecore Install Framework (SIF) to install and configure the environment. This new installation process and the absence of installation executables adds additional requirements that need to be met beforehand. This post will review the requirements as well as cover some issues you might encounter. But first, let’s review and discuss additional installation requirements.
Hint: This installation process works for newer Sitecore versions (9.0.2) also.
Pre-requisite software
SQL Server 2017
If you are starting with a fresh machine (which I recommend), you’ll need to install SQL Server 2017 (Developer Edition should be fine for your local environment). You can download SQL Server from Microsoft directly from this location.
Visual Studio 2017
Now this might seem like something of little importance, but if you look at the official Sitecore recommendation documentation, you’ll notice that they say you have to have Visual Studio 2017 installed prior to starting the actual installation. If you already have Visual Studio, you can install following “Microsoft .NET Framework 4.6.2 Developer Pack” which will add 4.6.2 support into your Visual Studio 2015.
Hint: If during Sitecore 9 installation you run into an error like the one above, you might want to check to see if you have VS 2017 installed.
Error Code: ERROR_SCRIPTDOM_NEEDED_FOR_SQL_PROVIDER
More Information: The SQL provider cannot run because of a missing dependency.Please make sure that Microsoft SQL Server Transact-SQL ScriptDom is installed.
Powershell 5.1
Make sure you are using Powershell 5.1 or higher. If you don’t have 5.1+ installed, follow this link for more information. You can check your powershell version by running the following script:
$PSVersionTable.PSVersion
Microsoft .NET Framework 4.6.2
Here’s the link to download the right version for your machine. Note: if you installed Visual Studio 2017, you likely already have the .NET Framework 4.6.2.
Microsoft Web Platform Installer 5.0
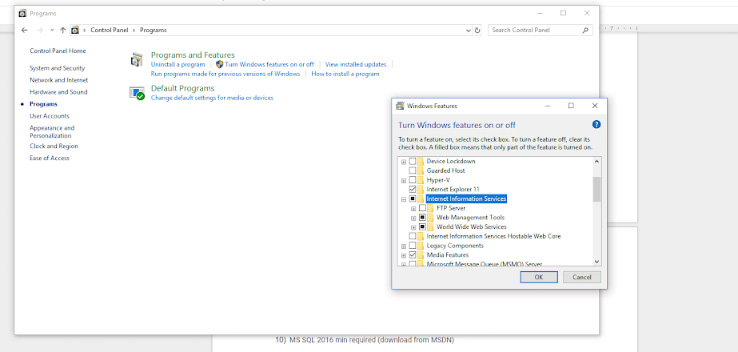
In order to install Platform Installer 5.0, first enable it in the Control Panel.
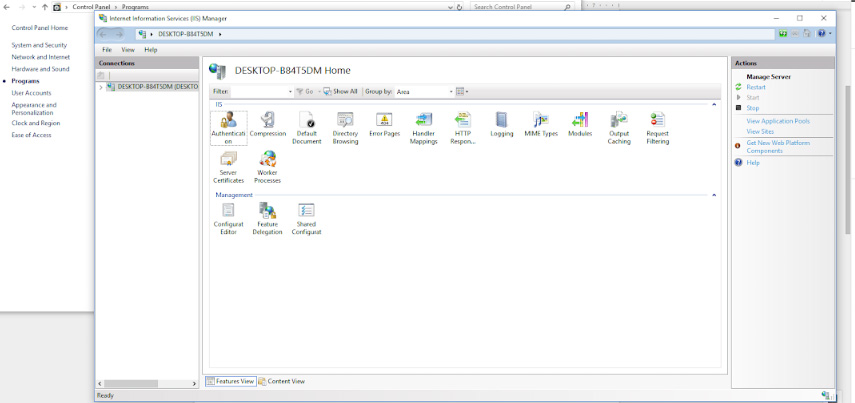
Then go to the Internet Information Services (IIS) Manager and click on Get New Web Platform Components.
Once that’s complete, you will see the following:
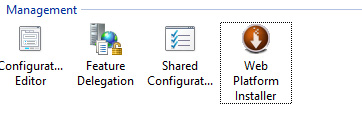
In order to complete the next 3 requirements, you’ll need to install Web Platform Installer. Click on the Get New Web Platform Components and once you finish the installation, you will see a new icon under Management.
IIS Platform Components
In IIS, click on the newly added icon under Management – Web Platform Installer. In the search bar, type in the name of the corresponding application you’re looking for. In this case, install these modules:
- URL Rewrite 2.1 (Use Web Platform Installer to install)
- Microsoft® SQL Server® Data-Tier Application Framework (17.1 DacFx) if you can not find it over the Web-Platform Installer, follow this link.
- Web Deploy 3.6 for Hosting Servers Supports (Could be set up with IIS -> “Actions” bar -> Get New Web Platform Components)
At this point, your machine should have all of the necessary pre-requisite software to install Sitecore 9, except for a functional running installation of SOLR.
Setting up SOLR
Now installing SOLR will probably be the most time consuming and error-prone part of the installation. Follow these steps to get it set up correctly.
Hint: You can use Solr-6.6.2 or any latest version of Solr available.
- First, you need to follow this link and download solr-6.6.2.zip.
- Install JRE if you don’t already have it.
- Add a system environment variable called JAVA_HOME that points to your Java installation:
- Variable Name: JAVA_HOME
- Variable Value (set as necessary): C:\Program Files (x86)\Java\jre1.8.0_77
- Install NSSM at C:/nssm (or the directory of your choice). NSSM is an application that will help set up windows services.
- Create and unzip SOLR 6.6.2 into C:/solr
- Hint: Remove any intermediary folders to avoid a folder structure like C:/solr/solr-6.6.2/server
- This should now be a valid path on your file system: C:/solr/server
- The NSSM Service Installer application window will open. Set the following values:
- Path: C:\solr\bin\solr.cmd
- Startup Directory: C:\solr\bin
- Arguments: start -f -p 8983
- Display Name: SOLR 6.6.2
- Description: C:\solr\bin\solr.cmd start -f -p 8983
- Startup type: Automatic
- Save the service in NSSM. Open your windows services and start the newly created SOLR 6.6.2 service. You can access windows services by typing ‘services’ into the start menu.
- Once the service is started, verify that you can see the SOLR Dashboard at http://localhost:8983/solr/#/
- Verify that after a reboot SOLR starts correctly and you can still see http://localhost:8983/solr/#/
Hint: If you ever need to uninstall your SOLR instance, do the following:
      #powershell uses 64/32 bit version according to your computer
      cd C:\nssm\win64
      #name should be installation name from ./nssm install command
      ./nssm remove "SOLR 6.6.2"
- Open Powershell, and use NSSM to uninstall SOLR
SOLR SSL Setup
Now that SOLR is installed, we need to set it up to run over SSL.
First, download solrssl, place it under .\Automation\solr-ssl\ and rename it to solrssl.ps1 and run.
Run .\Automation\solr-ssl\solrssl.ps1
Hint: If during this step, you get an error that says:
- “keytool.exe not on path. Enter path to keytool (found in JRE bin folder)”
You probably need to add a %JAVA_HOME%\bin to the Path variable in Environment Variables as shown in the picture below.
- Copy .\Automation\solr-ssl\solr-ssl.keystore.jks and .\Automation\solr-ssl\solr-ssl.keystore.p12 to C:\solr\server\etc
- Open C:\solr\bin\solr.in.cmd and add the lines below to it
- Restart your SOLR 6.6.2 window service Verify that you can see the SOLR Dashboard over SSL at https://localhost:8983/solr/#/
set SOLR_SSL_KEY_STORE=etc/solr-ssl.keystore.jks
set SOLR_SSL_KEY_STORE_PASSWORD=secret
set SOLR_SSL_TRUST_STORE=etc/solr-ssl.keystore.jks
set SOLR_SSL_TRUST_STORE_PASSWORD=secret
Install SIF
Run the install.ps1 script by pasting this into Powershell:
Register-PSRepository -Name SitecoreGallery -SourceLocation https://sitecore.myget.org/F/sc-powershell/api/v2;
Install-Module SitecoreInstallFramework;
Install-Module SitecoreFundamentals;
Update-Module SitecoreInstallFramework;
Update-Module SitecoreFundamentals;
Import-Module SitecoreFundamentals -Force;
Import-Module SitecoreInstallFramework -Force;
Hint: Some errors may occur during this step. If you run into something like you see on the following picture, all you need to do is run Set-ExecutionPolicy RemoteSigned in your Powershell instance under Administrator privileges.
Now after all the preparations are done, you can proceed with installing Sitecore using SIF!
The process of installation is pretty straightforward. You create a folder where you want to install your Sitecore 9 instance. In this folder, make sure to have your Sitecore Licence and your Automation folder that you downloaded for the Solr installation. Download your desired WDP XP0 package from Sitecore’s website and place it in the same folder. Now create a folder named sandbox with a folder named scripts inside and place a copy of the Sitecore license inside that. It should look like this:
In the Automation folder under Sitecore-Versions and 9.0, you will find the install.ps1 script. This is a SCORE script that can be obtained with the Scaffolded Solution or downloaded here to install.
.\Automation\Sitecore-Versions\9.0\install.ps1 -xp0package "Sitecore 9.0.1 rev. 171219 (WDP XP0 packages).zip" -site "YOURSITENAME"; -solrUrl "https://localhost:8983/solr" -solrRoot "C:\solr\" -solrService "SOLR 6.6.2" -sqlServer "YOURSQLSERVERNAME" -sqlAdminUser "YOUADMINNAME" -sqlAdminPassword "YOURSQLPASSWORD" -installDirectory ".\sandbox\" -license ".\license.xml"
Script parameters:
And if it all goes wrong, you can always use the uninstall script and just add your parameters – into the following script –uninstallscript.
Hint: After copying your SCORE license to the sandbox/App_Data it is wise to restart your IIS by opening Command Prompt under Administrator privileges and typing iisreset.
Note – The Script creates a site with the name “YOURSITENAME”.
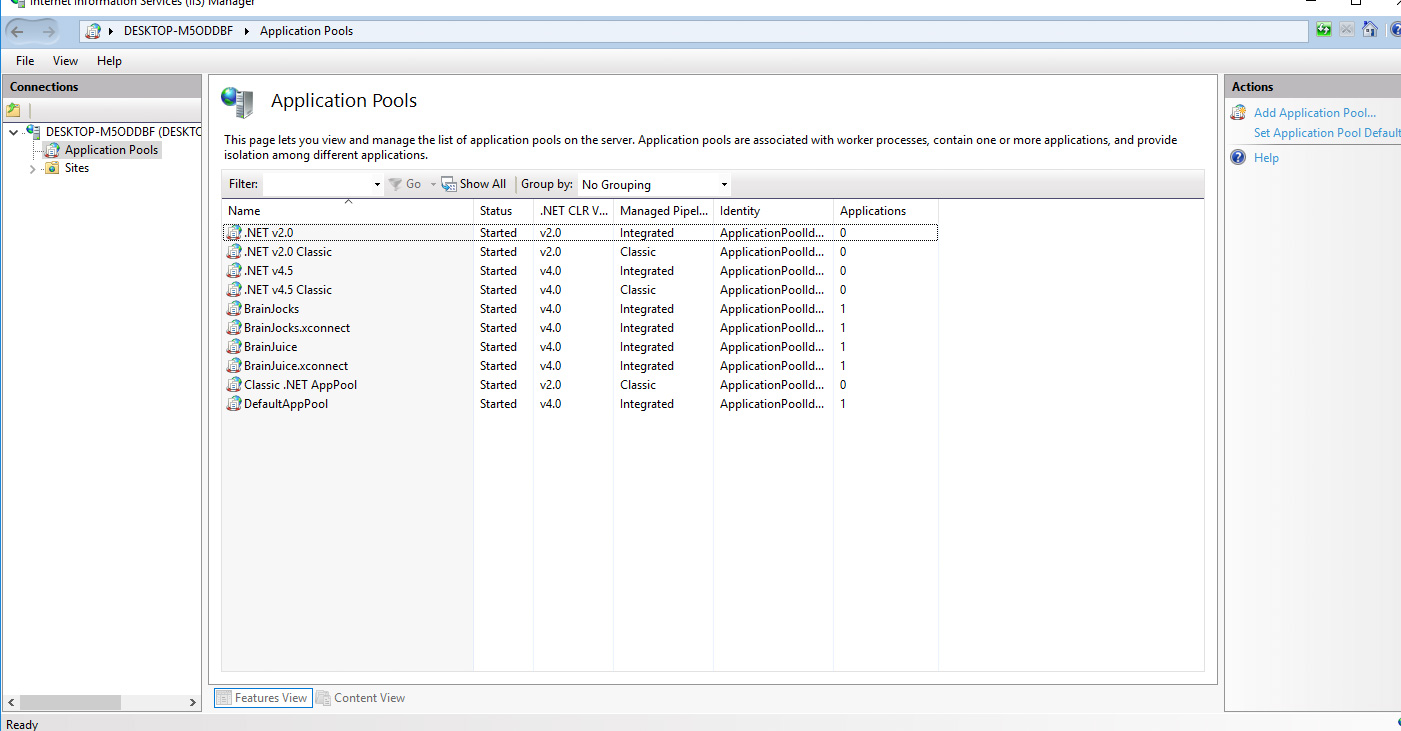
After the installation, you will notice that for each website you have two application pools: one named the same way as your website, and the other named your website name .xconnect.
Your sandbox will also look different than in any of the previous Sitecore versions. Most of the folders that used to be under sandbox are now under sandbox -> your website name.
Before the installation, we can see that the process has become more demanding and a great number of prerequisites are required. After the installation, we see that the content of the sandbox has also changed in regard to previous versions of Sitecore.
In the future, we can only hope that the process of installation will be even more simplified!
Please note that there are certain recommendations by Sitecore which SOLR version should be used with each new Sitecore 9 update. The list can be found here.


Thank you for sharing.
Nice work, this was very helpful. The prerequisites are most of the challenge.
For myself, I ended up installing two versions of Solr on different ports that match the version (662, 721) to support both Sitecore 8 and 9. And since I was using a new Windows 10 machine, I had to install an additional Powershell Module for SqlServer using ‘Install-Module -Name SqlServer -AllowClobber’. I believe some earlier version of Sql Server Management Studio installs some overlapping components.
Thank you for sharing your thoughts. I really appreciate your efforts and I am waiting for your further write ups thanks once again.|
Keep this going please, great job!|