Recently on a few of my projects, we’ve been discussing how to further enhance the content authoring experience for users. Typically within a SCORE site, we end up creating various page templates that represent logical portions of the site. These page templates typically have custom fields that drive functionality within the pages. Providing a mechanism for editing those custom data points is something you should consider if you want to prevent your authors from having to flip back and forth between Content and Experience Editor.
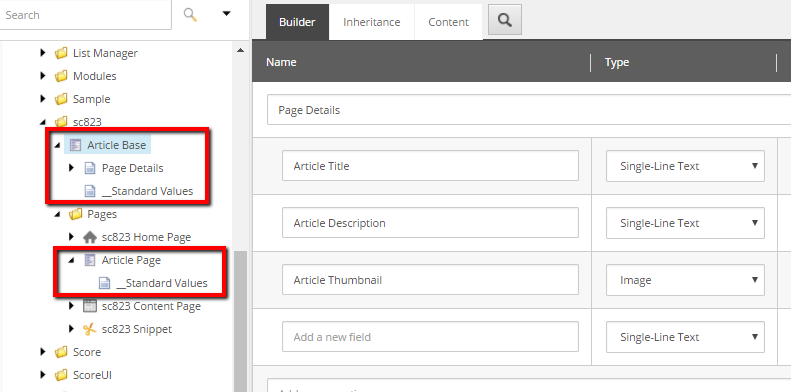
For example, let’s assume I’ve created an Article Base Template and Article Detail Page inheriting from this template. I have a few fields that I want to expose to things like my search index, custom components, etc. Pretty standard, right?

So what about the Ribbon?
In a vanilla SCORE solution, you have a few buttons that are injected into the Experience Editor Ribbon. Each button corresponds to different field sections of the various base templates that SCORE has. For example, Edit Meta Data button allows you to edit all fields that come from the SCORE Page Metadata base template.

Given that SCORE can achieve this, you should be able to provide very similar behavior within your solution and drive that behavior off of your custom implementation.
Sitecore Rocks
So there’s this plugin that you may or may not have heard about. It’s called Sitecore Rocks, and it’s an open source Visual Studio plugin. You really need to use this plugin to introduce new buttons; otherwise, you will be poking around in the raw values of the presentation details field of core database items (yuck!).
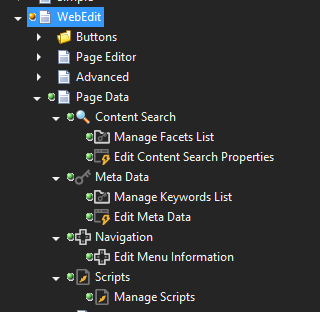
After you’ve opened up Sitecore Rocks and made a connection to your instance, go ahead and navigate down to this area of your Core database: /sitecore/content/Applications/WebEdit/Ribbons/WebEdit/Page Data. You should see some items that represent the SCORE Experience Editor buttons:

All we really need to do is create some similar items. The easiest way to do this is to just duplicate what’s already there and then start tweaking from there. Alternatively, you can inspect the various template types of each item and create a similar structure. SCORE is using the Large Button template for all of its items, but you should be able to use a mixture of other templates. From the official Sitecore documentation, here are the different types:

After you create your structure, there are a few fields you likely want to set as well. On the Chunk item (e.g., “Meta Data” or “Navigation” in the above picture), you should provide some Header text and a Unique ID.

And on the button item, I set my fields up like this:

Presentation Details in Core
After you’ve created your custom items, you need to start messing with the presentation details of them. To do this, you right-click the item and go to Tasks > Design Layout. For the actual Chunk, you should be aware that there IS a rendering assigned to this item. I didn’t have to set mine up from scratch, though, because I just copied what was already set up for the Scripts chunk.

If you go to the Design Layout of the button item, you should also see a LargeButton rendering defined. If you don’t, you’ll need to make sure you have one assigned just like the other SCORE buttons. On this particular button, you can open up the properties dialog in Sitecore Rocks and see extra fields that just are not available for editing within Sitecore. Strange, right?

Anyways, the PageCodeScriptFileName should call out a JavaScript command which should be executed when the button is clicked. I went ahead and set mine to /sitecore/shell/client/Sitecore/ExperienceEditor/Commands/EditPageDetails.js. Why? Because that’s where Sitecore stores its own.
The Actual Script
Now for the fun part: we get to write some code. Well.. a little bit of code. The actual JavaScript used to make this work is quite simple. You configure a Require.JS style module with two methods: canExecute and execute. Here’s what mine looks like:
require.config({
paths: {
scoreFieldEditor: "/-/speak/v1/score/FieldEditor"
}
});

define(["sitecore", "scoreFieldEditor"], function (Sitecore, Score) {
Sitecore.Commands.EditPageDetails = {
canExecute: function (context) {
if (context.currentContext.webEditMode !== "edit") {
return false;
}

context.currentContext.argument = "{guid-of-template}|{guid-of-another-template}";

return context.app.canExecute("ExperienceEditor.Score.IsScorePage", context.currentContext);
},

execute: function (context) {
context.app.disableButtonClickEvents();

Score.FieldEditor({
saveItem: false,
header: "Manage Custom Data",
title: "Assign Custom Data to the current page",
sections: "Page Details", // this magic string should align with your template section name
width: "900px",
height: "750px"
}).execute(context);

context.app.enableButtonClickEvents();
}
};
});
There are really only two things in here that you should take note of. First, within the canExecute function we’re essentially performing a check to determine if this button should be enabled or not. SCORE comes with a nifty feature where you can determine if the page derives from a specific template type. That’s where the pipe delimited guids come into play. Just set those to any base templates that you want this button to be available for. Secondly, the “sections” attribute of the Score.FieldEditor options should be set to the same template section you defined within your template. Those magic strings must align.
Seeing It in Action
If you’ve set everything up correctly, you should now see a custom button in the Ribbon for Experience Editor.

When you click on that button, you should receive a dialog pop up which shows you all fields from the section you explicitly wanted (for me, it was ‘Page Details’).

And that is how you enable custom page data to be editable from Experience Editor’s Ribbon in a SCORE solution.
Enjoy!
P.S. – If you want to see the actual source code, you can check it out here: https://github.com/jdylanmc/score-experience-editor-button. This is just a vanilla SCORE 2.5 installation (called sc823), where I’ve added a dummy Article template and hooked the button up to it.


Awesome posts. Thank you for sharing!
I have a requirement where a Content Author needs to insert a new page through the Experience Editor, but they cannot navigate to the content tree location where it needs to be added.
These pages only show up in lists that are dynamically created based on tagging.
Do you know of any examples of this? or any suggested path?
Thank you!!
Can they not navigate to the location due to security permissions? On one of my projects we are investigating creating Launchpad buttons that, when clicked, will create a new page and drop the user directly into experience editor on that page. I think a similar piece of functionality could be created for the Experience Editor ribbon, but it is a significant chunk of work. Unfortunately, I don’t have any examples yet 🙁